
Here’s the story of our Cargo Trailer Conversion. I had been waiting to post this thread until the project was done. Well…2.5 years later I realize it will never be done.
 It’s a constant work in progress. The most challenging part of the build is that we use the trailer weekly, starting from day-one. Any progress had to be in between our weekly trips!
Another disclaimer; my interior pictures aren't the best. Bare with me.
First some background.
My wife and I travel our region and the country both for fun and for business. We've talked about owning an RV for many years. Pretty much since we first met. We’ve considered just about everything you can imagine; motorhomes, truck campers, travel trailers, tear drops, and cargo trailers.
I’m an optometrist. Five years ago I left my job at a hospital to go into the private sector. A good opportunity came up in a rural healthcare setting in north-central Washington State, about three hours from our home. I committed to the new practice three days per week. For the first two years my wife and I stayed two nights every single week in a hotel down the street from the office. Our choice hotel was comfortable and relatively inexpensive. But…hotel life gets old quick. Always loading and unloading, and always staying in someone else’s bed sucks. By the way we also travel with our two smooth collies. As you can see they're very comfortable in the trailer:
So what better time to get an RV, right? It’s even a tax write-off for the business (oops did I say that out loud?). Given our intended purpose for the “RV”, our requirements were clear cut.
Priorities/Build Requirements:
1) Four season capable. The temperature range in north-central Washington state during an average year is -5 F to 105 F. We get rain, snow, wind, and sun. Our home on wheels will see all of this. This means we need plenty of insulation, double pane windows, a reliable heater, and air conditioning.
2) Capable of traveling 300 miles per week, 45 weeks of the year. This means light enough and small enough to comfortably tow behind my Tundra. Our commute includes mountain roads and a mountain pass. The Tundra’s max tow capacity is around 10,000 lbs. But I want to be less than half of the rated max.
3) Comfortable: We don’t mind roughing it now and then. We’ve tent camped and truck camped a lot. But this trailer is for work and we need the comforts of home. We want a bathroom with shower and toilet, a well equipped kitchen, and a true queen size bed with a residential style mattress.
4) Self-contained. We want to be able to stay anywhere we want without needing RV hook-ups. Although there are plenty of RV parks near us, we want to be able to boondock in the mountains or camp in store parking lots if needed.
5) Under $10,000. An RV loan sounds like a horrible investment. So we’re paying cash. We have considered used travel trailers, Class B motorhomes, and truck campers. But nothing that we could afford matched our requirements.
6) Incognito: This wasn’t a huge priority, but it would be nice not to look like every other RV’er out there. And given my profession and the fact that we’re in a small town, I especially didn’t want a cheap, ratty looking trailer. Since we don’t have $30-50,000 to buy a nice Airstream, we’d need to be creative .
Given those priorities a cargo trailer conversion started to look like a good idea.
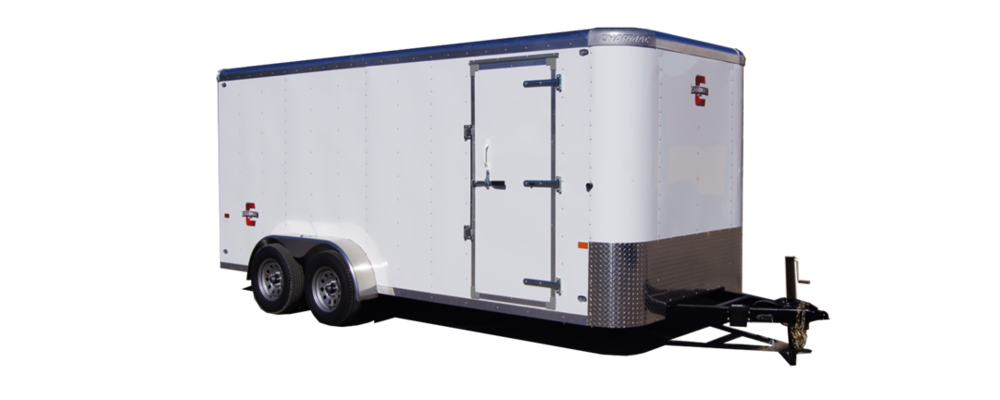
I began the search for new and used 7x14 or 7x16 cargo trailers. There were certain loose criteria that I was looking for in a trailer. Preferred features included double axles, an RV style door, good quality hinges, LED light package, more than 6’2” of head room, roof vents, good build quality, torsion axles, and a spare tire.
We visited the local trailer dealer and browsed the lot. I decided on a brand new 2013 7x16 double axel trailer made my Charmac. It’s the “Stealth” model which is their lightest duty trailer. Unlike some of the other brands I looked at, Charmac seems to build their light duty trailers using the same construction techniques and with the same quality as their heavier trailers. The difference is that the metal components like the frame and wall studs are smaller gauge and lighter weight. That sounded perfect for my needs.
The sticker claimed 2020 lbs, empty. My goal would be to keep the final build between 3000-4000 lbs.
My wife was very excited with the purchase and insisted we begin using it for “workamping” right away. That first week we slept in the trailer one night and the hotel the second night. Here we are camping by the river on our first night. Nothing to complain about so far

And there was another reason to do a CTC; My father-in-law offered us his 1996 truck camper that was ruined several years ago due to water damage. The camper’s wood superstructure is completely water logged and moldy, making it just about useless. He donated the camper to our project. All of the appliances, electrical, LP system, and plumbing were all practically unused and in great condition!
Below are pictures of us disassembling the camper. RV's sometimes have a reputation for being poorly built. I can say that this was not the case with this camper. During the disassembly process I developed an appreciation for the craftsmanship that went into the manufacturing process. I also got some good ideas for construction of our CTC.
Time for the project is hard to come by. I work four or five days a week and often the weekends are filled with activities like biking and bike racing. Over the two years, I’ve had 3-4 days per month to dedicate to the trailer. With so many things to do to the trailer and so few days to work, I didn’t know quite where to begin. All trailer projects had to be completed on the weekends. The trailer needed to be ready to roll out for the work week by Monday morning. I prioritized the things that made sense to do first from a build prospective as well as things that made the trailer more livable; for instance one of the first projects was insulating the walls with at least one layer of foam wherever I knew I wouldn’t cut holes in them. Also framing out the bedframe and the kitchen.
My design philosophy in framing the trailer was this: use the metal structure of the trailer to complement the strength of the wood framing, and visa versa. In other words, I’m trying to frame all the wood in such a way that it reinforces the metal studs and at the same time takes advantage of the metals’ stability. And I definitely did not want to build independently standing “furniture” in the trailer. Everything would be bolted to the metal studs. Weight savings is the primary advantage to this philosophy, but so is strength as I’ll talk about in a second. The downside to this construction method is that it will be virtually impossible to ever use this as a normal cargo trailer again. This stuff isn’t coming out!
I am also conscious of the fact that the interior luan paneling is a structural component of the trailer. Well, I’m not sure how much this is actually the case with my particular trailer. I took out all the wood paneling during the construction process and the trailer still seemed solid as it was when it was new. I actually put several thousand miles on the trailer without the wood paneling. The only thing I did notice was that a few of my sheet metal screws backed themselves out. I’m guessing that the lack of wood paneling allowed for some resonant frequencies to vibrate the structure and loosen the screws.
Never the less, all of the original wood, and more, went into the final build. However, in most cases it’s installed over top of a second layer of rigid foam insulation. Another advantage to my construction technique (using wood framing bolted to the steel studs) is that I believe my wood structural elements ultimately create a stronger superstructure than the interior paneling ever could have.
Another design consideration is load distribution. Our trailer is designed with the axles fairly far aft. I'm told this axle placement gives more stability during towing. The downside for a CTC is that it would have been very easy to layout the trailer with too much weight on the tongue. A high tongue weight will adversely affect handling. Since we put so many miles on, this wouldn’t be good. I’ve designed my interior layout with this in mind. Although I’ve never weighed anything in the trailer or done any calculations on paper, my rough goal is the commonly accepted 15% tongue weight.
To achieve this I’ve positioned most of the heaviest parts of the trailer over the axles or slightly aft of the axles. The fresh water tank is completely behind the axles. Although I’ve yet to take the trailer to the scales, my impression is that the truck and trailer handle better with freshwater tank full than when it’s empty. We’re only talking about 264 lbs of water, but it does seem to help. I’ll update the thread when I finally get it to the scales.
Insulation:
After some research and pondering, I decided on foil backed 1 inch rigid foam insulation sheets, R value of 6. The walls have two layers. The floor has one layer. Since head room is a concern, the ceiling has one layer where we walk, and two layers everywhere else. This design gave an extra inch of headroom.
Here my wife is applying foil tape to the seams of the first layer:
I experimented with two methods for installing the second layer of insulation. I used my table saw to rip custom 1 inch studs.
Here you see vertical studs:
To combat thermal bridging, I used horizontal studs for most of walls:
I used the same 1 inch studs for the insulation on the floor:
Here's the "drop ceiling"
Electrical:
The trailer has a 120 volt AC system and a 12 volt DC system. When all was said and done I’ve got more wire bundles running around this trailer than I ever thought I would. The 12 volt system uses all decent quality automotive stranded copper wire of various diameters. All connections are soldered. I even replaced the chassis wiring, done at the factory with cheap T-splices, with soldered connections. For the 120V AC system I followed local residential codes (basically), except that I used stranded copper wire instead of Romex.
The donor camper came with a nice 30 amp converter/charger/distribution box. I’m not sure why one would use a residential service circuit breaker box when this RV version seems perfectly suited to the job. It’s heavily built like a residential 120V box with residential style circuit breakers. It’s got two 15 amp circuits and one 20 amp circuit. On the DC side there are ten 15 amp circuits coming from the main distribution point.
I have a secondary distribution box under the kitchen counter to split the power into smaller circuits for various needs. I have a 92 amp hour 12 v AGM deep cycle battery. I might eventually upgrade to two 6v batteries in series but for now what I have works okay.
During an average week on the road, most of our electrical needs are 12 volt. We have a few 120v items that we use when we’re plugged in; various cell phone and laptop chargers, a work light (which can also run off my inverter), a battery float charger, and a ceramic heater. We have a 1000 watt generator that we very rarely use. The only NECESSITY that can’t be run without shore power is the air conditioner. My new 6000 BTU A/C unit will run off the generator, but I don't like to do this because of the noise.
One thing I still have to do is improve my charging system. I currently charge my battery with a 1.5 amp float charger. I’m either going to go with a 200-400 watt solar system or the Progressive Dynamics unit, or both. Unlike the old “dumb” converter, which I disconnected, the Progressive Dynamic system uses a switching power supply and includes a smart charger so as not to cook the battery.
Lighting:
I've installed about 15 LED light fixtures around the interior. I won't go into the details of each fixture. Most of them are standard RV light fixtures. I haven’t measured the exact amperage of any of the lights but when ALL of the lights are on together they draw 2-3 amps. My built in ammeter doesn’t seem to be accurate enough to measure milliamps. I plan to installed two 120 volt LED fixtures for use when we have shore power.
Heating:
We have three heaters on board. Our primary heater is an externally vented RV 12,000 BTU Atwood Hydroflame. It get’s HOT. My wife likes to keep the heat in the trailer at about 70 degrees (our house thermostat is only set to 65!) Our coldest night camping has been 10 F. No matter what the outside temperature the Hydroflame happily cycles on and off to maintain the trailer as hot as we could want it.

Some pics of the install:
When we’re plugged in to shore power we use the 750/1500 watt ceramic electric heater. It doesn’t get as hot as the Hydroflame but as long as the trailer is already up to temperature it has no trouble maintaining temperature.
We’ve also carried a Mr. Heater Big Buddy. We had intended to use it if we had problems with the other two heaters. Experience has shown that the Hydroflame is extremely reliable and safe. Therefor I don’t think I’ll carry the Big Buddy next season.
Propane System:
The donor camper was completely self-contained with a full host of propane appliances; stove/oven, hot water heater, furnace, and 3-way refrigerator. We’re using everything except the fridge in our conversion. The plumbing, wiring, and ventilation requirements for a 3-way refrigerator seemed like too much of a hassle. Instead I opted for an ARB 50 quart AC/DC refrigerator. We love it.
After deciding where each appliance would go, I re-plumbed the propane system using flexible copper tubing (the industry standard for RV’s). I was able to reuse several of the copper tube runs from the original camper. That was nice because I would not have been capable of making some of the 90 degree bends that the factory was able to do. I’m still not sure how they did it. As you can sort of see in the pictures below, because I was re-using pre-bent copper, not all the pipes look perfectly square and neat. It doesn’t affect the operation, it doesn't leak, and no one sees it anyway. I leak tested every fitting with gas leak testing fluid (soap and water). I have not had the system professionally leak tested yet, but I plan to. My propane sensor, which is presumably very sensitive, has never gone off. More on that below.
Hot water heater:
Furnace:
I also installed a propane bottle rack, the two 5 gallon bottles, and a plastic bottle cover on the tongue. I’m not completely happy with the look of this. Nothing says “RV” like propane bottles on your tongue. So I’m brainstorming about how to modify it to look better.
Tanks on tongue:
I also installed a new 2 stage auto-switchover propane regulator and a new combination carbon monoxide and flammable gas detector. The detector that I got came with a solenoid controlled valve to shut off the propane at the regulator in the event of an alarm. What I did not know until after I installed the solenoid-valve was that it draws a CONSTANT 1.5 AMPs at 12 volts. That’s right; 36 amps/day draw . This is because it uses a fail-safe mechanism in which it only keeps the gas line open when it’s getting current from the CO/LP detector unit. Any break in the signal for any reason (dead battery, blown fuse, wires cut, or an alarm condition) will result in the gas being shut off at the tanks. I don’t have the battery capacity, nor the charger capacity for that matter, to feed a constant 1.5 amp draw. So for now, I’ve removed the shut-off valve from the system. It’s too bad, because I was really looking forward to that safety feature. The CO/LP detector still works as an alarm, of course. If I eventually get solar power, or twice the battery capacity, I’ll put the valve back in line.
The propane regulator and shut-off valve:
Water System:
The donor camper had a complete plumbing system. I reused the water pump, hot water heater, 33 gallon fresh tank, faucet, and stainless steel sink. I did not trust the 15-20 year old plastic pipes from the camper. So I ran new PEX lines and new brass fittings and valves. I also got a new RV shower mixer and shower head from ebay.
The hot water tank is a Suburban 6 gallon electronic ignition model that also includes a 120 volt A/C element. The SW6DE:

For the shower, I decided to use an RV shower pan and build my own enclosure using fiberglass reinforced plastic (FRP) panels. I still need to take pictures of the finished product.
One of my requirements is cold weather capability. Most RV’s have water tanks that are exposed to the cold, usually within the frame rails under the trailer. I’m told that this is also one of the reasons travel trailers tend to sit so high off the ground. Not only does my trailer not have room for tanks underneath, I wouldn’t want them out in the cold anyway. So I put my fresh water tank inside the trailer on the floor in the compartment underneath the bed. There’s even a heating duct coming from the gas furnace to the area where the tank sits.
The grey water system is a work in progress. My wife was adamant about the bathroom/shower being in the front of the trailer. That presents a challenge for grey water drainage because I don’t want to store water toward the front of the trailer, or underneath the trailer. Currently the grey water from our sink and shower drain out under the trailer. Yes, this is frowned upon. But we really don't use much water. Sometimes when we're in a busy campground we'll put a collection bucket under the shower drain. More often than not however, we camp in areas that are so well drained that no puddles accumulate anyway.
We use a Thetford Curve porta potti. We've been impressed with this investment. It's made very well and is engineered to be as painless as possible to clean and drain. And don't worry; we only empty the toilet at approved RV sewer dump sites.

Framing the Holes:
The next adventure in trailer building involved framing out three holes for two windows and a residential window mount air conditioning. I’ve never welded before and I’m not a welder now. But I got the job done. I bought a wire feed welder from a friend of mine who is an experienced welder. He gave me an hour tutorial on the basics and sent me home with my new welder.
I got some metal tubing from the local metal place:
Probably the most “stressful” part of the build was framing the metal studs and cutting holes in the aluminum skin for the windows. You only get once chance! With some patience and careful measuring, I got all of my holes and framing within 1/16” of level and square. That’s good enough for me!
We decided to only install two small windows. There were two reasons for being minimal with windows: First, we wanted to maintain an incognito appearance. And second, windows are a huge source of heat loss in the winter. Although both windows are double pain glass, the metal frames still get very cold and build condensation. I’ll possibly add a third window within the rear doors if I can find one I like. I got both windows from surplus dealers on ebay.
Ham Radio:
What trailer would be complete without a ham radio station? One of the first things I noted about this trailer was the large, flat, metal roof. In radio land, that translates to both a good RF counterpoise (ground plane), and a good electric ground for an antenna system. I installed two antennas on the metal roof; a 5/8 wave VHF antenna and an HF antenna. For HF, I use “ham sticks” which are interchangeable depending on the band desired. The current radio is an Icom 706 Mkii, which covers the 2-160 meter bands. The radio is hard wired to the DC distribution center with a 15 amp fuse. I also have an MFJ versa tuner which is not pictured.
The aluminum roof is quite thin and I didn’t want to rely on its structure to secure the antennas. So I got two pieces of 16 gauge stainless steel plate to reinforce the roof where the antennas mount. The antenna mounts go through the plate and the aluminum. This creates a rock-solid mount.
Problems Encountered:
Here I’ll discuss a few minor issues I’ve encountered. Hopefully this will help someone doing their own project. Some of the issues wouldn’t be an issue for a trailer that doesn't see as many miles or didn’t see as much use in the winter.
Condensation: This is a winter problem. On a metal trailer thermal bridging is a huge issue. Without exception, any piece of metal continuous with metal on the outside of the trailer WILL get soaking wet. Insulation definitely helps the problem but the tricky part is forming a vapor barrier for every nook and cranny. Using two layers of insulation with wood studs to secure the inside layer helps. I did not experience any thermal bridging, or at least not any condensation, where I had the second layer of insulation and the wood studs. However, it’s just about impossible to isolate every single metal piece of the trailer. So I had to isolate those areas with the vapor barrier tape.
Corrosion: After several thousand miles of driving on winter roads through snow, ice, and de-icer, my trailer frame has rusted. I plan to treat everything with Paint Over Rust (POR) 15 this summer and hope for the best. The aluminum skin has also started to corrode in a few places. I didn't even know this was possible.
Leakage from underneath: During wet commutes, water seeps through the plywood flooring at the seams. It’s only enough water to make the wood look damp. I’m thinking about either painting or undercoating the underside of the trailer to help seal any tiny gaps.
Tires: The trailer now has between 15,000-20.000 miles on it. We’re on our second full set of tires. Actually I’ve replaced five of them in the last 2 years. This was an unexpected expense. I had no idea trailer tires wear out so quickly! I've learned the checking inflation is critical. The number one cause of trailer tire failure is underinflation.
I'll have more pictures and progress reports to add. To be continued!


 ,
, 
 . She thinks our 7x16 is good enough for now.

 . I've got 130,000 miles and it runs like new and I've never needed a single repair.