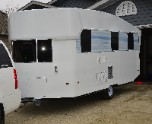
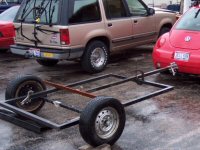
my truck camper

...ask your questions in the appropriate forums BUT document your build here...preferably in a single thread...dates for updates, are appreciated....

Re: my truck camper

Postby Philip » Thu Sep 22, 2016 9:53 pm

I would prefer to stay mechanical lift. Trying to do a manual lift when the total inside height collapsed is under 4' would be awkward for an older person. The top will have some wood structure in it. There will be two solar panels on top,a roof vent, maybe a set of roof rails. The rails would be for show and breakup the side outline of the panels from a distance. I wouldn't use the rails for any hauling.

On a rough guess with the panels and vent the top assy will come in around #100. The ply will be 1/4" inside and out. The closest place with 1/8" is 65 miles one way. The prices were almost the same as the 1/4" I can by local. My local lumber yard has 1/4 luan with exterior glue. It looks a lot better than the box stores.

Now those hinged sides in that second link to the small popup looked promising. I hadn't thought of that.
Philip
Silver Donating Member
 
Posts: 498
Images: 323
Joined: Thu Jun 09, 2016 3:57 am
Location: Peru,Indiana

Re: my truck camper

Postby OP827 » Thu Sep 22, 2016 10:07 pm

OK, I see your point now.
Philip wrote:.. Now those hinged sides in that second link to the small popup looked promising. I hadn't thought of that.

Here is the old patent on that idea. there could be more patents with more detail - https://docs.google.com/viewer?url=patentimages.storage.googleapis.com/pdfs/US1917824.pdf
Weather stripping would be a little bit involved, but nothing too complex.
User avatar
OP827
Donating Member
 
Posts: 1570
Images: 406
Joined: Fri Apr 25, 2014 7:27 pm
Location: Bruce County Ontario

Re: my truck camper

Postby Philip » Wed Sep 28, 2016 7:04 pm

Today I started working on the mounting system for the camper. The plates are 10 gage flat steel. They will have a 3/8" bolt holding them into the stake pockets . I'll use long wood screws to attach to the camper. Total of 6 mounts being used. Two fronts, two in the rear side, two in the rear.

Image

Image

Image

I went as far as I could today on the mounts. My compressor is down waiting on parts. So I moved to something else I will be needing with this build. I grabbed some scrap wood and made a frame to use for a hotwire. I'll need that with the foam.

Image

I know the truck needs a bath. :lol:
Last edited by Philip on Sun May 06, 2018 12:45 pm, edited 2 times in total.
Philip
Silver Donating Member
 
Posts: 498
Images: 323
Joined: Thu Jun 09, 2016 3:57 am
Location: Peru,Indiana
Top

Re: my truck camper

Postby OP827 » Wed Sep 28, 2016 9:32 pm

Hold downs are looking good. :thumbsup: Interesting how are you going to use hotwire. Is it going to be similar to a table saw setup, ie with some table and fence to make straight hotwire cuts or you will have a straight edge and put hotwire against the straight edge(s)(from both sides of the foamcut) ? :thinking:
User avatar
OP827
Donating Member
 
Posts: 1570
Images: 406
Joined: Fri Apr 25, 2014 7:27 pm
Location: Bruce County Ontario
Top

Re: my truck camper

Postby Philip » Wed Sep 28, 2016 10:59 pm

My table saw is a little 24" model table size. Its an old contractor model. To small of table for working ply or foam by your self. I could build extensions around it. But that will eat up a lot of room and cost to much. What I am going to do is build a hinged work table into one of my walls. It will be 8' long and about 50" wide. The long edge will set on the floor. I can stand a sheet of ply on it. Then lift it up and drop two legs. I'll use my skill saw with a guide.

With the build be based on 1/4 play and foam. The folding table doesn't need to be heavy built.

The hot wire will be C clamped to the drop table. I will have one cross member deeper than the rest for that purpose.

I'll build that folding table before anything. I just need my son to get an abandoned project out of my garage now. Then I can start moving faster on this project.

For the hot wire all I needed to pickup was the wire and a couple of small parts. I have had a 12 volt regulated power supply for years. Its max voltage is 14 with max amps of 3. Both settings are fully adjustable. So I can handle 30 gage wire easy. 30 gage wire on 3 amps is rated for 1600 degrees. For the foam only need around 600 or so from what I found.

No way I am running a power saw across foam. Takes to long to clean that mess up. Saw dust is bad enough. :lol:

Edit I just threw a tape on the table saw top 18x20 its smaller than I thought it was.
Philip
Silver Donating Member
 
Posts: 498
Images: 323
Joined: Thu Jun 09, 2016 3:57 am
Location: Peru,Indiana
Top

Re: my truck camper

Postby OP827 » Thu Sep 29, 2016 12:46 pm

Folding table is a good idea. I used mig welding wire and 12v charger for hotwire cutting. About 3 feet of wire was a right temperature to cut.
User avatar
OP827
Donating Member
 
Posts: 1570
Images: 406
Joined: Fri Apr 25, 2014 7:27 pm
Location: Bruce County Ontario
Top

Re: my truck camper

Postby Philip » Thu Sep 29, 2016 1:29 pm

OP827 wrote:Folding table is a good idea. I used mig welding wire and 12v charger for hotwire cutting. About 3 feet of wire was a right temperature to cut.


I don't really need the extra room the table will provide. It will make cleanup easy and give more walking around room. My garage is 24x26. The camper will be about the only thing of size in there.

I'll have around 12" of wire. With the adjustable power supply. I can dial it in pretty easy. I do have some mig wire around here also. I thought about trying it. Then just went ahead and bought some 30 gage ni-chrome wire. I'll see how hard the ni-chrome bends and holds a shape. If it doesn't. I'll try mig wire. I am going to use a soldering gun to cut out groves for wiring.

Compressor parts came in. I got it back up and running.
Philip
Silver Donating Member
 
Posts: 498
Images: 323
Joined: Thu Jun 09, 2016 3:57 am
Location: Peru,Indiana
Top

Re: my truck camper

Postby PaulS » Sun Oct 02, 2016 8:08 pm

Wow :thumbsup:
PaulS
PaulS
Teardrop Master
 
Posts: 101
Images: 0
Joined: Sat Dec 22, 2012 2:31 pm
Location: Michigan
Top

Re: my truck camper

Postby Philip » Wed Oct 19, 2016 6:19 pm

Been down for the last week with a minor med issue. Got that taken care of.

Today I went after the brackets agin. I welded on the hold down nuts. Then filed off the sharp edges. Threw them in the blast cabinet. Then threw some rattle can at them.

Image

Then I started on a weight reduction plan for the floor joists. The joists are 3/4"x 1.5". The holes are 7/8" spaced on 3" centers.

Image

I'll try and get the other 4 done tomorrow.
Last edited by Philip on Sun May 06, 2018 12:48 pm, edited 1 time in total.
Philip
Silver Donating Member
 
Posts: 498
Images: 323
Joined: Thu Jun 09, 2016 3:57 am
Location: Peru,Indiana
Top

Re: my truck camper

Postby Philip » Thu Oct 20, 2016 4:09 pm

I finished the rest of the floor joists off today.

Image

Sure wish that project was out of the garage!
Last edited by Philip on Sun May 06, 2018 12:49 pm, edited 1 time in total.
Philip
Silver Donating Member
 
Posts: 498
Images: 323
Joined: Thu Jun 09, 2016 3:57 am
Location: Peru,Indiana
Top

Re: my truck camper

Postby Philip » Sat Oct 22, 2016 6:19 pm

Today I worked on fitting the mounting brackets into the stake pockets. A couple of brackets needed some fine tuning. One bracket I need to remove the mounting nut I welded on. I made two left side front brackets. OOOPPPPPSSSS :lol:

Then I started on fitting the outside frame boards into place and working out the rear angles.

Image

Image

Image

I'll redo that right front bracket tomorrow and finish frame layout.
Last edited by Philip on Sun May 06, 2018 12:51 pm, edited 1 time in total.
Philip
Silver Donating Member
 
Posts: 498
Images: 323
Joined: Thu Jun 09, 2016 3:57 am
Location: Peru,Indiana
Top

Re: my truck camper

Postby noseoil » Sun Oct 23, 2016 7:35 am

Looking good. I like the well-thought-out-process on your build!
Build log: viewtopic.php?f=50&t=60248
The time you spend planning is more important than the time you spend building.........

137905
User avatar
noseoil
1000 Club
1000 Club
 
Posts: 1821
Images: 669
Joined: Sun Apr 27, 2014 8:46 am
Location: Raton, New Mexico, living the good life!
Top

Re: my truck camper

Postby Philip » Sun Oct 23, 2016 9:12 pm

noseoil wrote:Looking good. I like the well-thought-out-process on your build!


Oh yea if that applied. I would have not had to redo that right front side mount.

I hate those senor moments. :lol:

I did redo that mount today. Then my recliner grabbed me. You can guess what happened from there. :lol:
Philip
Silver Donating Member
 
Posts: 498
Images: 323
Joined: Thu Jun 09, 2016 3:57 am
Location: Peru,Indiana
Top

Re: my truck camper

Postby KCStudly » Mon Oct 24, 2016 10:17 am

:guzzle: then :goodnight: ?
KC
My Build: The Poet Creek Express Hybrid Foamie

Poet Creek Or Bust
Engineering the TLAR way - "That Looks About Right"
TnTTT ORIGINAL 200A LANTERN CLUB = "The 200A Gang"
Green Lantern Corpsmen
User avatar
KCStudly
Donating Member
 
Posts: 9633
Images: 8169
Joined: Mon Feb 06, 2012 10:18 pm
Location: Southeastern CT, USA
Top

Re: my truck camper

Postby Philip » Thu Oct 27, 2016 6:39 pm

Still have the old project in the garage and the weather hasn't been good for outside work.

Today I finished off the hot wire cutter wiring.

Image

Image
Last edited by Philip on Sun May 06, 2018 12:53 pm, edited 1 time in total.
Philip
Silver Donating Member
 
Posts: 498
Images: 323
Joined: Thu Jun 09, 2016 3:57 am
Location: Peru,Indiana
Top

PreviousNext

Return to Build Journals

Who is online

Users browsing this forum: No registered users and 11 guests