Once we return, we'll upgrade the finishes, add interior storage, clad the roof in aluminum and run electrical.
As the build has been primarily by my husband, I'll most likely have to add the details of what we used after the fact. He's been a little bit too busy to give me the play by play.
Day 1/2:
Assembled the base, coated underside with black goo, insulated, cut the sides

The Workshop

The base. 5'x8' utility trailer from Lowe's. 350lbs, rated for 1650lbs

Smelly and mysterious black goo that I can't recall the name of.
Day 3:
Sides up, cross beams installed, trial & error with window & door fitting. Parked for the week in a garage.. didn't take 15 tries to back it in.. nope..

Sides up

Bracing/cross beams

Back up attempt 12
Day 4:
Framing, insulation, interior skin

Framing & insulation

Lead hand

Does it fit?

Fun with routers
Day 5:
Interior skin continued, exterior skin and a few pieces of broken plywood.

Safety officer

Troubleshooting the skin

Almost sealed up, how do we hatch?
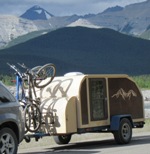
We have one more full day to finish it (this Saturday). We have to build the hatch, trim/seal the inside, finish the roof skin and we are still in debate on how to seal the roof. Our roofing experts tell us to apply peel & stick underlayment that has a 6 month UV rating before cladding the roof in aluminum when we return from our trip. I'm not sure that I've seen anyone use it but they are adamant it's the best way to go. We may also clad the sides.
http://www.interwrap.com/Titanium/psu_30_main.html