My wife and I decided to head the direction of a teardrop not long after starting our family. Most of our travels up to that point had been by bicycle, VW bus, or camping in the back of a pickup truck. We decided that a teardrop was the best compromise for being able to go on a moment's notice without having to worry as much about getting packed up or unpacking afterwards. We toyed around with the idea of a truck bed camper or a roof top tent but decided that it could become more trouble than it was worth trying to get a tent dried out certain times of year in the lovely Pacific Northwet. Err, Northwest.
We knew our family was going to be expanding, so we looked at some of the larger designs and originally settled on the Camp Inn 560. After some back and forth via email with Camp Inn, I quickly realized that Camp Inn wasn't set up to provide what I wanted. My wife and I really liked the design but not all the bells and whistles. Even a stripped down version was more than we wanted. The tipping point was that I wanted to match the wheels and track width to that of the tow vehicle (2015 Toyota Tacoma). So, after hashing it around for a few minutes, my wife told me to buy the tools that i needed to get the job done. Sorry guys, she doesn't have any sisters. The trailer grew a couple of inches on the body from the 560. We're just over 10' long and the body is 5' wide. The whole trailer overall is just over 14'.
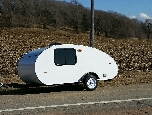
First step was figuring out the curve radii for the trailer. I eyeballed it from a profile picture I found from a 560 owner's travel blog and came up with a reasonable copy:
After that, it was off to the snail races.
I made a masking tape mockup on the garage floor:
Made the mockup of the side profile which later became the template:
The tires are 235 85 R16, which work out to just shy of 32" tall and just over 9" wide
Bought some steel and built a frame:
I mocked up things a lot as I was sorting out what ideas I wanted to stick with and what I would discard:
The blue tape was used to mark the location of shelves, counters and cabinets. Most of it wound up getting the axe but can be added later as we figure out just exactly what we need.
Sweet shocks dude:
Got the tongue box going. If I were doing this again, the tongue box would have been much, much later. I probably would have waited til I was ready to start skinning to build it.
Also made the deck. The floor is 1/2" plywood, 1" rigid foam, 1/4" plywood from bottom to top. Storage cubby is 6" deep. Helper is helping by constantly turning the dust collector on and off with the remote. She was pretty good with organizing the insulation scraps too.
Full size mattress mockup. We're still going back and forth over using a full size with foam filler pieces for the gaps or a queen size with cut outs for the wheel wells. We already have the full size...
Walls!
So, got the walls all up and installed, then left the country for a couple of months of work. Came back and the walls had warped at the top forward corner. I fought with straightening them out and finally decided to cut my losses and go a different direction.
Walls v 2.0!
Skeletonized template
New walls are a sandwich of 1/2" ply, 3/4" ply and 1/8" ply. The 1/8" is the inner panel. The 3/4" ply is routed completely through using my now skeletonized template. The 1/2" ply is the outer ply and is routed 1/4' deep using the same template. This gives me a cutout 1" deep, which works perfectly for the 1" rigid foam insulation. I also used the template to mark out the rigid foam and cut it to fit. The foam fits very snugly and helped lock the panels into position for gluing up.
The weather turned nice, so I took advantage and painted the frame:
And then back into the garage for roof work:
Once I was happy with the roof mockup, it was time to start actually putting stuff together for real. Gluing the walls together:
Foreman is not impressed.
Walls are on, roof is on:
Interior is simple. A couple of shelves for our duffel bags, couple smaller shelves for miscellaneous, and a grab handle for scooching around.
Flexible plywood is flexible. Started on the front, it's a sandwich. Two layers of 1/8" flexible plywood, 1" of kerfed rigid foam, one layer of 1/8" flexible ply to cover up the foam inside.
Holes for the windows, checked out the doors, started routing out grooves in the body for wire runs. The template was invaluable in locating the insulation within the wall.
Galley hatch, more flexible plywood to try and minimize spring back. It's a sandwich (hungry yet?) of 1/8" flexible ply, 1" kerfed rigid foam and 1/8" flexible ply
Galley. At this point, the plan is the three storage cubbies. We'll add in shelves and such as we use the camper and figure out what we need and don't. The left most hatch will house the battery and battery isolation switch.
The electrical center. I'll have USB and cigarette outlets, a CO/Propane monitor, a battery monitor, the switch for the master relay, and a momentary switch for the battery monitor. The panel is hinged so that it can flip down. Behind I'll have the fuse block for all of the accessories. Also got the wheel wells covered with rigid foam and, you guessed it, flexible plywood. Right now I have one layer of flexible plywood, but I think I'll add another for rigidity.
Rear end is all closed up. The fenders have a solid back which will cover the rigid foam visible in the picture. I also used roof sealant to cover the foam and any gaps where water might collect.
I changed my mind about forward storage cubbie access from the outside. It would have been two more hatches to make and, quite frankly, I was done with hatches at that point. So I filled them in and will use one side for mounting a jerry can rack. The opposite side will have a tall ammo can mounted. I'll keep wheel chocks and the like in the ammo can. I cut two more access holes into the back of the tongue box for access inside. My original idea was to mount the fuel cans on the side of the trailer a-la Dave Nathanson's trailer, but after hefting the can around I realized that I'd be able to mount it closer to the ground on the side of the tongue box. I don't know what my tongue weight is, but I can still lift the front end of the trailer up without grunting too loudly.
Varnish! Got three coats onto the body. It's not cosmetic, just to protect from any water that manages to work under the skin. I used thickened epoxy to fill in any oopsies on the seams of the body prior to varnishing
The aluminum arrives! It came on a pallet 12' long. Three sheets of .050 4'x8' and two sheets of .050 5'x12'. They put it on the top of my truck. It was interesting unloading by myself.
I wound up using a couple of boards to slide the individual sheets right onto the roof or the trailer.
Didn't have enough vacation time to start skinning, so I went back to work on the inside. Bunk bed mockup. She's going to have the best view in the house.
Aaaaaaand finally. Back from work, the aluminum starts to go on:
Another batch of good weather and I decided to blind all of my neighbors. It was like a beacon and they all came staggering over to see like moths to the flame

I got another boss somewhere along the way
Shiny
Galley hatch mostly works. I need to trim a little off the forward edge where the hinge attaches, along with putting a shim under the dome light to change the angle. I've also decided on a different latch mechanism, so I'll need to remove plan A and make some covers for the openings inside and out. I'll be picking up some gas struts in the next few days as well.
Which brings us up to today. Door production progresses:
Fender undercoating and painting with Rustoleum Stainless Steel followed by some layers of clear coat:
Fenders back on, door and hatch jambs painted with semigloss black:
Now I work on little things while waiting for some trim and other parts to show up in the mail

- Louis (Edited due to Photobucket's change of rules)


 My wife is the greatest but I never will hear her say "Buy the tools you need."

 Beautiful! Thanks for sharing!