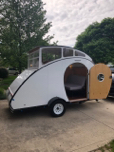
A new Teardrop Build

...ask your questions in the appropriate forums BUT document your build here...preferably in a single thread...dates for updates, are appreciated....

A new Teardrop Build

Postby Aguyfromohio » Sun Jun 24, 2018 7:14 pm

:)
User avatar
Aguyfromohio
Gold Donating Member
 
Posts: 392
Images: 76
Joined: Sun Jan 29, 2017 5:02 am

Re: A new Teardrop Build

Postby Aguyfromohio » Sun Jun 24, 2018 7:15 pm

We have been building over a year now and have one nearly done, another well along. We didn’t want to start posting in a build journal until we knew it would work out.
Like so many oddball ideas it happened at a pub over a beer. I said, “I’m thinking about trying to build a teardrop trailer.” My friend lit up, real excited said he’d nearly done it years ago and would love to. Over the next few Wednesday pub nights we came up with a list of features, let’s call it a functional specification. We would build two at the same time.

- Classic teardrop shape
- Small enough to tow behind a car or SUV
- Queen size bed folds into couch
- Enough bare floor to take off muddy shoes inside while sitting on the bed.
- No water or sink
- An air conditioner
- Typical rear galley, stove but no fridge
- 120 VAC convenience outlets - one inside, one in galley, one on passenger side
- shore power, large battery, inverter, charger
- torsion axle with electric brakes
- a few LED lights inside and out
- Standing room to dress
- In the boondocks air conditioner can be powered by idling tow vehicle all night

We decide to plan and design before we built.
User avatar
Aguyfromohio
Gold Donating Member
 
Posts: 392
Images: 76
Joined: Sun Jan 29, 2017 5:02 am

Re: A new Teardrop Build

Postby Aguyfromohio » Sun Jun 24, 2018 7:16 pm

So the functional spec has contradictions that needed compromises. Small size and teardrop shape work against standing room, queen bed and extra floor space.

We compromised. Trailer is pretty wide and tall for a teardrop and a bit heavy, we accepted that as small enough. Extra floor space is very small. Standing room means a hinged moving roof.

Complications follow from these decisions. The sidewalls are bigger than a single sheet of plywood, so we need seams in sheets. To get a reasonable weight we had to build lightly. To solve those two together we decided on structural insulated panels.

To get exactly the size and shape we want we used custom welded frames.
Off to the drawing board (or CAD station)
Last edited by Aguyfromohio on Thu Mar 05, 2020 1:55 pm, edited 1 time in total.
User avatar
Aguyfromohio
Gold Donating Member
 
Posts: 392
Images: 76
Joined: Sun Jan 29, 2017 5:02 am
Top

Re: A new Teardrop Build

Postby Aguyfromohio » Sun Jun 24, 2018 7:16 pm

All the major dimensions for the floor, walls, frame and axle depend on that queen size bed. We didn’t want to try to design and build a folding bed, we wanted to buy one. Hello Ikea. They have the only queen size sofa bed we could find that does not have arms on the sofa. We searched for days and only found that one. Arms would add four inches on each side, that ‘s eight inches overall and we are already wide. No can do. So we designed around that particular sofa bed. For floor space we allowed six inches between bed and door. Width became:

width of bed 56 inches
clear floor 6 in
thk drv wall 2 in
thk pass wall 2 in
drv fender 9 in
pass fender 9 in
TOTAL OVERALL 84 inches

Length was pretty arbitrary. We said 15 feet, that’s how long our cars are and they fit in the garage. Same for height – low enough to fit under my garage door.
User avatar
Aguyfromohio
Gold Donating Member
 
Posts: 392
Images: 76
Joined: Sun Jan 29, 2017 5:02 am
Top

Re: A new Teardrop Build

Postby Aguyfromohio » Sun Jun 24, 2018 7:19 pm

Lots of sketches and shapes followed. We finally found one we liked and drew it out to scale, and compared it to the Little Guy and T@b trailers. Our profile falls right between the two when we put the hitch balls all at the same spot. We knew we could live with either of those trailers so we could probably accept our overall size. I have a 3D Cad system, SolidWorks, and I have lots of experience using it. Good thing because the fussing about the final shape took weeks and weeks to be confident and get the parts to fit right in CAD.

First sketch:

Image


Final buildable shape:


Image
User avatar
Aguyfromohio
Gold Donating Member
 
Posts: 392
Images: 76
Joined: Sun Jan 29, 2017 5:02 am
Top

Re: A new Teardrop Build

Postby Aguyfromohio » Sun Jun 24, 2018 7:21 pm

So now we build. First we built a full size template. Our project needs several identical layers, each wall has 3 layers in a wall x 2 walls in a trailer x 2 trailers = 12 layers, all identical. We laid a full size sheet on the template; rough cut it; used a router to follow the template edge for a perfect cut. Sounds easy but sure takes some time. We made our template too heavy, using 3/4 inch plywood. We could barely lift it and it wanted to crack under it's own weight when laid on two saw horses. I would suggest half inch plywood, and skeletonize it to cut out areas that serve no purpose. But here' our template, too heavy and solid.


Image

Image


Image
Last edited by Aguyfromohio on Tue Feb 25, 2020 12:57 pm, edited 4 times in total.
User avatar
Aguyfromohio
Gold Donating Member
 
Posts: 392
Images: 76
Joined: Sun Jan 29, 2017 5:02 am
Top

Re: A new Teardrop Build

Postby Aguyfromohio » Sun Jun 24, 2018 7:24 pm

So the whole outside edge of the wall panels needs to be solid wood to hold screws. We cut 18 inch bits of construction grade 2 x 4’s and routed them perfect on the curved edge. Glued it all up. We oriented the skin sheets 4 ft horizontal and 8 feet vertical which gave us 4 ft wide wall panels. Since each has a solid wood perimeter so we could glue and screw the vertical joints wood-to-wood at the vertical seams. Used epoxy plus Kreg pocket screws.

After gluing up a complete wall we made another light router cut. For a matched set of left right we stacked them, clamped them, and followed the bottom wall to cut the top so they were exactly the same. Seems like we maybe went too far, but they were perfectly matched when we were done


Oh, and build another 12 layers –square flat front walls and square flat back walls.
Last edited by Aguyfromohio on Tue Feb 25, 2020 12:58 pm, edited 4 times in total.
User avatar
Aguyfromohio
Gold Donating Member
 
Posts: 392
Images: 76
Joined: Sun Jan 29, 2017 5:02 am
Top

Re: A new Teardrop Build

Postby Aguyfromohio » Sun Jun 24, 2018 7:29 pm

Gave drawings of the frame to a small local weld shop. We used 14 gage steel tube, 2 x 2 square. The A frame tongue pieces used 14 ga 2 x 3, long side vertical. Here they are at delivery. We painted them with a cheap brush and black gloss Rustoleum paint, it turned out great.

Image

Bought Flexiride axles with brakes, had to assemble bearings and seal onto spindles, and brakes, went together easy.

Image
User avatar
Aguyfromohio
Gold Donating Member
 
Posts: 392
Images: 76
Joined: Sun Jan 29, 2017 5:02 am
Top

Re: A new Teardrop Build

Postby Aguyfromohio » Sun Jun 24, 2018 7:30 pm

Bolted axle to the frame. We agonized over location to get good balance, got it right.


Image


Built a floor. We were trying to build light but the floor ended up heavier than it needed to be. Screwed ½ inch exterior grade plywood to top of frame, then glued on 1 inch foam; then ¼ inch birch ply, then prefinished hardwood floor, ¾ thick. That’s a heavy but solid floor, could have built lighter. TIP: custom frame should get a steel cross tube every 48 inches to catch plywood. We missed that one, had to reinforce bottom of seams with 2 x 4. Sigh, more weight…
User avatar
Aguyfromohio
Gold Donating Member
 
Posts: 392
Images: 76
Joined: Sun Jan 29, 2017 5:02 am
Top

Re: A new Teardrop Build

Postby Aguyfromohio » Sun Jun 24, 2018 7:32 pm

The door frame was an early worry so we started with it. It’s an over-sized door, round using two radii and two centers. Need a round oak moving door edge embedded into the door, and a round stationary oak door frame embedded into the wall. Screwed small mitered boards right onto template, then cut the curve with a router on a homemade trammel (compass). Cut a stepped profile to allow for gasket. Match-marked all the pieces, unscrewed it and later glued it into a wall panel. Glued both jamb and frame into one panel, full top and bottom skins, then cut the door out of the wall with a trim router running down the door gap.


Image


Stand up the walls. We placed vertical pine sticks into sidewalls to catch screws from end walls, pine-to-pine all he way through. Since the outer skins are pretty, we didn’t want screw head showing outside, used Kreg jig on end walls.


Image


Image

Now we start bending up aluminum trim on wall edges
Last edited by Aguyfromohio on Tue Feb 25, 2020 1:01 pm, edited 2 times in total.
User avatar
Aguyfromohio
Gold Donating Member
 
Posts: 392
Images: 76
Joined: Sun Jan 29, 2017 5:02 am
Top

Re: A new Teardrop Build

Postby KTM_Guy » Sun Jun 24, 2018 10:27 pm

Cool build, Look forward to see it come together.

Todd
User avatar
KTM_Guy
500 Club
 
Posts: 571
Images: 193
Joined: Sun Mar 05, 2017 7:50 am
Location: Mesa, AZ near Usery
Top

Re: A new Teardrop Build

Postby Aguyfromohio » Mon Jun 25, 2018 3:54 pm

Skin the front. Put in cross braces to catch screws, used glue too. That ¼ inch marine plywood does not bend well, screw heads were on the verge of pulling right through, had to tighten them gradually across. It worked.

Image


Image
User avatar
Aguyfromohio
Gold Donating Member
 
Posts: 392
Images: 76
Joined: Sun Jan 29, 2017 5:02 am
Top

Re: A new Teardrop Build

Postby Aguyfromohio » Mon Jun 25, 2018 4:06 pm

Make a main roof frame. It’s essentially the same as a galley hatch, just bigger. We had a catastrophic failure first time skinning the roof panel. The frame was too light and the skin forces broke it. It had four ribs each a single thickness of ½ inch plywood.


Image


Image


Version 2.0 had 12 ribs, making six stringers each double thickness. Added a reinforcing layer of fiberglass tape with epoxy on top and bottom edges. More weight again…It worked this time. Had a bit of spring back. When I was a schoolboy I built balsa model airplanes that had wings that looked like that. I guess I never got over it.


Image


And we finally get a panel.

Image


On another thread I chatted with Mr. Lahey about how we ended up putting straight edges and clamps all over to get the ribs to align. If you look closely you see two longer oak straight edges clamped across the ribs, then clamped to the cross members to pull all the ribs up tight against the straight edges keeping things aligned. Also notice a full set of little triangular wooden gussets glued in at each corner.
User avatar
Aguyfromohio
Gold Donating Member
 
Posts: 392
Images: 76
Joined: Sun Jan 29, 2017 5:02 am
Top

Re: A new Teardrop Build

Postby Aguyfromohio » Mon Jun 25, 2018 4:13 pm

Made a galley hatch, ½ inch plywood ribs, ¼ inch skins inside and out.


Image

Image


The radius on the tail end is only 10 inches so we used bending board. It’s not rated for being wet, so we are relying on extra coats of polyurethane


Image
User avatar
Aguyfromohio
Gold Donating Member
 
Posts: 392
Images: 76
Joined: Sun Jan 29, 2017 5:02 am
Top

Re: A new Teardrop Build

Postby Aguyfromohio » Mon Jun 25, 2018 4:18 pm

Test fit the galley hatch then assembled it. Spent a lot of time adding oak sticks to edges of the hatch and at the matching wall locations at hinge. We wanted hardwood to hold those highly stressed screws on hinges.


Image


We used ropes and clamps to hold galley hatch in place while we screwed on the hinge.


Image
Last edited by Aguyfromohio on Mon Jun 25, 2018 4:42 pm, edited 1 time in total.
User avatar
Aguyfromohio
Gold Donating Member
 
Posts: 392
Images: 76
Joined: Sun Jan 29, 2017 5:02 am
Top

Next

Return to Build Journals

Who is online

Users browsing this forum: No registered users and 7 guests