So, it's been awhile since we fabricated anything for the tear drop, or posted.
In that time, we learned (theory) about fiberglass/epoxy, and ordered (and received) Raka's 127 epoxy, 350 hardener, and a roll of 4 oz fiberglass. We haven't tried using it yet, but that will come soon. We also purchased masks and filters for both of us.
I also cut some angle iron to mount our battery case to the frame, behind the axle and underneath the camper floor.
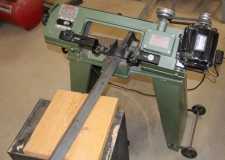
That's a Harbor Fright metal cutting band saw that I've owned for years. It acts like a guillotine, and just grinds away on the metal while the worker (who cares about his/her hearing) goes a few rooms away to eat lunch, or whatever. It took about an hour to cut 1 1/2" angle iron. Oh, yes, there used to be a cheap plastic guard for the belt and pullies. Clearly an add on for the western market. I've often wondered what the Chinese workers who built this adequate piece of machinery thought about westerners who required that sort of protection.
I also used a 70 year old drafting table to put (most of) our teardrop design on paper. I'd probably get a B- for the work from my high school drafting shop teacher (I think my near vision may have been a bit better back then), but the drawings are good enough to remind us what we want to do. If I had to do a lot of this sort of work, I'd invest in a good drafting machine (which I used in high school--shop programs rated higher in the school budgets back then), or perhaps a CAD program.
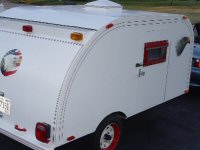
From the plans, we figured out the dimensions for our two passenger doors and three cargo doors, and ordered them from Challenger. They should be shipped in about a week.
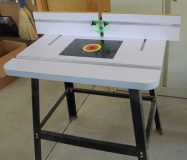
I also decided to order a separate base for our Bosch router to mount in the router table. Received it and mounted it. Now, we can just move the motor when we want to use the table.

This is a nice table from Grizzly that I bought for my wife a few years ago, but that we never used until this week.
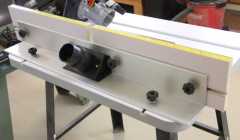
It has a split fence and includes plastic shims that go between the aluminum straight edge in the back and the out feed fence. I tried using it as a jointer for the first time this week, and the results are fantastic! (For ten years I built rustic furniture, and didn't see a need for a straight piece of wood. This is sure to change my woodworking! So, the industrial revolution has finally reached our cabin.)
Rather than epoxy the floor right away, I decided to start building the two bulkheads and front of the camper first. We plan to have a large cargo door on the front of our camper, which will have a Benroy profile and about 2 feet of flat vertical front. To mount the door, it seems easiest to frame that vertical front with plywood, just like the bulkheads, and then extend the two layers of roof (1/8" Baltic birch) over it.
The front and forward bulkhead will both consist of two layers of 3/4" skeletonized plywood. The idea is to have a 1 1/2 inches of foam in front, to match the depth of insulation from the roof, and also have 1 1/2 inches (sound insulation) between our heads and the Climate Right heater/AC, which will be in the forward storage compartment. The rear bulkhead, between the sleeping compartment and galley, will be a single piece of 3/4 inch skeletonized plywood, with foam, and with 1/8 inch Baltic birch on either side.
With the success of our router table jointing, I made some straight edge guides for our router and cut the 3/4 inch plywood to size. Found one sheet to have a large separation between layers in the middle. This was ACX plywood that we'd purchased from Rak's in Edgewood and came from Georgia Pacific. Terrible quality! I hope the teardrop doesn't just fall apart, due to this plywood! Of course, we got rid of the known defective sheet.
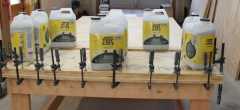
Anyway, here are two pieces of plywood being glued together.
I skeletonized one, cut foam to fit, and plan to use the router to cut the other sheet of plywood to match. After all of that, we will put a layer of 1/8 inch Baltic birch on each side. This will be our forward bulkhead, separating the sleeping compartment from the forward storage and AC/heater.
It is only 30 inches tall, as we plan to use the upper front, rounded over part of the camper, above the forward storage compartment, as a little extra storage behind our heads (when sitting up) accessible from the sleeping compartment. (That will make more sense as we progress, and I show pictures--hopefully!) Anyway, it should be a nice little area that will work like a night stand. I hope to keep a few bird books, and the like, selected for the areas we are travelling in, on my side.
Tom


 It's great when things come packed right..