tony.latham wrote:A 1/4" spiral up-cut bit with a router guide should work for this with a Fredrick's-style plywood skeleton. (Since he suggests boards, is it really a Fredrick's style skeleton?)
That 1/4" would remove the space needed for the two layers of 1/8" Baltic --and save trimming later after the blocking is installed.
I wouldn't be too excited about dragging an 1/8" bit at over 20,000 RPM even if it's a really shallow cut.

Wondered about that too, but that's what Steve Fredrick did to make his ledge. (He used a bushing vs a guide.) If I found the Rotozip adapter earlier I would have tried it his way. Now that I see them on Amazon (and elsewhere on the internet) I ordered one to play with. Probably wear a heavy shirt and face shield!

tony.latham wrote:But looking at the headliner/wall joint in my current 'drop ––cut with a jigsaw–– it's nice and tight with no wobble.
Tom: I'll be curious to see how you chose to make this cut and how it came out.

Tony
Me? or Tearlurker (who may also be named Tom; don't know)?
I drew two lines on my wall template 1/8" apart using this thing made with two ball bearing wheels
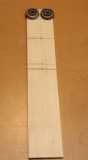
Did the same for each of the plywood skeletons. Then I cut the template with a fine jig saw blade, and each skeleton separately with the stiff upcut jigsaw blade. Stayed between the lines for all. Sanded the template and trimmed the ledge flat with a router. Checked with a machine square and both ledges are good.
When I posted a few days ago, I'd thought that I used the cut out from the template, sanded that to the other line and trimmed the cutoff from the ledges with the router (as I did with the hatch sides). In fact, I mis-remembered slightly and haven't done that with the ledge cutoff yet. I may, or may bandsaw the correct lines for the cutoff (as I make them into blocking pieces to fit in between the spars. Or do what Tony suggested to me, just put the blocking in as is and rout to the edge of the blocking to the wall after that.
Tearlurker, let us know how you do this!
Tom


 Danny
Danny