I am really enjoying reading about your latest project … thanks for the photos.
Are all 26 of your padlocks combination locks with the same combination?
Another "redneck" storage project for my tow vehicle
29 posts
• Page 2 of 2 • 1, 2
Re: Another "redneck" storage project for my tow vehicle
![]() by featherliteCT1 » Fri Jun 07, 2019 6:44 pm
by featherliteCT1 » Fri Jun 07, 2019 6:44 pm
- featherliteCT1
- 1000 Club

- Posts: 1167
- Joined: Wed Dec 28, 2016 6:54 am
- Location: Southern Indiana
Re: Another "redneck" storage project for my tow vehicle
![]() by working on it » Fri Jun 07, 2019 10:33 pm
by working on it » Fri Jun 07, 2019 10:33 pm
featherliteCT1 wrote:I am really enjoying reading about your latest project … thanks for the photos.
Are all 26 of your padlocks combination locks with the same combination?
* I wish, most all of the 26 I've mentioned are keyed. Actually, make it 37 locking devices, on my truck and trailer (I was way off...). Four sets of 4 keyed alike, three pairs of 2, five single padlocks, the tongue box key, two adjustable coupler locks, one receiver lock, one hitch lock, one coupler security lock (replaces the ball inside the coupler), and four cable locks (two are combinations). Kinda hard to keep track of.
* I carry two big keychains on me all the time, and there's a separate one just for the trailer when camping. There's the occasional overlap, with duplicate keys on 2 of the keychains simultaneously, and I have a whole box of duplicates in my home office. But, as a safety measure, I never leave home to go camping without a big bolt-cutter in my truck.
Last edited by working on it on Sat Jun 15, 2019 2:19 pm, edited 1 time in total.
2013 HHRv "squareback/squaredrop", rugged, 4x8 TTT, 2225 lbs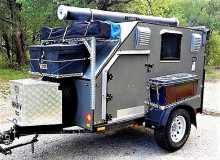


- *3500 lb Dexter EZ-Lube braked axle, 3000 lb.springs, active-progressive bumpstop suspension
- *27 x 8.5-14LT AT tires (x 3) *Weight Distribution system for single-beam tongue
- *100% LED's & GFCI outlets, 3x fans, AM/FM/CD/Aux. *A/C & heat, Optima AGM, inverter & charger(s)
- *extended-run, on-board, 2500w generator *Coleman dual-fuel stove & lantern, Ikea grill, vintage skillet
- *zinc/stainless front & side racks *98"L x 6" diameter rod & reel carrier tube on roof
-

working on it - 2000 Club

- Posts: 2189
- Images: 457
- Joined: Tue Oct 04, 2011 9:05 pm
- Location: DFW Texas
