Roof Framing on a Woody

Anything to do with mechanical, construction etc

Roof Framing on a Woody

Postby jpenning » Sun Nov 07, 2004 11:21 pm

Greeting again, Fellas.

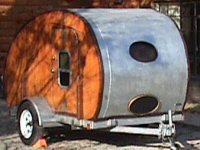
Got another quick question for ya (or maybe someone can point me in the right direction). My tear is going to be wood sides and top. The walls are 3/4" Birch (non-insulated). The exterior will be coated w/ 3+ coats of spar varnish. Is this sufficient for the elements? Also, is it ok for the roof to be 1/8th birch ply, 2x2 spars and another 1/8th birch ply or do I need to go with 1/4th for the top roof section? I am trying to save on some weight (man, those walls are heavy).

Thanks for any help!
jpenning
Teardrop Inspector
 
Posts: 9
Images: 2
Joined: Sat Oct 02, 2004 11:17 am
Location: Marietta, GA

Postby Steve Frederick » Mon Nov 08, 2004 7:49 am

I would feel comfy with the roof built as you indicated. After all, 1/4" is 2@ 1/8" :wink: :wink: If you could bond the layers together, you would have an extra-strong roof. That's the way I build, so it must be right!! :twisted: :twisted: The curved ply is very strong! Three coats of spar is good for protection too!
Blessings, Steve
Adirondacks, Upstate New York
Building Journals
The Shop Manual's 8-years old!! Thank's everyone!
New! 'Rondack Lodge Plans!Order Here!
Image
User avatar
Steve Frederick
Custom Teardrop Builder
 
Posts: 1984
Images: 29
Joined: Thu Apr 15, 2004 5:02 pm
Location: Upstate New York, Adirondacks (Great Sacandaga Lake)

Postby JunkMan » Mon Nov 08, 2004 10:28 am

Speaking of roof framing, does anyone have any close up pics of how the roof and side walls mate up when you build using a sandwich type wall? What I am trying to figure out, is if you make the outer skin larger than the inner skin. Also wondering if you do anything special to attach the inner ceiling to the walls other than just attaching it to the cross members. I'm thinking that there needs to some type of "edge" on the inside of the wall to attach the ceiling to.

Jeff
Jeff & Odie
Black Hills of South Dakota
User avatar
JunkMan
500 Club
 
Posts: 974
Images: 50
Joined: Sun Oct 24, 2004 6:21 pm
Location: Rapid City, South Dakota
Top

Postby Steve Frederick » Mon Nov 08, 2004 11:47 am

Jeff, I'm a heretic! :twisted: I build the roof so that if interlocks the walls.
I build the wall so that there is a ledge at the roof line. Fasten the roof liner on top of that ledge, frame the roof on top of that, Insulate, and skin the roof. You'll get a nice joint at the wall cieling line. You won't torture yourself trying to get that headliner up inside the cabin...It' just a nicer way! IMHO!!
Image
This is a view before skinning the forward section of the cabin cieling. See how the headliner rests on the framing of the insulated wall. I glue and screw the roof struts to the same ledge, no screws from the outside, nice for a woody! Also, the seam in the headliner falls on the forward closet wall.
Blessings, Steve
Adirondacks, Upstate New York
Building Journals
The Shop Manual's 8-years old!! Thank's everyone!
New! 'Rondack Lodge Plans!Order Here!
Image
User avatar
Steve Frederick
Custom Teardrop Builder
 
Posts: 1984
Images: 29
Joined: Thu Apr 15, 2004 5:02 pm
Location: Upstate New York, Adirondacks (Great Sacandaga Lake)
Top

Postby JunkMan » Mon Nov 08, 2004 7:19 pm

Steve,

That is exactly what I was thinking of. Glad to hear it works! I have looked at a lot of pics where it looks like the interior ceiling went on after the framing (usually on a 3/4" plywood side wall, not a sandwich wall), but your way looks easier, and you don't have to be as exact on the cut :roll: .

What do you put over the insulation and roof struts, 1/8" or 1/4" plywood? I'm thinking about 2 layers of 1/8", glued together, so it will roll easily, yet still be strong.

Jeff
Jeff & Odie
Black Hills of South Dakota
User avatar
JunkMan
500 Club
 
Posts: 974
Images: 50
Joined: Sun Oct 24, 2004 6:21 pm
Location: Rapid City, South Dakota
Top

Postby Steve Frederick » Mon Nov 08, 2004 8:59 pm

2 layers of 1/8", glued together, so it will roll easily, yet still be strong.

Exactly! 2 layers, glued together. I went nuts though, and covered the roof in Cedar!!
Blessings, Steve
Adirondacks, Upstate New York
Building Journals
The Shop Manual's 8-years old!! Thank's everyone!
New! 'Rondack Lodge Plans!Order Here!
Image
User avatar
Steve Frederick
Custom Teardrop Builder
 
Posts: 1984
Images: 29
Joined: Thu Apr 15, 2004 5:02 pm
Location: Upstate New York, Adirondacks (Great Sacandaga Lake)
Top

Postby JunkMan » Tue Nov 09, 2004 10:21 am

Steve,

The cedar looks great. I would love to build a "stripper" kayak some day. Having a matching "stripper" TD would be excellent.

Jeff
Jeff & Odie
Black Hills of South Dakota
User avatar
JunkMan
500 Club
 
Posts: 974
Images: 50
Joined: Sun Oct 24, 2004 6:21 pm
Location: Rapid City, South Dakota
Top

Postby Scooter » Wed Nov 10, 2004 10:35 am

Steve, I agree your tear looks great. It's on my short list of tears I'd most like to see in person someday.
The RoadCamper the old teardrop
User avatar
Scooter
500 Club
 
Posts: 687
Images: 69
Joined: Sun Jun 13, 2004 3:56 pm
Location: AZ
Top


Return to Teardrop Construction Tips & Techniques

Who is online

Users browsing this forum: No registered users and 3 guests