by working on it » Sun Mar 08, 2020 11:04 pm
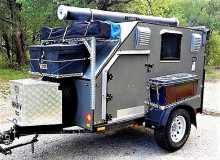
* I built (build, built, am building, will continue building....) a squareback TTT, starting 10-1-2011 and always modifying since. My frame was smaller than a HF, but I expanded it to 50' x 97.5" so I could build a 4'x8' (the traditional size, I thought), but now wish I had made it 5'x10' or 6'x12', for the added room. As is, I've crammed a lot inside, and even more outside (never leave home without more than you need!). And, I carry so much gear in my galley, that it's not a galley but just storage space, as you wish to have on yours.
* On a squareback, a rear hatch can be simply a solid sheet of plywood hung vertically from the roof, and sealed with bulb-seals all around the perimeter. I used a 48"W x 49.5"H piece for mine. The "galley" area is 46.5" wide, 48" tall, and 22" deep, while the cabin area is 46.5" wide, 48" tall, and 73.25" long (twin mattress will fit). Perfect for me, solo camping.
* My doors were simply the cut-outs from the sides, cut at the same time, and then trimmed, and edges sanded to easily open and sit flush without offset hinges (I mad an interior door jamb for them to close against, while compressing automotive seals.
* I ran wiring under the frame (battery in the tonguebox, master cut-off in the galley), then thru the rear bulkhead into the cabin, to a large key cabinet used as 12vdc fusebox, and split into forward and rear circuits for the 110vac. The forward 110vac wiring (and 12vdc for car stereo & computer case fans on my front vents) is run inside a grey wire loom in plain sight along the ceiling/wall interface (so I can easily fix any loose or compromised wiring). I have no insulation, so there wasn't a need to cover it.
* I used the "mix" of polyurethane and paint thinner lavishly before multiple coats of outdoor enamel eventually covered the plywood. So, all wood is thoroughly "plasticized" and water-resistant. Even so, since I have most of the plywood edges exposed, I tripled the protection by using black enamel on all edges (re-touched before camping each year), except on the roof/front slope area, which was sealed with PL adhesive before being painted. I never had much liking for epoxy nor fiberglass, so the polyurethane/oil-based enamel method was the way I went. Seven summers after painting, there's been no leaking, swelling, nor de-lamination anywhere.
* Additionally: I notice that your axle centerline is nearly at the center of your floorplan...you're going to have to carefully move most of the weight forward of the CL, or your trailer will not track nicely. My tongueweight was too light at first, until I found the right-sized tongue-box I needed (had always intended to use, but couldn't find before my first trip), and moved the battery and a lot of other weight there. Even so, I had to use work-around solutions before I got the balance where I wanted it. Read my posts to see my struggles (there never was a build journal).
2013 HHRv "squareback/squaredrop", rugged, 4x8 TTT, 2225 lbs- *3500 lb Dexter EZ-Lube braked axle, 3000 lb.springs, active-progressive bumpstop suspension
- *27 x 8.5-14LT AT tires (x 3) *Weight Distribution system for single-beam tongue
- *100% LED's & GFCI outlets, 3x fans, AM/FM/CD/Aux. *A/C & heat, Optima AGM, inverter & charger(s)
- *extended-run, on-board, 2500w generator *Coleman dual-fuel stove & lantern, Ikea grill, vintage skillet
- *zinc/stainless front & side racks *98"L x 6" diameter rod & reel carrier tube on roof