Kenskill style build in Delavan, WI (Now Cub Modern)

...ask your questions in the appropriate forums BUT document your build here...preferably in a single thread...dates for updates, are appreciated....

Re: Kenskill style build in Delavan, WI (Now Cub Modern)

Postby pchast » Sun Sep 15, 2019 8:19 pm

Looks good! :thumbsup:
pchast
Platinum Donating Member
 
Posts: 2056
Images: 97
Joined: Mon Jan 28, 2013 5:47 pm
Location: Athens, NY

Re: Kenskill style build in Delavan, WI (Now Cub Modern)

Postby breb » Mon Sep 16, 2019 6:58 am

Mr. lahey I would be so tempted to get a coat of paint on that teardrop. I don't know that anything would stop me. It looks A1 .
When your so close to the finish line you really have a hard time stopping for any other project. :D
breb
Teardrop Master
 
Posts: 128
Images: 119
Joined: Sun Aug 24, 2014 8:06 am
Location: wisconsin

Re: Kenskill style build in Delavan, WI (Now Cub Modern)

Postby retep » Mon Sep 16, 2019 8:00 am

Looks amazing Mr. L


Sent from my iPad using Tapatalk
retep
Teardrop Master
 
Posts: 106
Joined: Wed Mar 16, 2016 3:55 pm
Top

Re: Kenskill style build in Delavan, WI (Now Cub Modern)

Postby Mr. Lahey » Wed Sep 18, 2019 5:17 am

Thanks for the encouraging words guys.

However today is the day I'm going to put the teardrop on temporary hold. No doubt about it, it's jut begging for a paint job and completion. So stopping work on it is a very tough thing to do.

To me getting this garage heated is a very big deal. It's the only thing I want more than a completed camper. Hopes are it's a 7 day or less thing to get the shop heat going. Then back to the teardrop it is. My helper will finish up a different job in the next few days. I want to have all the materials and supplies here for when he can start by me.

I'm going to button up the tear today. Put the hatch back on and drop it back down on the wheels and tires. Then I'll start running around with the utility trailer to get all the supplies here for the heat project. Picking up the ceiling hung heater and chimney tomorrow. Then 18 sheets of 4x8 OSB board for ceiling and 12 rolls of insulation. Toss in all the gas pipe and fittings too and electrical supplies as well.

Quite a bit of shopping to do. I am such a tightwad too. :cry: I prefer having it, to spending it.

I will feel way better and quit whining about the cost, the very first day I can work out there when it would be too cold otherwise. :thumbsup:
My teardrop camper build journal: http://www.tnttt.com/viewtopic.php?f=50&t=64721
Mr. Lahey
The 300 Club
 
Posts: 336
Joined: Wed Oct 28, 2015 3:18 am
Location: Delavan WI
Top

Re: Kenskill style build in Delavan, WI (Now Cub Modern)

Postby Mr. Lahey » Mon Sep 23, 2019 4:04 pm

I stole a few moments from prepping for the garage heat project. I wanted to layout and mock up the below vintage stripe graphic from the pic I found. It would give me a chance to look at the graphic while I worked on the shop. So I quick laid it out on some scrap 1/8" ply cutoffs from the teardrop roof panels. I'm still unsure if I'm going to use it or not. So I want to look at it for a while and see how it sits with me. A few pic's of the templates I cut for the graphic.

Stripe I want to copy:

ernst.jpg
ernst.jpg (19.25 KiB) Viewed 3777 times


Templates I made to trace outline on both sides:

temp2a.jpg
temp2a.jpg (70.75 KiB) Viewed 3777 times


tempa.jpg
tempa.jpg (92.41 KiB) Viewed 3777 times
My teardrop camper build journal: http://www.tnttt.com/viewtopic.php?f=50&t=64721
Mr. Lahey
The 300 Club
 
Posts: 336
Joined: Wed Oct 28, 2015 3:18 am
Location: Delavan WI
Top

Re: Kenskill style build in Delavan, WI (Now Cub Modern)

Postby retep » Tue Sep 24, 2019 6:11 am

Very nice! I like the curves you chose. Fits the trailer well

Can't wait to see the final product.

Cheers Peter
retep
Teardrop Master
 
Posts: 106
Joined: Wed Mar 16, 2016 3:55 pm
Top

Re: Kenskill style build in Delavan, WI (Now Cub Modern)

Postby Mr. Lahey » Thu May 21, 2020 8:29 am

Finally have the weather, time, and motivation to get back to working on the teardrop. It feels good to be in the paint and final assembly phase of the project. It's also good to be working on it because I still enjoy it so.

Last season I closed out with finishing the PMF on the camper. I saturated all the canvas with 3 coats of 50/50 TB2 and water mix. It dried down to a very nice hard shell. It was also very coarse feeling. The surface was covered with fibers that rose up and dried hard. I decided to quick sand the whole camper to smooth that out. It went real quick as a light scuff sand was all it took. I then had a nice smooth surface for the first coat of primer.

Here are some pic's of the prime coat in progress. I will do a second coat of primer after another quick scuff/sand of the surface. Decided on a two tone paint job. The top surfaces are going to be a very light grey. The side walls are going to be a few shades darker grey. Thought is a neutral color scheme will look good behind any color tow vehicle I may use.

I've got some butyl tape on order to bed the windows, A/C hatch, and hatch hinges with. Also getting a list together of stainless screws together to mount all exterior items with. I have other projects going, so won't be full time on the teardrop. However this should be the season it get's completed. It's nice to be at the point where all the big tools are put away. No more sawing and belt sanding. Not going to miss that part of the build at all.

primer1.jpg
primer1.jpg (74.48 KiB) Viewed 3214 times


primer.jpg
primer.jpg (78.56 KiB) Viewed 3214 times
My teardrop camper build journal: http://www.tnttt.com/viewtopic.php?f=50&t=64721
Mr. Lahey
The 300 Club
 
Posts: 336
Joined: Wed Oct 28, 2015 3:18 am
Location: Delavan WI
Top

Re: Kenskill style build in Delavan, WI (Now Cub Modern)

Postby Staryder61 » Thu May 21, 2020 10:40 am

Great to see you back working on that fine teardrop...
Thank's for the update on the PMF.. how much you coated it with the TB2 and the pics showing it.. helps alot :thumbsup: :thumbsup:
Great job :applause: :applause:
Stay safe, David


Our CTC
6' X 12' CTC = Texas Sized Tackle Box
http://www.tnttt.com/viewtopic.php?f=42&t=74704
User avatar
Staryder61
Silver Donating Member
 
Posts: 827
Images: 528
Joined: Mon Oct 30, 2017 5:11 pm
Location: In one of 254 Counties in Texas
Top

Re: Kenskill style build in Delavan, WI (Now Cub Modern)

Postby breb » Thu May 21, 2020 9:20 pm

Mr. Lahey always good to here from you and to here your back to finishing your teardrop. Weather here is been acceptable . I like it when I can open up the garage door and tinker. How many coats of paint to go? Are you staying with your original design for painting? I finished my tongue box with cover and I moving onto a side table for galley . looking forward to seeing your progress.
breb
Teardrop Master
 
Posts: 128
Images: 119
Joined: Sun Aug 24, 2014 8:06 am
Location: wisconsin
Top

Re: Kenskill style build in Delavan, WI (Now Cub Modern)

Postby Mr. Lahey » Fri May 22, 2020 8:01 am

Thanks for the encouragement guys. It's been a help for the entire build.

As far as the paint job I figure I have at least 1 more coat of primer to apply. Maybe 2 depending on how I want the surface to look. I'm using Glidden Gripper primer. It is loaded with solids and so it builds up thick. The canvas pores have begun to fill in nicely with the first coat. As thick as this primer is it should fill and smooth things a good bit more with coat #2. I'm not trying for a super smooth surface. Just well coated and protected.

I plan to do 2 topcoats of the final colors. I'm still undecided about the big side graphic stripe. I do like the idea. I'm just having a problem with the fact that almost every single RV or travel trailer you see today has some type of swirly, swooshie, thingie graphic all over the sides of it. The last thing I want is to look like I'm trying to fit in with the crowd. So I've decided to get it painted and assembled. Then spend some time just looking at it that way. :thinking:

I can add the graphic anytime in the future if I decide to.
My teardrop camper build journal: http://www.tnttt.com/viewtopic.php?f=50&t=64721
Mr. Lahey
The 300 Club
 
Posts: 336
Joined: Wed Oct 28, 2015 3:18 am
Location: Delavan WI
Top

Re: Kenskill style build in Delavan, WI (Now Cub Modern)

Postby TimC » Sun May 24, 2020 10:50 am

Beautiful job! Looking forward to seeing it ready to roll. :applause:
Tim
Niagara, WI
My First Benroy Teardrop Build Thread - A 5x8 Woodie - http://www.tnttt.com/viewtopic.php?f=50&t=63575
My Second Teardrop (partial) Build Thread - Started August '16 - http://www.tnttt.com/viewtopic.php?f=50&t=66939
#3 My son's Benroy Foamie team build - Started July '20 - http://www.tnttt.com/viewtopic.php?f=50&t=72877

Image
User avatar
TimC
Gold Donating Member
 
Posts: 1421
Images: 747
Joined: Sat May 23, 2015 4:15 am
Location: WI/MI border
Top

Re: Kenskill style build in Delavan, WI (Now Cub Modern)

Postby Mr. Lahey » Tue Jun 16, 2020 1:27 pm

Just an update on current status. I've been priming and sanding and painting away here when time allowed.
2 coats of Glidden Gripper primer. 3 coats of Valspar exterior house paint. Lot's of drying and sanding time between each coat.

While I was painting and sanding I was deciding if I was going to go for the side graphic or not. Once I decided to use the graphic, I was debating if it should be a light or dark color. I settled on the light color I used on the roof and hatch. It's not a direct copy of the vintage graphic I posted a few posts up. I think it captures the spirit of the original nicely. I like how it now ties the two colors together.

Just today while working on the vent fan I changed the paint scheme a bit again. In the second pic below you can see the blue tape stripe across the roof. I painted from the tape down the front curve to the bottom in the dark grey color from the sides. Just seems like the light color would really show off all the busted bugs and what not that will collect on the front of the trailer. So that's it. It's painted and I'm sticking with it. I do have a spiffy twin color pinstripe tape on its way. That will get applied to the sides at the line where the dark grey side color and light grey colors meet.

Now I'm final installing windows, lights, vent fan, fenders and all the details. I will be camp ready pretty darn soon! :D

Time for my next sidetrack. The riding mower sounds like it chewed all it's teeth off the starter drive. Won't turn over and is dead in the garage. So time to go throw wrenches at the mower, and order some parts while the teardrop sits and waits again.


graph.jpg
graph.jpg (92.36 KiB) Viewed 2991 times


graph2.jpg
graph2.jpg (85.17 KiB) Viewed 2991 times
My teardrop camper build journal: http://www.tnttt.com/viewtopic.php?f=50&t=64721
Mr. Lahey
The 300 Club
 
Posts: 336
Joined: Wed Oct 28, 2015 3:18 am
Location: Delavan WI
Top

Re: Kenskill style build in Delavan, WI (Now Cub Modern)

Postby breb » Tue Jun 16, 2020 6:39 pm

Mr. Lahey as I read your latest post I find similarity in our projects . First off your paint job is looking great I like the light color scheme . Must be feeling good when your getting closer to the finish. Now to get to the similarity I am still doing the details in my build and the lawn tractor crapped out . Thought I had a hydro lock in the cylinder with an over flow of fuel so I dropped the projects on the TD and drained the crank case and I might as well do oil filter and change plug. Ok done back to the teardrop and when I tried the move the lawn tractor it wouldn't start. :thumbdown: I now suspect a bad solenoid . Will I get back to the TD . The next project there is the foam mattress/cushions. We decided to make our own covers for them. So that should be the last big project on my build. Maybe by that time all these campgrounds will be open.
breb
Teardrop Master
 
Posts: 128
Images: 119
Joined: Sun Aug 24, 2014 8:06 am
Location: wisconsin
Top

Re: Kenskill style build in Delavan, WI (Now Cub Modern)

Postby Mr. Lahey » Wed Jul 08, 2020 2:35 pm

Well here is another progress update. Along with a new challenge to overcome as well.

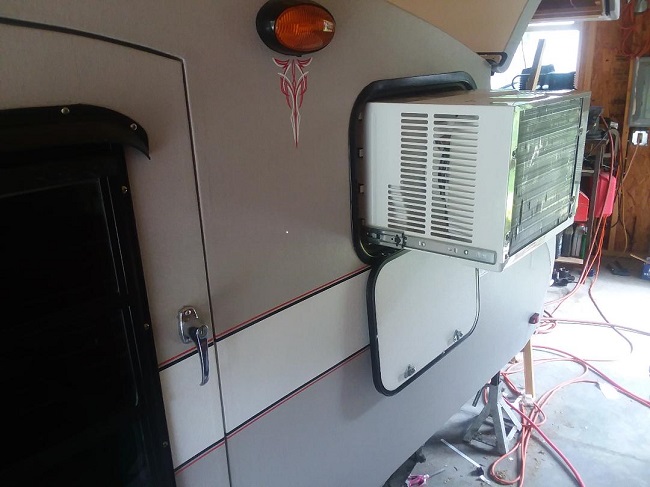
The tear is all painted, pinstriped, windows installed, vent fan installed and so forth. I've been working my way from front to back on the trailer. Which brings me to the latest challenge. Getting my A/C unit to cool and dehumidify correctly. From what I've read here on the forums the 5,000 btu window shakers are way too big for our campers. So the A/C won't run long enough to remove humidity. You end up with a cold damp cave. I had to work a bit just to get to the damp cave point.

Original concept was to just slide the A/C out. Turn the vents hard left to blow the cold air out of the cabinet and into the sleeper cabin. So fired it up and gave it a try just like that.

Fail.

All that happened was the cabinet chilled so quick that the compressor barely ran at all. Fan would run. The compressor would kick off in seconds. So the sleeper area was not cooling off much at all. Not to mention still very humid.

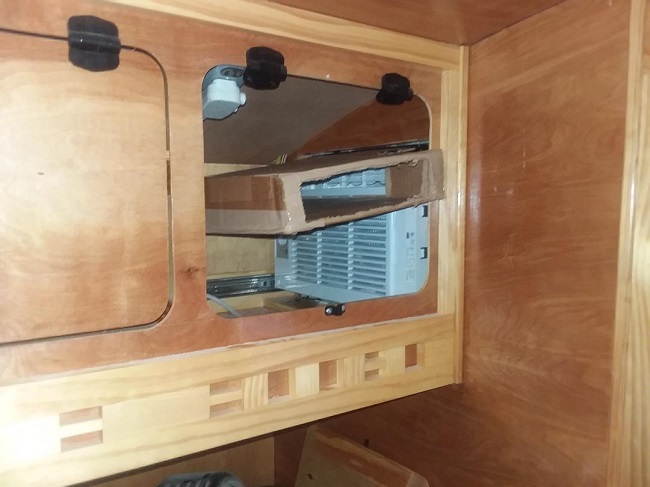
So I fashioned a crude cardboard test plenum to try and blow the cold into the cabin and keep it out of the cabinet. Worked like a champ. Problem is it cooled the sleep area too quick. Compressor runs a tad longer, but still not long enough. So it's cold but also very muggy and humid. So I've made it to cold damp cave status. Need to do better.

From what I've read in older threads here I need to slow the air flow through the unit. Get it to cool less so compressor runs longer. My question is am I better off restricting output or intake side of the A/C unit? Or a combo of restricting both sides of the equation?

Fortunately(??) I have the perfect experiment weather. High 80's to low 90's with insane 60 to 70% humidity. I figured now's the time to solve this rather than to be out camping and have these issues show up.

I'm going out there again now to try some restriction ideas I have. See if that helps or even solves it.
I welcome any ideas anyone has to deal with this, and look forward to replies as always.

Once I'm over this hill it's on to the back of the tear.
Final install of hatch hinge, hatch latch, and tail lights. Then install both fenders.
At that point I will be ready to camp in it!!!!! Hooray!!!
ac2.jpg
ac2.jpg (86.72 KiB) Viewed 2821 times


ac.jpg
Test plenum
ac.jpg (77.84 KiB) Viewed 2821 times
My teardrop camper build journal: http://www.tnttt.com/viewtopic.php?f=50&t=64721
Mr. Lahey
The 300 Club
 
Posts: 336
Joined: Wed Oct 28, 2015 3:18 am
Location: Delavan WI
Top

Re: Kenskill style build in Delavan, WI (Now Cub Modern)

Postby TimC » Wed Jul 08, 2020 7:49 pm

That is way cool! It'd be nice if somebody made a 12v 1kBTU AC unit that would work for us. Maybe someday.

Your build looks awesome.

Tim
Tim
Niagara, WI
My First Benroy Teardrop Build Thread - A 5x8 Woodie - http://www.tnttt.com/viewtopic.php?f=50&t=63575
My Second Teardrop (partial) Build Thread - Started August '16 - http://www.tnttt.com/viewtopic.php?f=50&t=66939
#3 My son's Benroy Foamie team build - Started July '20 - http://www.tnttt.com/viewtopic.php?f=50&t=72877

Image
User avatar
TimC
Gold Donating Member
 
Posts: 1421
Images: 747
Joined: Sat May 23, 2015 4:15 am
Location: WI/MI border
Top

PreviousNext

Return to Build Journals

Who is online

Users browsing this forum: No registered users and 10 guests