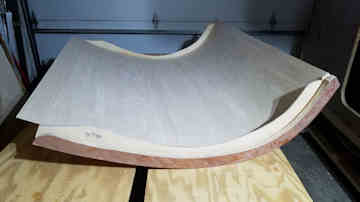
It has been a busy few weeks since I last posted. The following week since my last post, I was able to place the blocking and secure the inner skin to the hatch frame. Here is what it looked like after I got it secured but before the glue set and I trimmed the skin down with the bottom bearing trim bit.

- 20210130_181139 Small.jpg (29.31 KiB) Viewed 1870 times
This is the last picture that I have taken since everything else didn't really show anything new or interesting.
I started to work out the wiring in the hatch and figured that it would be a lot easier to varnish the inside without the wires sticking out and getting in the way. With two days of upper 60s and lower 70s temperatures coming on, I put off finishing the carpentry work, took the work from home option for a couple days and finished the inside surface of the hatch. I put the last coat of polyurethane down Wednesday afternoon and winter returned for a few more days Thursday. The following weekend I ran the little bit of electrical in the hatch, cut, kerfed, and inserted the foam, and put the outer skin on. This represents a big milestone in the project. All carpentry except the galley is complete.

Happy with my progress and wanting to push on. I saw another warm weekend coming so I sanded my walls smooth so that I could get a good round over of my roof. That went mostly well. If you recall, I tried filling my screw holes with the thickened epoxy. The epoxy wasn't quite thick enough and it oozed out of the holes. I was able to sand off the high drips from the ooze but at the bottom, where the walls secure to the floor, my sander was not quite flush with the wall and I removed the top ply and probably all the epoxy from the underlayment. Note to others, be careful when you start sanding in that area. It doesn't tale long to sand that away. I will probably brush some more epoxy over that area to let it soak in if it will absorb it.
With the warm day coming, I went to fiberglass the roof and hatch. That's end of this run going well. First mistake is that I should have brought the epoxy inside over night to warm up. It still got cold overnight and when I started it was very thick and didn't pump well. A little time in the sun solved that problem towards the end of the day but that didn't help starting out. My fiberglass cloth is a tighter weave than the standard and I could not get the goo that was my resin to flow through the cloth. With much pushing and working, I was able to get the cloth to wet and stick to the wood. The problem is that since it didn't flow well I have a lot of areas that the epoxy is barely covering the cloth while other areas are thick. As the epoxy warmed up, it started to flow better but the vertical surface then started to be a problem. I figured the best course of action was to pour the epoxy on the curve and work it down trying to get it worked into the cloth before it ran on the floor. It worked mostly well though not great. I have no idea how I would have done it if I had one of those profiles that curved at the bottom a well as the top. The final issue was that the epoxy ran out as I got to the end of the cabin. I had just enough to finish the cabin. I didn't get to apply the fiberglass to the hatch.

While it is still cold, I will finish the wiring and the galley as well as start welding. One day an axle will arrive and I will need to fabricate the chassis.

After all that is complete, the weather should be warming up so that the epoxy will flow and I can try again with the fiberglass on roof and hatch.


