Skinning

Anything to do with mechanical, construction etc

Skinning

Postby asianflava » Wed Nov 24, 2004 3:52 pm

I started marking the skin stringer positions on the walls. I had a problem where do I start? Image

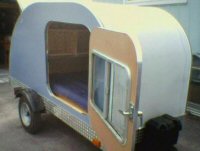
I would rather start it on the 2X4 but then another question comes up, how do I bolt the 2X4 to the trailer frame when one side is enclosed?
User avatar
asianflava
8000 Club
8000 Club
 
Posts: 8412
Images: 45
Joined: Mon Aug 02, 2004 5:11 am
Location: CO, Longmont

Postby D. Tillery » Wed Nov 24, 2004 4:22 pm

Man am I glad I'm watching this site. My biggest fear is painting myself into a corner. Although you haven't quite done that I can't wait to hear the best way out.
D. Tillery
D. Tillery
User avatar
D. Tillery
Teardrop Master
 
Posts: 266
Images: 9
Joined: Thu Jul 22, 2004 5:47 pm
Location: Providence, still a Texan, RI

Postby SteveH » Wed Nov 24, 2004 4:40 pm

I would skin starting from the bottom, but only run that piece to the floor, and then start another piece from there. Just my "opinion", but the reason I would do it that way is because you might some day need to replace the bottom piece because of denting from debris thrown up from the tow vehicle tires.

I would also skin the sides before I did the top/front so the edges of the sides could be turned over the edge and under the top to aid in sealing out water. Again, just my opinion.
SteveH
Calling an illegal alien an "undocumented immigrant"is like calling a drug dealer an "unlicensed pharmacist ".
User avatar
SteveH
2000 Club
2000 Club
 
Posts: 2101
Images: 42
Joined: Mon Nov 01, 2004 8:28 am
Location: Bexar Co, TX
Top

Postby angib » Wed Nov 24, 2004 6:29 pm

As you seem to be, sort of, following the drawings for the New Cub, I thought I ought to throw in my ideas!

All my Cub designs start the skin at the 2x4 as that's where the skin has become horizontal - if you only run it from the floor, that's gonna be visible, though only from a low angle.

But then I also design the frame to go under the floor, so that the 2x4 is not sitting on the frame, so it doesn't get bolted down.

That made sense to me, but perhaps to no-one else!

Andrew
User avatar
angib
5000 Club
5000 Club
 
Posts: 5783
Images: 231
Joined: Fri Apr 30, 2004 2:04 pm
Location: (Olde) England
Top

Postby asianflava » Wed Nov 24, 2004 7:45 pm

angib wrote:
But then I also design the frame to go under the floor, so that the 2x4 is not sitting on the frame, so it doesn't get bolted down.

Andrew


Yes I was going to make the frame fit inside the 2x4s and side walls. Then bolt the shell to the frame by running the bolts from the 2x4 to the frame (parallel to the ground). That way I can use multiple countersunk screws on the 2x4s in the cabin.
User avatar
asianflava
8000 Club
8000 Club
 
Posts: 8412
Images: 45
Joined: Mon Aug 02, 2004 5:11 am
Location: CO, Longmont
Top

Postby angib » Thu Nov 25, 2004 2:09 pm

asianflava wrote:Then bolt the shell to the frame by running the bolts from the 2x4 to the frame (parallel to the ground).

I think I get the idea. Instead of bolts, you could use what we Brits call 'coachscrews' (see photo) - a big woodscrew with a hex or square head. They are probably as strong as a bolt (except in direct pull) and require access from only one side.
Image
Andrew

PS Happy Thanksgiving to you all over there (it's just a regular day over here!).
User avatar
angib
5000 Club
5000 Club
 
Posts: 5783
Images: 231
Joined: Fri Apr 30, 2004 2:04 pm
Location: (Olde) England
Top

Postby asianflava » Thu Nov 25, 2004 3:32 pm

We have carraige bolts but they are not the same. Carraige bolts have a mushroom head with a square to sink into the wood. A nut screws onto the other end. The bolts you pictured are called "lag screws" here.

I think I may have figured out what I will do. I think I will use blind nuts on the other side of the 2x4. If I install them before skinning, then I will not need access to the back. I will also be able to remove the bolts if needed. Also, they have a large flange area to provide better pull resistance.

Any comments?

Image
User avatar
asianflava
8000 Club
8000 Club
 
Posts: 8412
Images: 45
Joined: Mon Aug 02, 2004 5:11 am
Location: CO, Longmont
Top

Postby angib » Thu Nov 25, 2004 4:19 pm

asianflava wrote:Any comments?

:?
1. Do they grip the wood really well? It would be a shame if you pushed the bolts through the front and knocked the tee nuts out the back..... :cry:

2. You must have a very clever plan for how you are going to transfer the position of the holes in the 2x4s to the frame, as the holes will be hidden behind the frame.... :thinking:

Andrew (assassinating ideas once again)
User avatar
angib
5000 Club
5000 Club
 
Posts: 5783
Images: 231
Joined: Fri Apr 30, 2004 2:04 pm
Location: (Olde) England
Top

Postby asianflava » Thu Nov 25, 2004 5:45 pm

angib wrote:1. Do they grip the wood really well? It would be a shame if you pushed the bolts through the front and knocked the tee nuts out the back..... :cry:

I didn't think of that, good thing you mentioned it. A little bit of insurance now will make things easier later. Since I have epoxy laying around, I could put some epoxy and cloth on them. Even if it doesn't bond to the nut, it's only job is to prevent it from pushing out. Or even easier, I'll screw a block of wood on top of it.

angib wrote:2. You must have a very clever plan for how you are going to transfer the position of the holes in the 2x4s to the frame, as the holes will be hidden behind the frame.... :thinking:


That's the easy part, just clamp the 2X4 to the frame and drill all the way thru. Put the blind nut on, epoxy it and you're good to go. I haven't done any skinning so the cavity is still exposed. Also, neither the frame or the floor is put together making adjustments easy.

It's good to have a Devil's Advocate so that you can see all sides of the situation. You won't be suprised when something unexpected crops up.
User avatar
asianflava
8000 Club
8000 Club
 
Posts: 8412
Images: 45
Joined: Mon Aug 02, 2004 5:11 am
Location: CO, Longmont
Top

Postby tdthinker » Thu Nov 25, 2004 10:19 pm

This is why I hate and am affraid of skinnning, that is why I am going rhino liner, lol. bye
Ryan
User avatar
tdthinker
500 Club
 
Posts: 512
Images: 1
Joined: Wed Jun 09, 2004 10:23 pm
Location: Illinois
Top

Postby asianflava » Fri Nov 26, 2004 12:40 am

You still have to put wood under the Rhino.
User avatar
asianflava
8000 Club
8000 Club
 
Posts: 8412
Images: 45
Joined: Mon Aug 02, 2004 5:11 am
Location: CO, Longmont
Top

Postby tdthinker » Fri Nov 26, 2004 1:21 am

I know I have to put ply wood under it but aluminum is what I would hate to do. bye
Ryan
User avatar
tdthinker
500 Club
 
Posts: 512
Images: 1
Joined: Wed Jun 09, 2004 10:23 pm
Location: Illinois
Top

Postby JunkMan » Sat Nov 27, 2004 7:27 pm

Speaking of skinning, what thickness aluminum should be used, and how tight of a radius can you bend? I want to have about a 6" radius at the lower rear.
Jeff & Odie
Black Hills of South Dakota
User avatar
JunkMan
500 Club
 
Posts: 974
Images: 50
Joined: Sun Oct 24, 2004 6:21 pm
Location: Rapid City, South Dakota
Top

Postby Big Guy with a Little Guy » Mon Nov 29, 2004 4:02 pm

The tee nuts shown above work really well for this application. They are quite strong, and they only push out of place if they are not properly installed, and you give a premature shove before the bolt is threaded into the nut. Tee nuts are very common in furniture construction, particularly in holding sofa feet in place. Think of the strain and torque a sofa puts on the feet. I worked in furniture for 12 years, and I never saw a tee nut fail its purpose.

One thought about making sure a tee nut does not fall out of the hole: simply screw in place a sheetmetal screw so that half of the screw head covers the edge of the tee nut. If you put a washer under the sheetmetal screw, the screw can be placed a bit further away from the tee nut.
Big Guy with a Little Guy
Not So Tiny Travel Trailer Dude
 
Posts: 229
Joined: Mon Jun 28, 2004 2:52 pm
Top

Postby Guest » Tue Nov 30, 2004 2:14 am

angib wrote:I think I get the idea. Instead of bolts, you could use what we Brits call 'coachscrews' (see photo) - a big woodscrew with a hex or square head. They are probably as strong as a bolt (except in direct pull) and require access from only one side.
Image
Andrew

PS Happy Thanksgiving to you all over there (it's just a regular day over here!).


Sir Andrew,
We call those Lag Bolts over here.
Guest
 
Top


Return to Teardrop Construction Tips & Techniques

Who is online

Users browsing this forum: No registered users and 2 guests