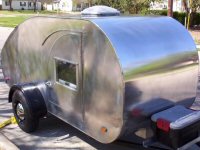
(The Puffin) New Tiny Trailer

Anything to do with mechanical, construction etc

Postby steve wolverton » Mon Nov 06, 2006 6:55 pm

Not much work going on with the Tiny Trailer these last couple of days. I was visiting a buddy out of town this weekend, so no building. The girl I visited is thrilled with the build and we talked about a few trips that we want to make. I've got her lined up for Christmas. :thumbsup:

The little brown truck showed up this afternoon with a box for me. $131.88 to my front door.

Image

That's a gallon of resin, fast + slow hardener (mixed together later), 6 yards of fiberglass, 1 pound of wood flour, and 1 pound of glass bubbles.

I started sealing the wood yesterday. I should have it sealed and ready for paint this weekend. Sunday I'm hoping to hang the door, and finish all the trim. It should be camp ready by this Sunday night. :R
Last edited by steve wolverton on Tue Jun 03, 2008 4:16 pm, edited 2 times in total.
�veni, vidi, vici.�
User avatar
steve wolverton
1000 Club
1000 Club
 
Posts: 1676
Images: 11
Joined: Sun Nov 07, 2004 9:39 pm
Location: Brazoria, TX

Postby Jimbo » Tue Nov 07, 2006 7:40 pm

steve wolverton wrote:Not much work going on with the Tiny Trailer these last couple of days. I was visiting a buddy out of town this weekend, so no building. The girl I visited is thrilled with the build and we talked about a few trips that we want to make. I've got her lined up for Christmas. :thumbsup:

The little brown truck showed up this afternoon with a box for me. $131.88 to my front door.

That's a gallon of resin, fast + slow hardener (mixed together later), 6 yards of fiberglass, 1 pound of wood flour, and 1 pound of glass bubbles.

I started sealing the wood yesterday. I should have it sealed and ready for paint this weekend. Sunday I'm hoping to hang the door, and finish all the trim. It should be camp ready by this Sunday night. :R


Newbie glass question here, do you cover the entire body with the cloth or just the seams? BTW, I really enjoy watching your builds.
Started many, finished none... Bought a TTT <Sigh> ;)
User avatar
Jimbo
2nd Teardrop Club
 
Posts: 290
Images: 1
Joined: Sun Apr 18, 2004 5:56 pm
Location: Kentucky

Postby steve wolverton » Tue Nov 07, 2006 8:29 pm

Jimbo wrote:Newbie glass question here, do you cover the entire body with the cloth or just the seams?


I'm covering the roof section with fiberglass, but not the sides. The reason is to keep the roof from checking as it's tortured/bent/stressed around the corners.

Jimbo wrote:BTW, I really enjoy watching your builds.


Thanks. I appreciate that. :thumbsup:
�veni, vidi, vici.�
User avatar
steve wolverton
1000 Club
1000 Club
 
Posts: 1676
Images: 11
Joined: Sun Nov 07, 2004 9:39 pm
Location: Brazoria, TX
Top

Postby steve wolverton » Tue Nov 07, 2006 8:45 pm

Well I went flying home after work to try to beat the darkness. I passed people like crazy, cut them off, flipped them off, and got home with a little daylight to spare. I'm only kidding, I didn't cut anyone off. :roll:

Tonight I sealed the exterior with epoxy. The biggest pain was the roof because it's so wide I have a hard time reaching across while on a ladder.

I also sealed a seam on the back with epoxy/wood flour mixture. I had a little left over so I filled in a few screw holes as well.

Image
Last edited by steve wolverton on Tue Jun 03, 2008 4:16 pm, edited 2 times in total.
�veni, vidi, vici.�
User avatar
steve wolverton
1000 Club
1000 Club
 
Posts: 1676
Images: 11
Joined: Sun Nov 07, 2004 9:39 pm
Location: Brazoria, TX
Top

Postby NightCap » Tue Nov 07, 2006 11:47 pm

steve wolverton wrote:Well I went flying home after work to try to beat the darkness. I passed people like crazy, cut them off, flipped them off, and got home with a little daylight to spare. I'm only kidding, I didn't cut anyone off. :roll:

Tonight I sealed the exterior with epoxy. The biggest pain was the roof because it's so wide I have a hard time reaching across while on a ladder.

I also sealed a seam on the back with epoxy/wood flour mixture. I had a little left over so I filled in a few screw holes as well.

Image


Think I could ask a favor amigo? :twisted: I mean :worship: I was wondering if you could whip up a quick tutorial on the uses of the epoxy wood flour mixture? How to make it and best way to apply etc so a nimrod like me could read it a couple of dozen times and know how to do it. :worship: You see, I want to get it right the first time. Can't afford many mistakes. :D Oh yeah, "Please?" Do you need to use cloth or would fibers do the same thing? I want a strong joint where wall meets roof on the outside of the tear. It is ok to talk down to me.. lol
Image
#1 - 100% Done #2 - 100% Done Thinking about #3
User avatar
NightCap
1000 Club
1000 Club
 
Posts: 1131
Images: 259
Joined: Sun Jul 02, 2006 9:28 pm
Location: Iowa, Dayton
Top

Postby steve wolverton » Wed Nov 08, 2006 7:06 pm

I got the second coat of epoxy on the camper today. I'm still trying to figure out what I'm going to do for the very front of the camper between the lowered sections. I'm planning to put a storage box on the tongue (purchase a black storage box - not build) but I need to tie the sides in with the front/back. I'll figure out something this weekend.

I filled in the screw holes and seam on the front part of the camper too. I also managed to fill most of the screw holes with epoxy/wood flour mix tonight. Tomorrow I have nothing planned but to fill all the holes so I can fiberglass Friday.

Image
Last edited by steve wolverton on Tue Jun 03, 2008 4:16 pm, edited 2 times in total.
�veni, vidi, vici.�
User avatar
steve wolverton
1000 Club
1000 Club
 
Posts: 1676
Images: 11
Joined: Sun Nov 07, 2004 9:39 pm
Location: Brazoria, TX
Top

Postby steve wolverton » Wed Nov 08, 2006 7:27 pm

NightCap wrote:I was wondering if you could whip up a quick tutorial on the uses of the epoxy wood flour mixture? How to make it and best way to apply etc so a nimrod like me could read it a couple of dozen times and know how to do it. :worship: You see, I want to get it right the first time. Can't afford many mistakes. :D Oh yeah, "Please?" Do you need to use cloth or would fibers do the same thing? I want a strong joint where wall meets roof on the outside of the tear. It is ok to talk down to me.. lol


Not sure about 'wood fibers.' Wood flour is what I use, and it's the texture of regular white flour. Very powdery. "Wood fibers" would concern me as it sounds very course. I think you want flour. Andrew (anjib) knows a lot more about the glass fibers than I. Maybe he can chime in if he's watching this thread?

Ok, I'll give this a shot. Not real sure if this is what you want, but I hope some find it useful.

Image
The first thing is to mix your epoxy. My epoxy is Raka brand. I use the pump on the epoxy system so I don't have to measure. (It's usually a good idea to measure the first few pumps to make sure your pumps are working properly) I use two pumps of epoxy (the gallon jug) and 1 pump of the hardener. You can also see the bondo squegee I use later.

Image
This photo shows the epoxy mixed. I always use plastic drinking cups and plasticware to mix it. This way I just trash it when done. You can use rubber bowls if you'd like. Wait for the epoxy to dry and pop out the old epoxy to re-use the container.

Image
The next thing to do is add your fillers. I'm using wood flour (pine wood flour) to add to the epoxy. This stuff is really cheap, and it works very well. It makes *very* strong bonds. If you epoxy wood together using this method, the wood will tear away before the epoxy joint fails. It's also *very* difficult to sand.

Image
Here is the wood flour mixed with the epoxy. I used 4 big tablespoons of pine flour for the small amount of epoxy. I mixed it to a peanut butter thickness. I turned the spoon upside down to try to show the thickness of the mixture.

Image
Using the spoon I dabbed some of the mixture into the seam/screw holes on the front of the camper. I usually don't apply it this way, but I wanted to show a before and after. I usually carry a small piece of plywood around with me, and after mixing the epoxy/wood flour I pour it (actually scoop it) onto the piece of plywood and use it similar to an artist using a paint palette. This spreads the epoxy out more and keeps it from "going off" or "kicking off" too soon. If you keep the epoxy mixture in a cup, you'll need to work very fast as it will heat up. I find it easier to use the "palette."

Image
Using a bondo squegee, I smeared the epoxy/wood flour mix into place. I try to do it all in one swipe. I never drag the squegee both directions, it's only one directions when I apply it. Try to keep the epoxy mixture as close to a finished product as you can - it will save you a lot of time in sanding.

The one pictures above is a good seam fill. I'll go back later with a mixture of epoxy/glass bubbles and do the same thing.

Hope this helps. :thumbsup:
Last edited by steve wolverton on Tue Jun 03, 2008 4:16 pm, edited 2 times in total.
�veni, vidi, vici.�
User avatar
steve wolverton
1000 Club
1000 Club
 
Posts: 1676
Images: 11
Joined: Sun Nov 07, 2004 9:39 pm
Location: Brazoria, TX
Top

Postby NightCap » Wed Nov 08, 2006 8:24 pm

Thanks! that was a pretty darn good tutorial. It should be made part of a sticky. Thanks for taking the time to do that. Illustrations were excellent.

I did not ask my one question very good I guess. Not wood fibers but fiberglass fibers. Have you heard of this. I would worry that the wood flour would color the wood too much. Could I be saying would any more? :D
Image
#1 - 100% Done #2 - 100% Done Thinking about #3
User avatar
NightCap
1000 Club
1000 Club
 
Posts: 1131
Images: 259
Joined: Sun Jul 02, 2006 9:28 pm
Location: Iowa, Dayton
Top

Postby steve wolverton » Wed Nov 08, 2006 8:30 pm

NightCap wrote:Not wood fibers but fiberglass fibers. Have you heard of this. I would worry that the wood flour would color the wood too much. Could I be saying would any more? :D


I'm sorry, I didn't read your original message correctly. To be honest with you, I really don't know that answer. I haven't used fiberglass fibers, chopped strand, etc. I would also be concerned with matching the color. Maybe someone else can help us out. :thinking:
�veni, vidi, vici.�
User avatar
steve wolverton
1000 Club
1000 Club
 
Posts: 1676
Images: 11
Joined: Sun Nov 07, 2004 9:39 pm
Location: Brazoria, TX
Top

Postby bdosborn » Wed Nov 08, 2006 10:22 pm

Steve,

Great pictures of the wood filler. How about some shots of how you sealed the plywood? Do you just pour a cup of epoxy on and spread it around? Which hardner did you use or did you mix them?
Thanks,
Bruce
2009 6.5'X11' TTT - Boxcar
All it takes is a speck of faith and a few kilowatts of sweat and grace.
Image
Boxcar Build
aVANger Build
User avatar
bdosborn
Donating Member
 
Posts: 5594
Images: 806
Joined: Wed May 05, 2004 11:10 pm
Location: CO, Littleton
Top

Postby steve wolverton » Wed Nov 08, 2006 10:46 pm

bdosborn wrote:How about some shots of how you sealed the plywood? Do you just pour a cup of epoxy on and spread it around?


I don't have any pics from sealing the exterior, but it's very easy. I used a paint roller and mixed larger batches of epoxy. I then just rolled it on. It does take quite a bit of epoxy though, almost 1/2 gallon to cover my camper with 2 coats.

I've used the pour it on and spread it around method before, but it gets quite messy on vertical surfaces. The epoxy is almost like water & runs everywhere unless you spread it quickly. I will use this method when I glass the camper to press the epoxy into the fiberglass cloth.

bdosborn wrote:Which hardner did you use or did you mix them?


I mixed the fast + slow for a medium hardener. :thumbsup:
�veni, vidi, vici.�
User avatar
steve wolverton
1000 Club
1000 Club
 
Posts: 1676
Images: 11
Joined: Sun Nov 07, 2004 9:39 pm
Location: Brazoria, TX
Top

Postby duke » Wed Nov 08, 2006 11:29 pm

Using a bondo squegee, I smeared the epoxy/wood flour mix into place. I try to do it all in one swipe. I never drag the squegee both directions, it's only one directions when I apply it. Try to keep the epoxy mixture as close to a finished product as you can - it will save you a lot of time in sanding.

The one pictures above is a good seam fill. I'll go back later with a mixture of epoxy/glass bubbles and do the same thing.


Steve,

Do you sand the epoxy/wood flour mix and then apply the epoxy/glass bubble mix, kind of like a finishing putty??
There comes a time in every rightly constructed boy's life that he has a raging desire to go somewhere and dig for hidden treasure. - Mark Twain
Image.Image
User avatar
duke
Teardrop Master
 
Posts: 121
Images: 7
Joined: Sat Jul 15, 2006 10:16 pm
Location: WI, Green Bay
Top

Postby steve wolverton » Thu Nov 09, 2006 7:09 am

duke wrote:Do you sand the epoxy/wood flour mix and then apply the epoxy/glass bubble mix, kind of like a finishing putty??


Yes sir - that's exactly what you do. After it dries (usually the next day depending on hardeners used, outside temp, humidity, etc.) treat it just like finishing putty. :thumbsup:
�veni, vidi, vici.�
User avatar
steve wolverton
1000 Club
1000 Club
 
Posts: 1676
Images: 11
Joined: Sun Nov 07, 2004 9:39 pm
Location: Brazoria, TX
Top

Postby Jimbo » Thu Nov 09, 2006 8:15 pm

So, have you been keeping track of how much you have into the project?
Started many, finished none... Bought a TTT <Sigh> ;)
User avatar
Jimbo
2nd Teardrop Club
 
Posts: 290
Images: 1
Joined: Sun Apr 18, 2004 5:56 pm
Location: Kentucky
Top

Postby steve wolverton » Thu Nov 09, 2006 10:13 pm

Little brown truck stopped by and dropped off more camper parts today. I ordered 3 windows - cost was 122.50 shipped. One for each side, and one for the door.

I filled some more screw holes tonight with epoxy/wood flour. Tomorrow I'm hoping to have everything filled and prepared for glassing. I'll probably glass on Saturday instead of Friday. I hope to start painting (maybe only the sides?) this Sunday.

Image

Jimbo wrote:So, have you been keeping track of how much you have into the project?


Indeed.

11/09/06

Trailer $189.00
Lumber/Hardware $244.83
Epoxy/Fiberglass $131.88
Windows $122.50

Total $688.21
Last edited by steve wolverton on Tue Jun 03, 2008 4:17 pm, edited 1 time in total.
�veni, vidi, vici.�
User avatar
steve wolverton
1000 Club
1000 Club
 
Posts: 1676
Images: 11
Joined: Sun Nov 07, 2004 9:39 pm
Location: Brazoria, TX
Top

PreviousNext

Return to Teardrop Construction Tips & Techniques

Who is online

Users browsing this forum: No registered users and 3 guests