A question about generic Benroy Hatch ...

Anything to do with mechanical, construction etc

A question about generic Benroy Hatch ...

Postby kayakrguy » Fri Dec 01, 2006 7:41 pm

Hi everyone,

Tomorrow I hope to rout the roof and hatch skins. On the generic Benroy plans I think it calls for leaving a 1/4" edge over the outside edge of the sidewall of the T? What is the purpose of that? It seems like that would create a lot of wind resistance/stress/ and moisture capture ??

Clarification appreciated...

Jim
A disposition to preserve, and an ability to improve, taken together, would be my standard of a statesman...

But what is liberty without wisdom, and without virtue? It is the greatest of all possible evils; for it is folly, vice, and madness, without tuition or restraint.

Edmund Burke
User avatar
kayakrguy
Lifetime member
 
Posts: 917
Images: 195
Joined: Sun Feb 05, 2006 8:26 pm
Location: Jersey Shore

Postby NightCap » Fri Dec 01, 2006 7:54 pm

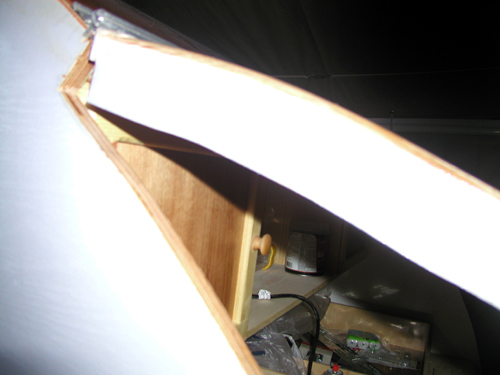
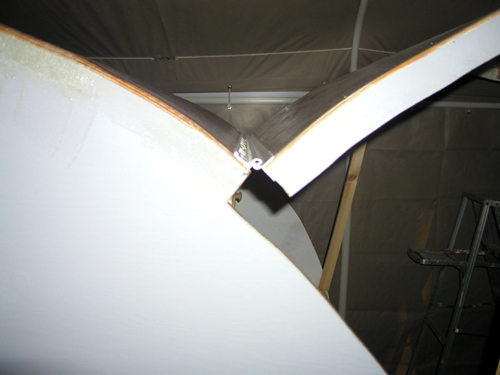
I think they are talking about the metal hinge only there. I know that it depends on the type of hinge you use how you do the finishing touches. It also depends on how you do your hatch. I routed my roof and hatch skin flush with the side of the trailer. I cut the two inch hatch out of the side of my trailer. The 2 inches that I cut out of the wall of the trailer became my two outside hatch spars. I'll get a picture and post it on this post to make my self more clear.
I did a 1/4 inch round over along the whole top edge of my trailer.
Image
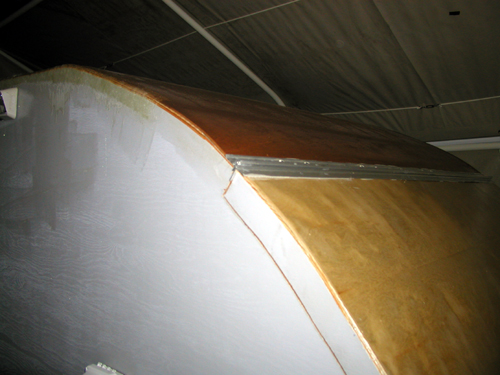
The aluminum hinge is the only thing that hangs over by 1/4 inch.
Image
Image
Image
Image
#1 - 100% Done #2 - 100% Done Thinking about #3
User avatar
NightCap
1000 Club
1000 Club
 
Posts: 1131
Images: 259
Joined: Sun Jul 02, 2006 9:28 pm
Location: Iowa, Dayton

Postby rbeemer » Fri Dec 01, 2006 10:24 pm

Jim,

The 1/4 inch is only for installing the skins. After the glue dries and you route them (using a flush trim bit or bit of your choice) the overhange should be gone.

Nightcap is correct though that you want to install the hinge with an overhang to help prevent water from entering the gally or other close by areas.
Rick

If ducks had scales, would fish quack?
rbeemer
500 Club
 
Posts: 997
Images: 13
Joined: Sun Apr 03, 2005 11:35 pm
Location: Oregon, Tigard
Top

Postby Tripmaker » Sat Dec 02, 2006 8:42 am

My understanding though is that the hatch skin is to overhang so that an AL angle attached to the hatch will fit over the side wall. Correct?
Jim


I started with nothing and still have most of it left.
User avatar
Tripmaker
500 Club
 
Posts: 893
Images: 59
Joined: Fri Aug 18, 2006 12:09 pm
Location: Fort Wayne, IN
Top

Postby madjack » Sat Dec 02, 2006 12:28 pm

Tripmaker wrote:My understanding though is that the hatch skin is to overhang so that an AL angle attached to the hatch will fit over the side wall. Correct?


...nope...you will trim the overhang to be flush, so that the angle will sit tight against the top and the body...... 8)
...I have come to believe that, conflict resolution, through violence, is never acceptable.....................mj
User avatar
madjack
Site Admin
 
Posts: 15128
Images: 177
Joined: Thu Dec 02, 2004 5:27 pm
Location: Central Louisiana
Top

Postby Tripmaker » Mon Dec 04, 2006 9:54 am

madjack wrote:
Tripmaker wrote:My understanding though is that the hatch skin is to overhang so that an AL angle attached to the hatch will fit over the side wall. Correct?


...nope...you will trim the overhang to be flush, so that the angle will sit tight against the top and the body...... 8)


Now I'm confused. But that's nothing new. Why is it then that everyone talks about having to use rivets...ahhh I see said the blind man. The outer skin hangs over the hatch frame but not the sides of the body of the TD. And the rivets are use to attach the angle to the overhang. This leads to another question. I've been told that 1/8' ply is enough for the roof and hatch skin. Does this become a weak point? It sounds like there will be a 1 inch wide strip of plywood only 1/8"thick. Does this overhang get damaged with wear and tear over time?
Jim


I started with nothing and still have most of it left.
User avatar
Tripmaker
500 Club
 
Posts: 893
Images: 59
Joined: Fri Aug 18, 2006 12:09 pm
Location: Fort Wayne, IN
Top

Postby Gerdo » Mon Dec 04, 2006 12:07 pm

My skin overhangs about an inch. My bows go inside the galley, then the skin (luan and filon) overhang. I also had to poprivet my aluminim trim on (nothing there but skin to screw too) This is where my weatherstrip is. My body walls are notched down, in the galley opening, from the rest of the walls the thickness of the weathersrtiping you are using (make the notch smaller than the weatherstrip so the weatherstrip compresses when the hatch is closed) Some hatches are built like NightCap's with the bows lined up with the sides with the weatherstrip between them and some are recessed like mine.
Image
Image
User avatar
Gerdo
1000 Club
1000 Club
 
Posts: 1361
Images: 156
Joined: Mon Apr 25, 2005 12:02 am
Location: Littleton, Colorado
Top

Postby Tripmaker » Mon Dec 04, 2006 12:12 pm

Gerdo,

Is there a trick to figuring out the geometry of those hatch supports? Where did you get them?

thanks
jim
Jim


I started with nothing and still have most of it left.
User avatar
Tripmaker
500 Club
 
Posts: 893
Images: 59
Joined: Fri Aug 18, 2006 12:09 pm
Location: Fort Wayne, IN
Top

Postby Gerdo » Mon Dec 04, 2006 1:24 pm

The trick that I used was: take the measurements of the longest one, figure the open height of the hatch, take 3 peices of masking tape with an X on each, the bottom mount (masking tape X) is put inside to clear the bows, measure and but a take X on the hatch bow, measure from the hinge and put an X on the galley wall where the support would be when closed. Repeat 10 - 20 times untill the suport fits. You will move all 3 Xs untill everything fits (open at the right height, closed, setback so the hatch ribs don,t hit when closed, suport doesnt hit anything in the galley open or closed)

http://www.austinhardware.com/dept.asp?dept%5Fid=121

The top mount was the one that came on the support.
Image
The bottom mount was turned around and I fabed the L brackets.
Image
User avatar
Gerdo
1000 Club
1000 Club
 
Posts: 1361
Images: 156
Joined: Mon Apr 25, 2005 12:02 am
Location: Littleton, Colorado
Top

Postby asianflava » Mon Dec 04, 2006 3:21 pm

I used hydraulic hatch struts with top mounts similar to the one pictured above. I had to reinforce the wood with epoxy and glass cloth to prevent the screw holes from elongating.
User avatar
asianflava
8000 Club
8000 Club
 
Posts: 8412
Images: 45
Joined: Mon Aug 02, 2004 5:11 am
Location: CO, Longmont
Top

Postby Tripmaker » Tue Dec 05, 2006 9:01 am

Thanks for trying Gerdo but I'm sorry to say I don't follow what you are trying to tell me. Sometimes I'm dense.
Jim


I started with nothing and still have most of it left.
User avatar
Tripmaker
500 Club
 
Posts: 893
Images: 59
Joined: Fri Aug 18, 2006 12:09 pm
Location: Fort Wayne, IN
Top


Return to Teardrop Construction Tips & Techniques

Who is online

Users browsing this forum: No registered users and 1 guest