Floating AL question.

Anything to do with mechanical, construction etc

Floating AL question.

Postby Tripmaker » Wed Dec 20, 2006 7:33 pm

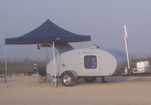
I have tacked (stapled) on my first piece of AL with the idea of just floating it rather than glueing it as many on here have suggested. I know there are two camps on this subject. Is it normal to have a bit of give, I'll call it a slight bubble, in larger expanses? It's not something you can see, I can just feel it is not completely tight against the sidewall in some spots when I push on it. The staples are not driven home and be pulled easily if you think I need to reposition it. My concern is will it expand in the hot summer sun to become something that can be seen?

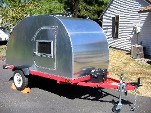
The AL I ended up with is painted red on one side but I'm using the natural side out. I was suprised to find out that this side also has some kind of clear coating on it. At first I thought it might be a protective film but there is no where to get under it to peal anything off, I tried on a scrap piece and all I could do is scratch it with a knife. I know it has a coating because I put an ohm meter to it and there no continuity. It looks like the finish, whatever it is, should stay looking nice without much work. :) Anyone know what the coating might be?
Jim


I started with nothing and still have most of it left.
User avatar
Tripmaker
500 Club
 
Posts: 893
Images: 59
Joined: Fri Aug 18, 2006 12:09 pm
Location: Fort Wayne, IN

Postby kerryd » Wed Dec 20, 2006 8:03 pm

Tripmaker, could be Mylar Kerry
kerryd
Teardrop Master
 
Posts: 158
Images: 0
Joined: Wed Aug 09, 2006 7:28 pm
Location: brooksville , florida

Postby Gage » Wed Dec 20, 2006 11:06 pm

Go HERE to see how I did mine. And by the way, using staples to hold your skin in place just defeats your purpose unless your going to remove the staples. .040t alum. will move at least 1/8" around the edges. If it is stapled down it's just going to bubble out. It hasn't been hot enought to really see how much it will move. Wait until summer.
Image Image Image
Remember 'Teardrop Time'.......Take your time, you don't have to have it finished NOW.
User avatar
Gage
8000 Club
8000 Club
 
Posts: 8321
Images: 28
Joined: Sat Apr 17, 2004 9:14 pm
Location: Palmdale, CA
Top

Postby madjack » Wed Dec 20, 2006 11:40 pm

trip, we floated ours in the same way...it basically lays flat against the substrate...there is a very slight amount of oil canning in the large flat area beteen the fenders and the top edge when left in intense summer sunlight...you have to look forit to find it......
madjack 8)
...I have come to believe that, conflict resolution, through violence, is never acceptable.....................mj
User avatar
madjack
Site Admin
 
Posts: 15128
Images: 177
Joined: Thu Dec 02, 2004 5:27 pm
Location: Central Louisiana
Top

Postby Tripmaker » Thu Dec 21, 2006 8:14 am

Gage - If you didn't use staples I assume that the skin is held in place by the trim. Doesn't the screws holding the trim, and I assume going through the skin put the same restriction on the AL as the staples? By "overtrimmed 3/16", do you mean that the skin is smaller or larger than the wall? I stapled my skin to the wall and then ran the cutting tool around the profile to cut off the excess so with a few exceptions it is pretty much the same size as the wall. My side and roof material are both the same .030 thickness so I don't expect too much problem bending the roof skin.

madjac - That is the area I'm referring to, between where the fenders will be and the roof. If you press your finger against it at say room temperature do you feel any deflection behind the AL on your TD? Or is it just when it gets hot? Like I said it is not something you can't see on mine now but it can be felt.

I guess I don't know what it is supposed to feel like at this point. It would be easier for me if I knew what the results should be. The only TD's I've looked at so far had the skin glued on so the skin was very tight to the wall. This is part of the "learning new skills" that everyone talks about.

Thanks for the help guys.
Jim


I started with nothing and still have most of it left.
User avatar
Tripmaker
500 Club
 
Posts: 893
Images: 59
Joined: Fri Aug 18, 2006 12:09 pm
Location: Fort Wayne, IN
Top

Postby Gage » Thu Dec 21, 2006 3:25 pm

Tripmaker wrote:Gage - If you didn't use staples I assume that the skin is held in place by the trim. Doesn't the screws holding the trim, and I assume going through the skin put the same restriction on the AL as the staples? By "overtrimmed 3/16", do you mean that the skin is smaller or larger than the wall? I stapled my skin to the wall and then ran the cutting tool around the profile to cut off the excess so with a few exceptions it is pretty much the same size as the wall. My side and roof material are both the same .030 thickness so I don't expect too much problem bending the roof skin.
<snip>
Thanks for the help guys.

My roof skin is .062. It doesn't expand that you can see. The sun roof, hatch hinge and side moldings hold it in place. My sides are .040 and you can see movement. Like I said, about an 1/8". I overtrimed them by about 3/16" so they wouldn't, say bottom out and try and 'bubble out'. And by the way, the 3/16" over trim was a guess and ended up to be a good guess. With the doors and fenders holding it solid if forces all movement outward. And yes the skin is trimmed smaller than the side. It moves up under the edge molding. That's how I can tell how much movement there is because of the scratches/scuff marks along the edges.

My '56 Dalton has .020 thick skins and is stapled several places and is located solid along the edges and the side skins bubble out almost an inch. Very noticeable, I didn't want that on my tear. I have seen several tears that have had there skins glued down solid bubble. And then again some that haven't. Just remember that wood and aluminum have different expansion properties.
Image Image Image
Remember 'Teardrop Time'.......Take your time, you don't have to have it finished NOW.
User avatar
Gage
8000 Club
8000 Club
 
Posts: 8321
Images: 28
Joined: Sat Apr 17, 2004 9:14 pm
Location: Palmdale, CA
Top

Postby madjack » Thu Dec 21, 2006 5:02 pm

Trip, we used the same template we used to cut the sides to cut the AL, sliding it up a scooch to acount for the roof ply...the only time you can feel or find any deflection is when it has been out in intense heat/sun for a while...in fact, that was on only one occasion, after that one time we have not felt/seen any deflection...we used .032 Al throughout
madjack 8)
...I have come to believe that, conflict resolution, through violence, is never acceptable.....................mj
User avatar
madjack
Site Admin
 
Posts: 15128
Images: 177
Joined: Thu Dec 02, 2004 5:27 pm
Location: Central Louisiana
Top

Postby Sonetpro » Thu Dec 21, 2006 5:10 pm

Trip,
Mine is floated. But I did glue it. It is glued with outdoor carpet adhesive. The glue is flexable so it moves. It is not screwed or stapled, Just held on the edges with the trim. It hasn't bubbled yet.
My top is .063 and the sides are .032. I wouldn't use .063 for the roof again it was a bugger to bend around the radius.
}><)))'> ~--------------·´¯) SteveT
You don't know what the limit's are until you take it there.ImageImageImage
User avatar
Sonetpro
Site Admin
 
Posts: 2038
Images: 107
Joined: Sun Oct 30, 2005 8:11 am
Location: Plantersville, TX
Top

Postby Gage » Thu Dec 21, 2006 5:22 pm

Sonetpro wrote:Trip,
<snip>My top is .063 and the sides are .032. I wouldn't use .063 for the roof again it was a bugger to bend around the radius.

Yep, it was a pain in the........But it sure looked nice when it was finished. Being 5 wide, it was the only thing I could get at the time. My roof is one piece of 5'x12'x.062
Image
Image Image Image
Remember 'Teardrop Time'.......Take your time, you don't have to have it finished NOW.
User avatar
Gage
8000 Club
8000 Club
 
Posts: 8321
Images: 28
Joined: Sat Apr 17, 2004 9:14 pm
Location: Palmdale, CA
Top

Postby Tripmaker » Thu Dec 21, 2006 6:59 pm

Gage that shot from the front sure looks nice. I lucked out finding the AL that I got. It was special ordered by a component maker for a job for one of their customers who then cancelled the job. They are selling it off at what I guess is cost @ $1.25 sq ft. That makes a 5x 12 piece $75.00.

I think I'll try to remove a few of the staples and get the AL tighter to the sides. I may have created a bubble when I first attached it.

As always thanks for the help guys. I'll get some new pics posted soon.
Jim


I started with nothing and still have most of it left.
User avatar
Tripmaker
500 Club
 
Posts: 893
Images: 59
Joined: Fri Aug 18, 2006 12:09 pm
Location: Fort Wayne, IN
Top

Postby asianflava » Thu Dec 21, 2006 7:38 pm

Tripmaker wrote: I lucked out finding the AL that I got. It was special ordered by a component maker for a job for one of their customers who then cancelled the job. They are selling it off at what I guess is cost @ $1.25 sq ft. That makes a 5x 12 piece $75.00.


You can say that again, that is about half of what I paid. I may have bought more aluminum but some of it isn't going to be used.
User avatar
asianflava
8000 Club
8000 Club
 
Posts: 8412
Images: 45
Joined: Mon Aug 02, 2004 5:11 am
Location: CO, Longmont
Top

Postby Jiminsav » Thu Dec 21, 2006 8:52 pm

put a few spots of PL adhesive in the center of the bubble, and use the trim screws around the edges to hold it down.
Jim in Savannah
If you can read this bumper sticker, my camper fell off.
User avatar
Jiminsav
3000 Club
3000 Club
 
Posts: 3059
Images: 40
Joined: Sat Apr 17, 2004 8:49 pm
Location: Georgia, Savannah
Top

Postby boardhead » Fri Dec 22, 2006 6:27 pm

I used "Wilsonart" water based contact cement (Home Depot) to hold the aluminum sides onto the plywood while I built the doors and got all of the trim molding in place. It forms a looser bond that breaks away easily - also it is non-toxic. I built this during the hottest part of Summer, so the aluminum was expanded during the build. I have not observed any pillowing on hot days (90 - 100 F), and there are no observable problems or pulling now that it is cold (20 - 40 F).

The top aluminum sheet was bonded to the spars with polyurathane glue - also during the hottest days of Summer. Again, no distortion observed in any weather.
User avatar
boardhead
Teardrop Advisor
 
Posts: 59
Images: 16
Joined: Wed May 03, 2006 8:36 pm
Location: Tigard, OR
Top

Postby Tripmaker » Fri Dec 22, 2006 10:42 pm

Do you guys use the same top molding on the rear of the wall -where the cut out is for the hatch? Is the weatherstrip then attached to the wall or the underside of the hatch overhang?
Jim


I started with nothing and still have most of it left.
User avatar
Tripmaker
500 Club
 
Posts: 893
Images: 59
Joined: Fri Aug 18, 2006 12:09 pm
Location: Fort Wayne, IN
Top

Postby Denny Unfried » Sat Dec 23, 2006 8:39 am

Tripmaker wrote:Do you guys use the same top molding on the rear of the wall -where the cut out is for the hatch? Is the weatherstrip then attached to the wall or the underside of the hatch overhang?

Where the hatch meets the wall I used Counter Top edge molding which has a 3/16" edge to cover the aluminum. The seal is attached to the bottom of the hatch. Several pics on my web site.
aka - "Uncle Denny"
<img src="http://www.uncledennyscorner.com/teardrop/photos/Linux.gif">
User avatar
Denny Unfried
sprint car builder/racer & all that jazz
 
Posts: 411
Joined: Mon Jun 21, 2004 8:54 am
Location: So Bay, CA
Top

Next

Return to Teardrop Construction Tips & Techniques

Who is online

Users browsing this forum: No registered users and 5 guests