Cabinet Face Materials

Anything to do with mechanical, construction etc

Cabinet Face Materials

Postby Classic Finn » Thu Jan 04, 2007 3:24 am
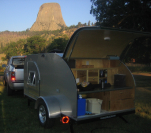
I have a question for you concerning the cabinet face framing.. On the material used - How do I determine the Width of it? Im going make the face (s)framing shortly...I need to go out and buy material so I want to get the proper size material..(Width). In otherwards the facial frame what is the most common width used and how are the doors measured then so the sizes match...Gee wonder if Im making any sense.. :oops: :oops:

My Finnish to English translating machine is not workin properly without strong coffee this mornin... :lol:

Best Regards
Classic Finn
Royal Teardrop Society Scandinavian Bureau Chief of Staff

Image
User avatar
Classic Finn
Midnight Sun Voyager
 
Posts: 17488
Images: 146
Joined: Fri Apr 29, 2005 4:29 am
Location: Country of Finland

Postby Podunkfla » Thu Jan 04, 2007 5:15 am

Heikki... I usually make the inboard verticle stiles 1.5" wide and the outer end ones 2" wide. The horizontal rails are usually 1.5" wide... Top and bottom ones are sometimes wider. The doors are usually rabbited to overlap the face-frame 1/4". Full inset flush doors are much harder to get perfect... but I do like the way they look. This is prolly about average for most cabinets... Although it is common to scale up the sizes for larger pieces of furniture like big honkin entertainment centers and such. I usually plane the lumber to 3/4" finished thickness. :)

friend ~ Brick
<B>~ Brick
<I>... I've done so much with so little for so long... Now I can do almost anything with nothing! </I></B>
Image...Lots more pix here!
User avatar
Podunkfla
ol' noodle haid
 
Posts: 2261
Images: 5
Joined: Fri Aug 04, 2006 9:25 pm
Location: North Florida near the Suwannee River

Postby Sonetpro » Thu Jan 04, 2007 5:33 am

Heikki, I used 1x3's (3/4"x2.5") on my tear, But I wanted the bolder look and the boat latchs I used needed the width. On my kitchen cabinets in the house I used 1x2's. It just depends on the look your after.
Image
}><)))'> ~--------------·´¯) SteveT
You don't know what the limit's are until you take it there.ImageImageImage
User avatar
Sonetpro
Site Admin
 
Posts: 2038
Images: 107
Joined: Sun Oct 30, 2005 8:11 am
Location: Plantersville, TX
Top

Postby bledsoe3 » Thu Jan 04, 2007 6:15 am

Heikki, If you want to cheat like I did, buy a sheet of ply and cut out the opening. That's the easiest way I could think of.
Image
Image
One sheet of ply made the upper and lower galley cabinet faces and the cabin cabinet face. I cut to height and width and then cut the opening in the middle of the ply. I know you're doing a nicer tear than I did but this info may be helpful to some builders who don't have a lot of wood working experience (like me).

P.S. Don't let the pictures discourge you. They are before I squared the doors up.
If you do what you've always done, you'll get what you've always got.
User avatar
bledsoe3
3000 Club
3000 Club
 
Posts: 3694
Images: 112
Joined: Tue Jun 07, 2005 5:55 am
Location: Oregon, Portland
Top

Postby Classic Finn » Thu Jan 04, 2007 9:04 am

Thank You All for the Info - Im off to get the material. No experience yet but I intend to get some shortly.. :lol: :lol:

Thanks Again

Heikki :thumbsup:
Royal Teardrop Society Scandinavian Bureau Chief of Staff

Image
User avatar
Classic Finn
Midnight Sun Voyager
 
Posts: 17488
Images: 146
Joined: Fri Apr 29, 2005 4:29 am
Location: Country of Finland
Top

Postby Classic Finn » Thu Jan 04, 2007 9:07 am

bledsoe3 wrote:Heikki, If you want to cheat like I did, buy a sheet of ply and cut out the opening. That's the easiest way I could think of.
Image
Image
One sheet of ply made the upper and lower galley cabinet faces and the cabin cabinet face. I cut to height and width and then cut the opening in the middle of the ply. I know you're doing a nicer tear than I did but this info may be helpful to some builders who don't have a lot of wood working experience (like me).

P.S. Don't let the pictures discourge you. They are before I squared the doors up.


Bledsoe Ive thought about your idea many many times...I,ll give the other method a try 1st... I like trying the more difficult 1st then the easiest last.. :lol: :lol: :lol:

I like pain and sweat.... :lol: :lol:

If you remember my 1st hatch.. :shock:

Heikki ;)
Royal Teardrop Society Scandinavian Bureau Chief of Staff

Image
User avatar
Classic Finn
Midnight Sun Voyager
 
Posts: 17488
Images: 146
Joined: Fri Apr 29, 2005 4:29 am
Location: Country of Finland
Top

Postby Sonetpro » Thu Jan 04, 2007 9:36 am

Heikki,
Get a router table for your router. A must for milling the grooves for the panel and rabbeting small stock.
}><)))'> ~--------------·´¯) SteveT
You don't know what the limit's are until you take it there.ImageImageImage
User avatar
Sonetpro
Site Admin
 
Posts: 2038
Images: 107
Joined: Sun Oct 30, 2005 8:11 am
Location: Plantersville, TX
Top

Postby dwgriff1 » Thu Jan 04, 2007 10:01 am

If your rails and styles are too thin you might run into trouble with hinges later. On the other hand, the wider the more they block entrance to the cabinet interior.

I wanted structural strength, so I made them mortise and tennon, but of just 1 1/2" material. My doors swing up, and I discovered I needed more clearance on the sides so the doors would clear the window trim.

Since most of us are building #1 trailer, we need to be ready to do somethings more than once! I made a set of cabinet doors (there are just 6 in the entire trailer) and didn't like them, so I burned them and made another set.

I'll like the new ones longer than I'll remember the task of remaking them.

dave
User avatar
dwgriff1
500 Club
 
Posts: 947
Images: 4
Joined: Mon Jul 04, 2005 4:20 pm
Location: SW Idaho
Top

Postby halfdome, Danny » Thu Jan 04, 2007 10:57 am

Heikki, The general rule on making face frames here on the west coast is 3" wide stiles at the wall and inside corners for clearance from switches, doors and other obstacles not to mention your door knob that could prevent a 90 deg opened door. The intermediate stiles are 2" wide as anything else looks and performs less than desired. Top rails on lowers is 3" and upper top rails are a minimum of 2" wide and can be wider to accommodate crown molding etc. I make intermediate rails 1 1/2" to 2" wide depending on what is involved. I make my bottom rails 1 1/4" wide on uppers and lowers. If you make full overlay doors they need to be 1" wider at the width & height of the opening after your final trim. I make them 1/8"to 1/4" taller to trim & square the stiles after assembly. I've noticed many doors made like outdoor window frames (rails long & stiles in between).When making interior doors the stiles go long and the rails go in between. Flush doors like I did in my cabin should have 3/32" to 1/8" gap on all 4 sides after your final trim as above mentioned. This is what I have learned from working in about 20 kitchen cabinet shops on the west coast since 1966. I no longer do residential work but do the commercial stuff now. You'll notice my light switch is sitting on top of the paneling and needs clearance, besides it's more desirable to have a door open more than 90 deg so I went with the 3" stiles at the walls.
:D Danny

Image
ImageImage
"Conditions are never just right. People who delay action until all factors are favorable do nothing". William Feather
Don't accept "It's Good Enough" build to the best of your abilities.
Image
Teardroppers Of Oregon & WashingtonImage
User avatar
halfdome, Danny
*Happy Camper
 
Posts: 5894
Images: 252
Joined: Sun Aug 14, 2005 11:02 pm
Location: Washington , Pew-al-up
Top

Postby Podunkfla » Thu Jan 04, 2007 3:36 pm

Danny... I like your explanation a whole lot better than mine. :thumbsup:

(I forgot about mentioning leaving extra width for full overlay doors.) :o

friend ~ Brick
<B>~ Brick
<I>... I've done so much with so little for so long... Now I can do almost anything with nothing! </I></B>
Image...Lots more pix here!
User avatar
Podunkfla
ol' noodle haid
 
Posts: 2261
Images: 5
Joined: Fri Aug 04, 2006 9:25 pm
Location: North Florida near the Suwannee River
Top

Postby halfdome, Danny » Thu Jan 04, 2007 3:44 pm

Podunkfla wrote:Danny... I like your explanation a whole lot better than mine. :thumbsup:

(I forgot about mentioning leaving extra width for full overlay doors.) :o

friend ~ Brick

Thanks Brick, I spent my 4 year apprenticeship and more making face frames and a variety of cabinet doors on a production level. They use to call me "Dan The Face Frame Man" :lol: I was glad to go into assembly as it's more to my liking. Funny thing I'm making raised panel doors today for the dishwasher (Red Oak), guest bath case (Red Oak & Walnut) & Master Bath case (Canary Wood & Walnut). "Gotta do the Honey Doe's".
:D Danny
ImageImage
"Conditions are never just right. People who delay action until all factors are favorable do nothing". William Feather
Don't accept "It's Good Enough" build to the best of your abilities.
Image
Teardroppers Of Oregon & WashingtonImage
User avatar
halfdome, Danny
*Happy Camper
 
Posts: 5894
Images: 252
Joined: Sun Aug 14, 2005 11:02 pm
Location: Washington , Pew-al-up
Top

Postby halfdome, Danny » Fri Jan 05, 2007 10:00 am

Here is a simple drawing to show what a style, rail etc is and where they go. :) Danny
Face Frames & Door Frames
ImageImage
"Conditions are never just right. People who delay action until all factors are favorable do nothing". William Feather
Don't accept "It's Good Enough" build to the best of your abilities.
Image
Teardroppers Of Oregon & WashingtonImage
User avatar
halfdome, Danny
*Happy Camper
 
Posts: 5894
Images: 252
Joined: Sun Aug 14, 2005 11:02 pm
Location: Washington , Pew-al-up
Top

Postby Tripmaker » Fri Jan 05, 2007 10:37 am

I used 1x2 poplar for mine and like the way the face frame turned out. look at your kitchen cabinets for ideas. There is probabaly no right or wrong way to do it as long as it looks good and you like it.

Image
Jim


I started with nothing and still have most of it left.
User avatar
Tripmaker
500 Club
 
Posts: 893
Images: 59
Joined: Fri Aug 18, 2006 12:09 pm
Location: Fort Wayne, IN
Top

Postby Classic Finn » Fri Jan 05, 2007 1:49 pm

Tripmaker

That looks real nice, clean and simple.... :applause: :applause: With my wood experience we,ll see what I come up with... :thumbsup: ;)

Classic Finn ;)
Royal Teardrop Society Scandinavian Bureau Chief of Staff

Image
User avatar
Classic Finn
Midnight Sun Voyager
 
Posts: 17488
Images: 146
Joined: Fri Apr 29, 2005 4:29 am
Location: Country of Finland
Top

Postby Classic Finn » Fri Jan 05, 2007 1:53 pm

halfdome, Danny wrote:Here is a simple drawing to show what a style, rail etc is and where they go. :) Danny
Face Frames & Door Frames


Thank Danny

Nice of you to show the meaning of the terminology in your proffession..
and thanks for the drawings..

Classic Finn ;)
Royal Teardrop Society Scandinavian Bureau Chief of Staff

Image
User avatar
Classic Finn
Midnight Sun Voyager
 
Posts: 17488
Images: 146
Joined: Fri Apr 29, 2005 4:29 am
Location: Country of Finland
Top

Next

Return to Teardrop Construction Tips & Techniques

Who is online

Users browsing this forum: No registered users and 5 guests