Roof trusses, skinning, interior ceiling, aluminum trim..

Anything to do with mechanical, construction etc

Roof trusses, skinning, interior ceiling, aluminum trim..

Postby Keith B » Mon Jan 29, 2007 4:38 pm

:D Hello all… I’m new to the site; my name is Keith from Wichita, KS. Well, we’re tired of tenting camping and the teardrop seems to fit the bill nicely since the tow vehicle will range from a Jeep CJ7 up to a Suburban.

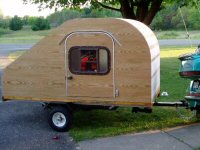
Well, I may have gotten ahead of the game but I’m building my “own” design, 5x10, so please don’t laugh when we come to NE for the annual meeting, providing we get the project done by then. The general shape of the unit is drawn an in "my gallery of photos". Well, the walls are built and I used 15/32 plywood and 1”x1/2” “nail strips” around the edges, windows, doors, etc…

Question 1: (part a) since I have a roof section of about 7’ that is flat, are 2x2’s on 7-10-12-14” centers enough or should I incorporate some steel? (part b) when attaching the “trusses” to the sides I’m not to fond of end grain screwing, do others have any ideas such as angle iron on the ends through bolted (countersunk) then through bolted through the trusses.

Question 2: exterior siding will be floating aluminum that I understand is the most favorable. Since it’s winter should I trim the aluminum a ¼” shy to give it room to expand or will flush trim be acceptable?

Question 3: for the underlayment on the roof I was going to skin w/ 1/8” plywood, glued and screwed; then contact cement a 2nd layer of 1/8” plywood, then the aluminum. I figured this would be far easier to apply and bend than one solid sheet of ¼” plywood – any thoughts, concerns?

Question 4: Interior ceiling – is bendy ply structural enough or should I stick with 1/8” smooth oak paneling? The interior sides will be 1/8” bead-board oak or birch.

Question 5: Is annealing aluminum hard to do and provide good results or should I purchase the $2 p/foot soft metal trim?

Now don’t everyone get mad all at once that a new guy is asking so many questions – I promise to make the finished product at least presentable.
************
Keith
"Work and work and do your best! Paint and putty will do the rest!"
User avatar
Keith B
Silver Donating Member
 
Posts: 550
Images: 148
Joined: Mon Jan 29, 2007 3:54 pm
Location: Wichita, KS

Postby Miriam C. » Mon Jan 29, 2007 5:12 pm

Welcome Keith,
the answer to question 1 is yes. I put mine on 12" center except at the curves and I put the framing for the vent where I wanted it.

Question 2 and 3 I will leave for those who do alum. 8)

Question 4---You don't need a lot of structure for the inside ceiling. I used 1/8 Birch. Since it was placed the length it was bendy enough. Since you are 5 wide the bead board might bend if you are careful. I wouldn't spend the extra on bendy for that.

I don't do torch...ever.... :shock:

Enjoy and we'll see you in Neb.,
“Forgiveness means giving up all hope for a better past.â€
User avatar
Miriam C.
our Aunti M
 
Posts: 19675
Images: 148
Joined: Wed Feb 15, 2006 3:14 pm
Location: Southwest MO

Postby Keith B » Mon Jan 29, 2007 5:17 pm

Hi Miriam - pleasure to meet you. Thank you for the great advise - this discussion board I think will be a "thought" saver. We sure hope to make it to NE to meet this great bunch of people.
************
Keith
"Work and work and do your best! Paint and putty will do the rest!"
User avatar
Keith B
Silver Donating Member
 
Posts: 550
Images: 148
Joined: Mon Jan 29, 2007 3:54 pm
Location: Wichita, KS
Top

Postby rbeemer » Mon Jan 29, 2007 5:18 pm

Keith,

Welcome to the squirrel grocery store :?

We won't get mad at you as long as you don't get mad at us. :lol: :lol:

I see you are using the currency of the realm (pictures)

As far as annealing aluminum,if you look at sdtrippers2's index(at top of page) you should see a lot of information from this forum. That index will help you answer alot of question and provide more info than you want :lol: :lol:
If it is not there ask away, you will probably get more answers than you can shake a stick at.
Rick

If ducks had scales, would fish quack?
rbeemer
500 Club
 
Posts: 997
Images: 13
Joined: Sun Apr 03, 2005 11:35 pm
Location: Oregon, Tigard
Top

Re: Roof trusses, skinning, interior ceiling, aluminum trim.

Postby asianflava » Mon Jan 29, 2007 7:00 pm

Question 1: (part a) since I have a roof section of about 7’ that is flat, are 2x2’s on 7-10-12-14” centers enough or should I incorporate some steel?


I'd have to warn you about overbuilding. My entire tear is built of 1/8 ply with 1 by (3/4in) framing and foam insulation. The walls, shelves, floor, roof were all built with this "sandwich". I did use 2 layers of 1/8in ply on the exterior of the roof but in retrospect, i think I would have been fine with one layer. I wanted my trailer to come in under 1000lbs. I overshot this goal by about 150lbs.

I wouldn't worry about end grain screwing. The roof to sidewall joint doesn't have to be super strong because the cabinets and bulkhead walls will prevent the box from racking. :thumbsup:

Question 2: exterior siding will be floating aluminum that I understand is the most favorable. Since it’s winter should I trim the aluminum a ¼” shy to give it room to expand or will flush trim be acceptable?


If you are able to, go ahead. I was just happy to get it on without wasting the sheet. :shock: You probably won't have to clearance it all the way around. The bottom should sit on a ledge so that it will not "float" downwards and expose the top edge.

I glued my sheets on with the Henry's 663 carpet adhesive. During our IRG trip, my tear went thru 110 desert heat to the 60's within a week. I didn't have any noticable buckling.

Question 5: Is annealing aluminum hard to do and provide good results or should I purchase the $2 p/foot soft metal trim?


Annealing isn't hard, it is a bit time consuming though. I bought my aluminum trim from the metal supplier. It came in 17ft lengths which meant that I didn't have to piece it together.

Now don’t everyone get mad all at once that a new guy is asking so many questions – I promise to make the finished product at least presentable


Don't sweat it, we all have questions. Anything is fine, as long as you get to use it.

I think I'll have to insert Gage's disclaimer: I'm not saying that this is the right way to do it. I'm just saying that this is how I did it.
User avatar
asianflava
8000 Club
8000 Club
 
Posts: 8412
Images: 45
Joined: Mon Aug 02, 2004 5:11 am
Location: CO, Longmont
Top

Postby Keith B » Mon Jan 29, 2007 7:55 pm

WOW!!! thanks for all the great tips and pointers from everyone. I will admit, I do have overbuilditis being an old home framer - I just hate weekness. I guess I need to thing more about old airplane wings.. thin wood and frabric and they all held up extremely well. I've added many more photos to my gallery - so far so good I hope, the walls came in at about 50#s each without the interior skin on - so I'll "think" about what to do from here on out to build smart, not hard.
************
Keith
"Work and work and do your best! Paint and putty will do the rest!"
User avatar
Keith B
Silver Donating Member
 
Posts: 550
Images: 148
Joined: Mon Jan 29, 2007 3:54 pm
Location: Wichita, KS
Top

Postby dwgriff1 » Mon Jan 29, 2007 9:19 pm

Keith,

I want to echo Asianflava.

Work really hard to keep the weight down. These are pretty small boxes, and they have monstrous strength, and overbuilding is almost automatic.

My 5 by 8 weighs 580. No frame, all wood, fully lined and insulated. If I were doing it again, I might get it down to somewhere near 500, but going much lighter would most likely mean leave out insulation, inside skin, etc.

You decide what you need.

dave
User avatar
dwgriff1
500 Club
 
Posts: 947
Images: 4
Joined: Mon Jul 04, 2005 4:20 pm
Location: SW Idaho
Top

Postby Keith B » Mon Jan 29, 2007 10:08 pm

so what everyone is saying is to not build this out of 2x6's :lol: Well, I was worried, so I went and just weighed the side walls... they came in at 50#'s each without insulation or the 1/8th" interior skin... hope that's not to bad ...
************
Keith
"Work and work and do your best! Paint and putty will do the rest!"
User avatar
Keith B
Silver Donating Member
 
Posts: 550
Images: 148
Joined: Mon Jan 29, 2007 3:54 pm
Location: Wichita, KS
Top

Postby doug hodder » Mon Jan 29, 2007 10:14 pm

Keith, when thinking about weight, think about the options you want installed on your tear...Me, I don't carry a battery, propane, water storage, AC, Microwave, inverter on mine. That sort of stuff adds weight in a hurry. I carry the battery in the pickup and hook it up when I get there. A plastic jug that I can fill up for water and a coleman stove for cooking...A typical deep cycle battery on the front is 44# 5 Gallons of water 42#, I don't carry a spare anymore unless I'm taking a long trip as that is another 42# on the tire size I have...and just for grins, weigh a fully loaded cooler. Mine has come in as heavy as 78# and it's not an extra large one..I have no idea on an AC unit, or microwave or inverter as I don't need them when I camp. I guess the point is to build as light on the structure as possible cuz it all adds up quickly. And then there are the mandatory Dutch Ovens...and ask Dean...they come in a lot of different sizes... 1/8" material for the interior skin and exterior with an aluminum overlay is plenty...you can get by without using hardwoods on the stringers in the ceiling, but I would recommend one at the galley hinge. Also bear in mind that there are lots of ways of building these little toys and others may not agree with my opinions...there is no right or wrong way, just what works for you in your situation..Doug
doug hodder
*Snoop Dougie Doug
 
Posts: 12625
Images: 562
Joined: Tue Dec 14, 2004 11:20 pm
Top

Postby Miriam C. » Mon Jan 29, 2007 10:22 pm

Keith your sides look good. The one thing you might want to address is the door-way. If your door is going to have a mattress in it you will find it easier to keep the beding in if you have some wood across there. How much depends on the depth of your mattress.

Keep up the good work.
“Forgiveness means giving up all hope for a better past.â€
User avatar
Miriam C.
our Aunti M
 
Posts: 19675
Images: 148
Joined: Wed Feb 15, 2006 3:14 pm
Location: Southwest MO
Top

Postby Keith B » Mon Jan 29, 2007 10:24 pm

Hey Doug, thanks for the great advise. For giggles I went and weighed my camp box (the one I take when I tent camp), it came in at about 93#s, including the box, so I'm guessing all the stuff inside (stoves, utinsels, lanterns, etc.) is probably a good 60#.. so your advise is WELL taken. I will put 1/8" on from here on out - thank you.
************
Keith
"Work and work and do your best! Paint and putty will do the rest!"
User avatar
Keith B
Silver Donating Member
 
Posts: 550
Images: 148
Joined: Mon Jan 29, 2007 3:54 pm
Location: Wichita, KS
Top

Postby Keith B » Mon Jan 29, 2007 10:35 pm

Thanks Miriam.... actually, the bedding is in the door only about 12", thus why I went with a 10'TD, 20" in the front is just "floor", so we have a place to take off our shoes, wet swimming suits, etc. However I was going to build a "miniture" bed frame so hopefully that will do the trick.
************
Keith
"Work and work and do your best! Paint and putty will do the rest!"
User avatar
Keith B
Silver Donating Member
 
Posts: 550
Images: 148
Joined: Mon Jan 29, 2007 3:54 pm
Location: Wichita, KS
Top

Postby Keith B » Mon Jan 29, 2007 11:02 pm

DANG!!! TearDrops are ADDICTIVE -all this advise has me thinking what I either want to 1.) start over since I'm minimally invested :thinking: , eliminate or change on this TD or 2.) do differently on my next teardrop :applause:
************
Keith
"Work and work and do your best! Paint and putty will do the rest!"
User avatar
Keith B
Silver Donating Member
 
Posts: 550
Images: 148
Joined: Mon Jan 29, 2007 3:54 pm
Location: Wichita, KS
Top

Postby doug hodder » Mon Jan 29, 2007 11:13 pm

Sorry guy.. :lol: :lol: :lol: ...your problem is you cooked up all sorts of ideas and you haven't even got #1 done, it's not uncommon....I used #1 as a lesson/primer...Git-R-Dun...sell it and then build what you want to keep...if not...then do some modification right now, as the further you go along, the harder it is going to be to make the changes...I recommend many adult beverages....lots of arm waving, sketches, cardboard templates, and day dreaming...then put saw to wood...just do what you want, and don't hold back on the imagination side....when it is all said and done, you are going to be happiest in knowing you built what you wanted, and won't have to go through the "well, ya know what I should have done" syndrome....just my opinion...Doug
doug hodder
*Snoop Dougie Doug
 
Posts: 12625
Images: 562
Joined: Tue Dec 14, 2004 11:20 pm
Top

Postby Keith B » Mon Jan 29, 2007 11:30 pm

You know, you might be right in that... I just cleaned up my shop and entered it into the "contest" on this site, so maybe since I only have $50 in this project I better take a sit back, with MANY ADULT beverages as you say and re-think my design - I could always store these side for later... then again... this is good practice for the REAL deal... you know, I think that's what I'll do. Hind sight is always 20/20 and the best lessons learned are hard ones, so why not build this one, make notes along the way, then when it's time to kick it up a knotch I'll be ready to really put the craftsman side of me into it, all the while saving up some Rose Wood, Walnut, Birdseye Maple. I always have scraft left over and I could make a pretty trick unit... this one will be my lesson. And who knows, if I can win the shop contest the "manual" would be a GREAT help.
************
Keith
"Work and work and do your best! Paint and putty will do the rest!"
User avatar
Keith B
Silver Donating Member
 
Posts: 550
Images: 148
Joined: Mon Jan 29, 2007 3:54 pm
Location: Wichita, KS
Top

Next

Return to Teardrop Construction Tips & Techniques

Who is online

Users browsing this forum: No registered users and 5 guests