Stars Over the Arctic Skies Shop - Again Photos 4 U

Anything to do with mechanical, construction etc

Postby Classic Finn » Mon Mar 26, 2007 6:35 pm

toypusher wrote:That's sure a great feeling to get something done, isn't it?? :thumbsup:


It sure is Kerry... It feels mighty fine that the snow is gone for good I hope... The stars are keeping me going... as you know that be my ceiling here in the Arctic Skies...

Im pushin this everyday as much as I can now....I got to get to this place in May...I think you folks would enjoy this scenery its a National Park
More bautiful than I can describe... Great Fishing too... Nice sandy beaches...

Image The rock there that you see ... it has a nice spot to camp right behind it overlooking the lake... ;)

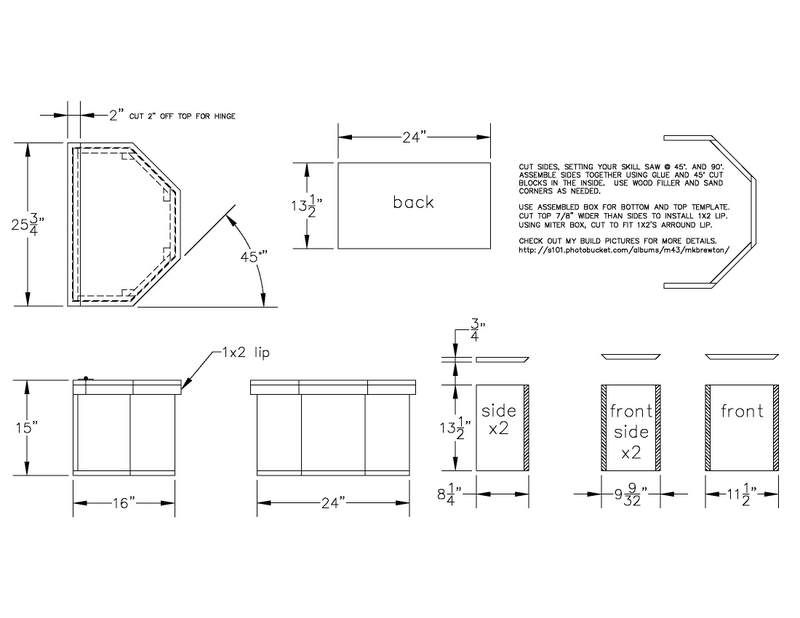
Question for you Kerry or anyone else... How do I know the exact staple to use on this birch till it dries... Im adding another layer of ply onto it...
then the outer skin...

Classic Finn ;)
Last edited by Classic Finn on Mon Mar 26, 2007 6:47 pm, edited 4 times in total.
Royal Teardrop Society Scandinavian Bureau Chief of Staff

Image
User avatar
Classic Finn
Midnight Sun Voyager
 
Posts: 17488
Images: 146
Joined: Fri Apr 29, 2005 4:29 am
Location: Country of Finland

Postby toypusher » Mon Mar 26, 2007 6:40 pm

I have no idea on the staple size. Maybe Steve Frederick or Doug could tell you that. I used lots of 18ga 5/8" brads from my air nailer, but mine was then all covered with aluminum on the outside and I only used brads where the trim would cover on the interior.
User avatar
toypusher
Site Admin
 
Posts: 43040
Images: 324
Joined: Fri Jan 28, 2005 12:21 pm
Location: York, PA Area

Postby Classic Finn » Mon Mar 26, 2007 6:44 pm

toypusher wrote:I have no idea on the staple size. Maybe Steve Frederick or Doug could tell you that. I used lots of 18ga 5/8" brads from my air nailer, but mine was then all covered with aluminum on the outside and I only used brads where the trim would cover on the interior.


Mine will be Aluminum on top also.. or thin Stainless...I just need the epoxy to hold the next layer of ply till it dries...


Classic Finn ;)
Royal Teardrop Society Scandinavian Bureau Chief of Staff

Image
User avatar
Classic Finn
Midnight Sun Voyager
 
Posts: 17488
Images: 146
Joined: Fri Apr 29, 2005 4:29 am
Location: Country of Finland
Top

Postby rbeemer » Mon Mar 26, 2007 6:45 pm

Heikki,
If you have one skin stapled, nailed or screwed on and you are adding another layer. Couln't you use constuction adhesive or other glue to hold it on? If this is the insde of your hatch, your could glue one half at a time and use wights to hold it down, let it dry and then glue the other half.

Does this make since or am I smoking some very interesting tobacky
Rick

If ducks had scales, would fish quack?
rbeemer
500 Club
 
Posts: 997
Images: 13
Joined: Sun Apr 03, 2005 11:35 pm
Location: Oregon, Tigard
Top

Postby Classic Finn » Mon Mar 26, 2007 6:49 pm

rbeemer wrote:Heikki,
If you have one skin stapled, nailed or screwed on and you are adding another layer. Couln't you use constuction adhesive or other glue to hold it on? If this is the insde of your hatch, your could glue one half at a time and use wights to hold it down, let it dry and then glue the other half.

Does this make since or am I smoking some very interesting tobacky


Yupper you be making sense... I thought it would help much more if I staple it down while its drying... then I can add the next layer...

Heikki ;)
Royal Teardrop Society Scandinavian Bureau Chief of Staff

Image
User avatar
Classic Finn
Midnight Sun Voyager
 
Posts: 17488
Images: 146
Joined: Fri Apr 29, 2005 4:29 am
Location: Country of Finland
Top

Postby toypusher » Mon Mar 26, 2007 6:50 pm

Classic Finn wrote:
toypusher wrote:I have no idea on the staple size. Maybe Steve Frederick or Doug could tell you that. I used lots of 18ga 5/8" brads from my air nailer, but mine was then all covered with aluminum on the outside and I only used brads where the trim would cover on the interior.


Mine will be Aluminum on top also.. or thin Stainless...I just need the epoxy to hold the next layer of ply till it dries...


Classic Finn ;)


Also, if the first is completely dry and affixed well, you could just use clamps to hold the second to the first. Use some crosspieces of 2x? or the like and clamp at each side. Use how ever many you need to keep it tight against the first layer.
User avatar
toypusher
Site Admin
 
Posts: 43040
Images: 324
Joined: Fri Jan 28, 2005 12:21 pm
Location: York, PA Area
Top

Postby Classic Finn » Tue Mar 27, 2007 3:24 pm

Anyone here have a good pic of the front towbox was it by Mary K?

Or who else made a real classy looking one?

I have sides drawn at 13 deep. 22 1/2 high.. 45 1/2 inches wide.. Whats the best way to put it together... 11 degree radius. and 1" straight on top end.


Classic Finn :thinking:
Royal Teardrop Society Scandinavian Bureau Chief of Staff

Image
User avatar
Classic Finn
Midnight Sun Voyager
 
Posts: 17488
Images: 146
Joined: Fri Apr 29, 2005 4:29 am
Location: Country of Finland
Top

Postby Mary K » Tue Mar 27, 2007 5:41 pm

Classic Finn wrote:Anyone here have a good pic of the front towbox was it by Mary K?

Or who else made a real classy looking one?

I have sides drawn at 13 deep. 22 1/2 high.. 45 1/2 inches wide.. Whats the best way to put it together... 11 degree radius. and 1" straight on top end.


Classic Finn :thinking:


Here is mine.....
Image

And here is the drawing
Image

I can send you the file if you need it.

Mk
Mary K

I don't know half of you half as well as I should like; and I like less than half of you half as well as you deserve. Bilbo Baggins
User avatar
Mary K
6000 Club
6000 Club
 
Posts: 6425
Images: 44
Joined: Wed Aug 02, 2006 3:07 pm
Location: Florida, Pensacola
Top

Postby Classic Finn » Thu Mar 29, 2007 1:37 pm

Ok after all the planning and questions I went out and made a quick template on the towbox...

What do you think? Does it look ok or should it be higher yet?

Image

Image

Image


Classic Finn
Last edited by Classic Finn on Thu Mar 29, 2007 1:59 pm, edited 2 times in total.
Royal Teardrop Society Scandinavian Bureau Chief of Staff

Image
User avatar
Classic Finn
Midnight Sun Voyager
 
Posts: 17488
Images: 146
Joined: Fri Apr 29, 2005 4:29 am
Location: Country of Finland
Top

Postby rbeemer » Thu Mar 29, 2007 1:53 pm

I would not go any higher , IMHO it looks great for how tall it is. One thing you might want to do is for the side pieces make the edge closest to the trailer follow your trailer curve(at the bottom) so it looks like an original piece and not ad add on. Tha way also you would not have to have a back piece, you trailer would become your boxes back. 8)
Rick

If ducks had scales, would fish quack?
rbeemer
500 Club
 
Posts: 997
Images: 13
Joined: Sun Apr 03, 2005 11:35 pm
Location: Oregon, Tigard
Top

Postby Classic Finn » Thu Mar 29, 2007 1:56 pm

rbeemer wrote:I would not go any higher , IMHO it looks great for how tall it is. One thing you might want to do is for the side pieces make the edge closest to the trailer follow your trailer curve(at the bottom) so it looks like an original piece and not ad add on. Tha way also you would not have to have a back piece, you trailer would become your boxes back. 8)


Hi Rick

Wife and I were just talking about the back there that looks like garb aage... in the back lower section..Im going to re cut the bottom there. :thumbsup: :thumbsup:

Height is at 25 inches ... at present..and width at 45 inches..

Classic Finn :thumbsup:
Last edited by Classic Finn on Thu Mar 29, 2007 4:48 pm, edited 1 time in total.
Royal Teardrop Society Scandinavian Bureau Chief of Staff

Image
User avatar
Classic Finn
Midnight Sun Voyager
 
Posts: 17488
Images: 146
Joined: Fri Apr 29, 2005 4:29 am
Location: Country of Finland
Top

Postby Mary K » Thu Mar 29, 2007 4:33 pm

Ah, Thats a better Box!!! I wanted to do one like that...but couldn't figure out how to do it...

Looking good, Yes I would fix that back part...

Mk
Mary K

I don't know half of you half as well as I should like; and I like less than half of you half as well as you deserve. Bilbo Baggins
User avatar
Mary K
6000 Club
6000 Club
 
Posts: 6425
Images: 44
Joined: Wed Aug 02, 2006 3:07 pm
Location: Florida, Pensacola
Top

Postby Classic Finn » Thu Mar 29, 2007 4:47 pm

Mary K wrote:Ah, Thats a better Box!!! I wanted to do one like that...but couldn't figure out how to do it...

Looking good, Yes I would fix that back part...

Mk


Im here drawing the template again to make the curve for the lower portion... lets see then how it fits... :scratchthinking:

So does that radius seem ok looking versus the top front?

Classic Finn :)
Royal Teardrop Society Scandinavian Bureau Chief of Staff

Image
User avatar
Classic Finn
Midnight Sun Voyager
 
Posts: 17488
Images: 146
Joined: Fri Apr 29, 2005 4:29 am
Location: Country of Finland
Top

Postby rbeemer » Thu Mar 29, 2007 5:13 pm

I think the top radius of your box closley matches the top radiys of your tear.

I like it and give it two turkey legs up :lol: :lol:
Rick

If ducks had scales, would fish quack?
rbeemer
500 Club
 
Posts: 997
Images: 13
Joined: Sun Apr 03, 2005 11:35 pm
Location: Oregon, Tigard
Top

Postby Classic Finn » Thu Mar 29, 2007 5:42 pm

rbeemer wrote:I think the top radius of your box closley matches the top radiys of your tear.

I like it and give it two turkey legs up :lol: :lol:


:rofl: :rofl: :hammerhead: 
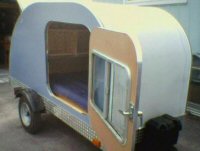
Almost have the bottom redone.. :?

Classic Finn ;)
Royal Teardrop Society Scandinavian Bureau Chief of Staff

Image
User avatar
Classic Finn
Midnight Sun Voyager
 
Posts: 17488
Images: 146
Joined: Fri Apr 29, 2005 4:29 am
Location: Country of Finland
Top

PreviousNext

Return to Teardrop Construction Tips & Techniques

Who is online

Users browsing this forum: No registered users and 3 guests