building light on 10x6x5 old popup chassis

Anything to do with mechanical, construction etc

Postby mrrwt » Mon Apr 30, 2007 12:14 pm

I had a very productive weekend I think. The walls are slowing me down a bit because I am having to think about where everything goes but, they are moving along. What do you think about the profile? the side wall is 10ft long and 5 ft high from the top of the deck.

I am still trying to decide how I want to do the sidewall framing, i will use 3/4 pine as the material, but should i stop it 1 1/2" from the top of outside ply to allow for the spars to sit on top of the wall frame? or should I frame up to the top and have the spares between the frame on each side? i have seen several different ways of doing this. any help would be appreciated.

Here are some pics of what i got accomplished this weekend.

Image

I got the floor put on.

Image

After building the floor I removed the bolts and flipped the whole thing over to put the tar on.

Image

I cut out my sidewall profile and started laying out where everything will go.

Image

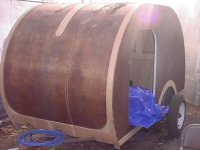
Here is a dry fit of the sidewall profile to see what it will look like, I am so excited.

Image

Here is another pic of the dry fit sidewall, I am only 5'2 and I will still crouch in my 5' tear, but it will be huge for me compared to a normal tear.

Image

Here is a pic of my wife Briana having fun working on the tear with me.

Image

Here is a pic of me in my work clothes, Hat for the sun, Safety glasses with tint, and an old t-shirt. This is what I usually look like on the weekends.

Please let me know what you think and any tips or suggestions are greatly appreciated.

Randy
User avatar
mrrwt
Teardrop Inspector
 
Posts: 9
Images: 19
Joined: Mon Apr 16, 2007 9:49 pm
Location: Kansas City, MO

Postby reiltear » Mon Apr 30, 2007 1:28 pm

You don't mess around! Great progress!

Framing - I'm planning on stopping it 1-5/8" below to allow for 1/8" inside skin and still have full 1-1/2" for insulation and ribs/spars. Many people on this forum talk about framing/insulating/skinning/painting walls while flat and horizontal, which implies that one has to know where lights, switches etc. have to be. Wired in, not installed yet, of course.

The next steps for me would be:

Stand/install walls

Bend/install interior ceiling skins

Install spars

Wire/insulate

Bend/install exterior skins

Before you cut out your final profile you need to have your hatch planned out and accomodated into the "final cut". I don't remember if anybody mentioned this yet, at the top of the page there is a link to "Generic Benroy Plans". They are absolutely free and extremely helpful.

Thanks for the pics

Ilya
User avatar
reiltear
Teardrop Master
 
Posts: 222
Images: 18
Joined: Wed Nov 22, 2006 1:11 am
Location: San Juan Capistrano, CA

Postby Miriam C. » Mon Apr 30, 2007 2:51 pm

Randy, If you Haven't already, you might check out Steve F's build and go to his www also. He has a wonderful way to do the hatch. You want to have that marked and cut before you separated the sides forever. It is easier to do with them together.
http://tnttt.com/viewtopic.php?t=12886 Follow the link.

;) Ilya is doing his roof the way I did mine and the way Steve did one of his. I got the idea from one of his builds. It is just easier to get the ceiling, spars and roof this way.

Image

all is supported by the wall framing which was planned to be smaller.
Image
“Forgiveness means giving up all hope for a better past.â€
User avatar
Miriam C.
our Aunti M
 
Posts: 19675
Images: 148
Joined: Wed Feb 15, 2006 3:14 pm
Location: Southwest MO
Top

Previous

Return to Teardrop Construction Tips & Techniques

Who is online

Users browsing this forum: No registered users and 5 guests