If you leave now you can make it here in time for the spring fling. I want a tour of your Puffin. All these tears and TTT's on this site are not real till you can physically touch them. If you can't make it I under stand.

Teardrops n Tiny Travel Trailersor t n ttt for short (tnttt.com) |
![]() by NightCap » Tue May 22, 2007 11:25 am
by NightCap » Tue May 22, 2007 11:25 am

![]() by steve wolverton » Tue May 22, 2007 4:36 pm
by steve wolverton » Tue May 22, 2007 4:36 pm
NightCap wrote:If you leave now you can make it here in time for the spring fling.

![]() by NightCap » Tue May 22, 2007 5:00 pm
by NightCap » Tue May 22, 2007 5:00 pm
![]() by Hudsonite » Thu May 24, 2007 12:11 pm
by Hudsonite » Thu May 24, 2007 12:11 pm
![]() by steve wolverton » Fri May 25, 2007 12:17 am
by steve wolverton » Fri May 25, 2007 12:17 am
Hudsonite wrote:First, where did you get your hardware for the camper door? What hinge did you use, and where did you get the silver material around the door edges? Second, what hardware did you use to make your new table that attaches to the side?
![]() by Hudsonite » Fri May 25, 2007 4:52 am
by Hudsonite » Fri May 25, 2007 4:52 am
![]() by steve wolverton » Mon May 28, 2007 11:48 pm
by steve wolverton » Mon May 28, 2007 11:48 pm
 "Yup, vintage December 2006."


![]() by NightCap » Tue May 29, 2007 1:57 pm
by NightCap » Tue May 29, 2007 1:57 pm
steve wolverton wrote:
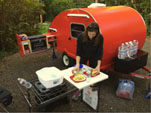
Very simple addition, but I think it really adds to it.
![]() by steve wolverton » Tue May 29, 2007 2:32 pm
by steve wolverton » Tue May 29, 2007 2:32 pm
NightCap wrote:It could be hard to undo unless red is easy to cover with white.


![]() by NightCap » Tue May 29, 2007 3:45 pm
by NightCap » Tue May 29, 2007 3:45 pm
![]() by steve wolverton » Tue May 29, 2007 3:50 pm
by steve wolverton » Tue May 29, 2007 3:50 pm
NightCap wrote:Ok, I'm on board then. Can you get the red on the wheel as well?

![]() by SaGR » Tue May 29, 2007 6:47 pm
by SaGR » Tue May 29, 2007 6:47 pm
steve wolverton wrote:For the inside, I'm going to use epoxy/wood flour, which is almost impossible to sand. It makes a very strong joint. All the inside corners will be glued using the epoxy fillet method. Instead of a screw every 6" or so holding the camper together, the camper will basically be welded solid using epoxy.

![]() by steve wolverton » Tue May 29, 2007 8:00 pm
by steve wolverton » Tue May 29, 2007 8:00 pm
SaGR wrote:I've built several boats over the years all using S&G construction so was wondering if it would apply to this.
![]() by Zorkman » Tue May 29, 2007 9:38 pm
by Zorkman » Tue May 29, 2007 9:38 pm

![]() by packerz4 » Tue May 29, 2007 9:50 pm
by packerz4 » Tue May 29, 2007 9:50 pm

Return to Teardrop Construction Tips & Techniques
Users browsing this forum: Google [Bot] and 6 guests
