Teardrops n Tiny Travel Trailersor t n ttt for short (tnttt.com) |
(The Puffin) New Tiny Trailer


-

steve wolverton - 1000 Club

- Posts: 1676
- Images: 11
- Joined: Sun Nov 07, 2004 9:39 pm
- Location: Brazoria, TX
Teardrops n Tiny Travel Trailersor t n ttt for short (tnttt.com) |
![]() by NightCap » Mon Jun 11, 2007 11:25 am
by NightCap » Mon Jun 11, 2007 11:25 am
 Your trailer is now a luxury model.
![]() by Mary K » Mon Jun 11, 2007 1:05 pm
by Mary K » Mon Jun 11, 2007 1:05 pm
steve wolverton wrote:Three mirrors on the ceiling.


![]() by steve wolverton » Mon Jun 11, 2007 1:48 pm
by steve wolverton » Mon Jun 11, 2007 1:48 pm
![]() by steve wolverton » Mon Jun 11, 2007 11:15 pm
by steve wolverton » Mon Jun 11, 2007 11:15 pm


![]() by steve wolverton » Mon Jun 11, 2007 11:53 pm
by steve wolverton » Mon Jun 11, 2007 11:53 pm

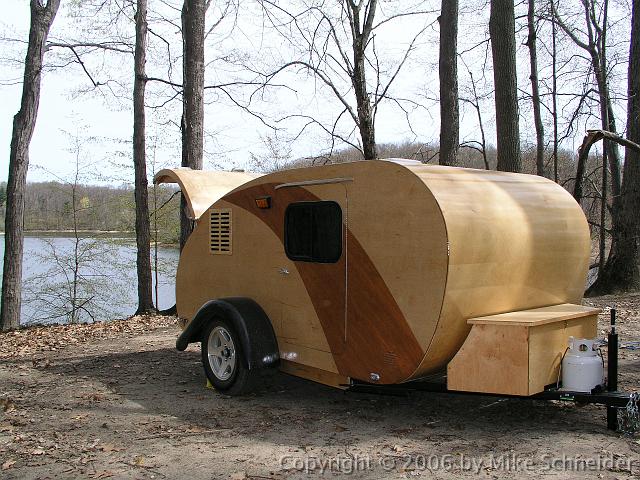
 I'm sanding the top sides smooth this time. The swoosh thing on the line on the front is offset to the far left (port) side of the camper. The swoosh thing on the back will be offset to the right of the camper. I think it breaks it up and makes it more interesting.
![]() by Novanut » Tue Jun 12, 2007 12:02 am
by Novanut » Tue Jun 12, 2007 12:02 am
![]() by steve wolverton » Tue Jun 12, 2007 12:11 am
by steve wolverton » Tue Jun 12, 2007 12:11 am
Novanut wrote:Steve, i noticed that you now have wheelwell cutouts. Is this for function or for looks? Thanks, Jay
![]() by Kankujoe » Tue Jun 12, 2007 12:56 am
by Kankujoe » Tue Jun 12, 2007 12:56 am
steve wolverton wrote:I'm now turning my attention back to the outside of the camper. I got all of my stripe up except on the very back of the camper. I have a few screws holding it on until the epoxy sets, and then I'll remove the screws and fill in the holes.
What a big dusty mess out there.
Fill, sand, fill, sand...


![]() by steve wolverton » Tue Jun 12, 2007 1:24 am
by steve wolverton » Tue Jun 12, 2007 1:24 am
Kankujoe wrote:Have you considered making it more like the typical "EKG heart beat - blip?" You could then rename your TT "the Heart Break Hotel."


![]() by steve wolverton » Tue Jun 12, 2007 1:13 pm
by steve wolverton » Tue Jun 12, 2007 1:13 pm


![]() by Steve Frederick » Tue Jun 12, 2007 1:45 pm
by Steve Frederick » Tue Jun 12, 2007 1:45 pm


![]() by steve wolverton » Tue Jun 12, 2007 1:56 pm
by steve wolverton » Tue Jun 12, 2007 1:56 pm
Steve Frederick wrote:I just got caught up on the remodel! Nice job Steve! I like the settee!
This is one llllllloooooonnnnngggg thread!! I wonder if it's a record??
![]() by steve wolverton » Tue Jun 12, 2007 2:51 pm
by steve wolverton » Tue Jun 12, 2007 2:51 pm

Return to Teardrop Construction Tips & Techniques
Users browsing this forum: No registered users and 2 guests
