Mounting a window in 3/4 plywood

Anything to do with mechanical, construction etc

Mounting a window in 3/4 plywood

Postby Caradoc » Tue Jun 19, 2007 4:17 pm

I've recently got a couple of Grant's wonderful little windows for my teardrop that's eternally under construction.
Image

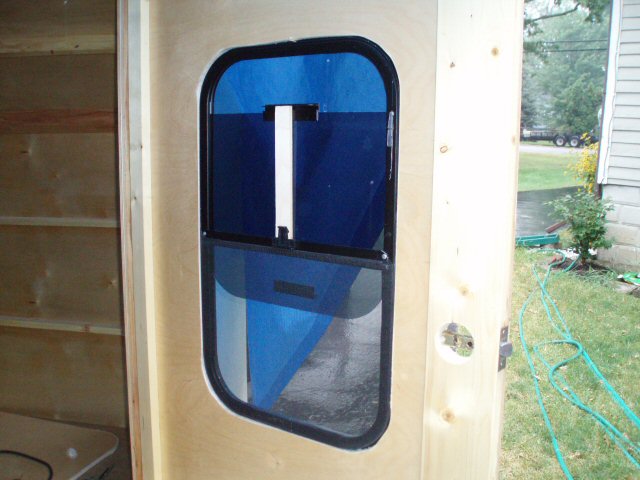
I'm want to put them in the doors of my trailer, and these doors are made from 3/4 plywood (no sandwiching).

However, I can't figure out how I'd mount these once I cut the hole out. It came with a bit of trim, but the trim seems to work for a wall about 1 1/2" wide. Does anybody have any pictures of how it's done?

Thanks,

Lance
User avatar
Caradoc
Teardrop Advisor
 
Posts: 69
Images: 6
Joined: Wed Aug 16, 2006 3:45 pm
Location: Reno, NV

Postby Classic Finn » Tue Jun 19, 2007 4:28 pm

Greetings Lance

Ive got similar kind of windows. I cut the hole to the inside measurement of the window.. Then Used a sealant for windows by Sikaflex.

And mine has a metal frame that screws into the inner window itself...however Im thinking of making the inner frame out of wood.

Here is a pic of my door..

Image

Image
I ordered mine from Camp Inn.

Im sure someone else will reply as to how they did it but this is my way of installing it..Im not sure if I helped any ... :thinking:

Classic Finn ;)
Royal Teardrop Society Scandinavian Bureau Chief of Staff

Image
User avatar
Classic Finn
Midnight Sun Voyager
 
Posts: 17488
Images: 146
Joined: Fri Apr 29, 2005 4:29 am
Location: Country of Finland

Postby chief5 » Tue Jun 19, 2007 7:01 pm

what about adding a 3/4 oak frame around the window opening on the inside (or outside if you choose)? That way you have a 1.5" thickness to install the window into.

Good Luck, Lorn
chief5
Teardrop Builder
 
Posts: 39
Images: 2
Joined: Wed Jul 20, 2005 10:45 pm
Top

Postby mikeschn » Tue Jun 19, 2007 7:11 pm

I stuck my windows, which are the same as yours, into my Escape Hatch doors, which are only 1/2" thick. I didn't use a trim ring. I was going to make a trim ring out of plywood, but since I am going to dismantle the Escape Hatch for parts, that won't happen.

Here's an inside picture...

Image

Mike...
The quality is remembered long after the price is forgotten, so build your teardrop with the best materials...
User avatar
mikeschn
Site Admin
 
Posts: 19202
Images: 475
Joined: Tue Apr 13, 2004 11:01 am
Location: MI
Top

Postby madjack » Tue Jun 19, 2007 7:18 pm

Lance, we didn't like the inside clamp ring so we ditched it...drilled some holes in the outside flange, added sealant and screwed it in place w SS screws...then painted the screw heads black...we cut a grove in the window openning and used some plastic T molding to finish it out...
madjack 8)
...I have come to believe that, conflict resolution, through violence, is never acceptable.....................mj
User avatar
madjack
Site Admin
 
Posts: 15128
Images: 177
Joined: Thu Dec 02, 2004 5:27 pm
Location: Central Louisiana
Top

Postby Darren » Tue Jun 19, 2007 7:51 pm

My window cutout was pretty rough so I installed mine like chief5 suggusted. Not all of the screws hit solid wood and some were in the edge of the window frame. I think it's more than strong enough.

Image

EDIT:

The trim ring was way to deep for the 3/4 door depth so heres how I trimmed them down. Still havent decided if I'm going to use them or just make another wood ring to go around it on the inside.

Image
Image
User avatar
Darren
the camper formerly known as Victor Star
 
Posts: 1356
Images: 161
Joined: Sat Dec 03, 2005 12:09 am
Location: Shawnee, Kansas (KC)
Top

Postby grant whipp » Wed Jun 20, 2007 1:47 am

Hey there, Lance!

Lorn's got the right idea, here ...

chief5 wrote:what about adding a 3/4 oak frame around the window opening on the inside ...? That way you have a 1.5" thickness to install the window into ...


But, I've got the clamp-rings for 3/4" walls ... if I'd have known that's what you wanted ... :oops: ... :oops:

Let me know if I can help ... I've got pictures, too!

CHEERS!

Grant
Celebrating Retirement after over 32 Years of Building, Promoting, Supporting, Supplying, Living the Lifestyle, and Loving Teardrop Trailers!
"Life Moves a Little Slower When You're On Teardrop Time"
The nature of Life, itself, is change ... "Those who matter, don't mind, and those who mind, don't matter."
Image
User avatar
grant whipp
Teardrop Manufacturer
 
Posts: 1815
Images: 117
Joined: Sun Jan 16, 2005 2:00 pm
Location: Jefferson State ('tween CA & OR!)
Top

Postby GPW » Wed Jun 20, 2007 7:07 am

We did exactly as Mad Jack did (He suggested it)and cut out the hole as neatly as we could, sanded nicely on the ply edges, then mounted the window with exterior drilled holes and sealant .... with the curtains up, you can't see the edges anyway and looks fine ...unless you're really "anal" about trim ... :roll:
There’s no place like Foam !
User avatar
GPW
Gold Donating Member
 
Posts: 14920
Images: 546
Joined: Thu Feb 09, 2006 7:58 pm
Location: New Orleans
Top

Postby Caradoc » Wed Jun 20, 2007 11:22 pm

Grant Whipp wrote:But, I've got the clamp-rings for 3/4" walls ... if I'd have known that's what you wanted ...

Let me know if I can help ... I've got pictures, too!


Thank you Grant, you've been more than helpful with your products, and I'll probably order some more trim soon.

I happened to have this forum opened when I thought I'd post the question, and I thought it'd make an interesting forum question, since I hadn't seen this discussed yet.

Thank you everybody for your pointers so far. Now I've got to go and cut some holes in my doors without screwing everything else up.

8)
--Lance
User avatar
Caradoc
Teardrop Advisor
 
Posts: 69
Images: 6
Joined: Wed Aug 16, 2006 3:45 pm
Location: Reno, NV
Top


Return to Teardrop Construction Tips & Techniques

Who is online

Users browsing this forum: No registered users and 8 guests