OH NO!!! MY HATCH!!!

Anything to do with mechanical, construction etc

OH NO!!! MY HATCH!!!

Postby Nic » Fri Jul 06, 2007 9:48 pm

It makes me sick to think of it. I just wanna cry! My poor hatch!

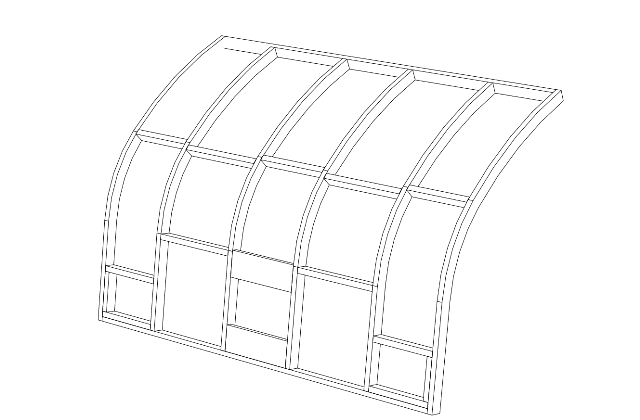
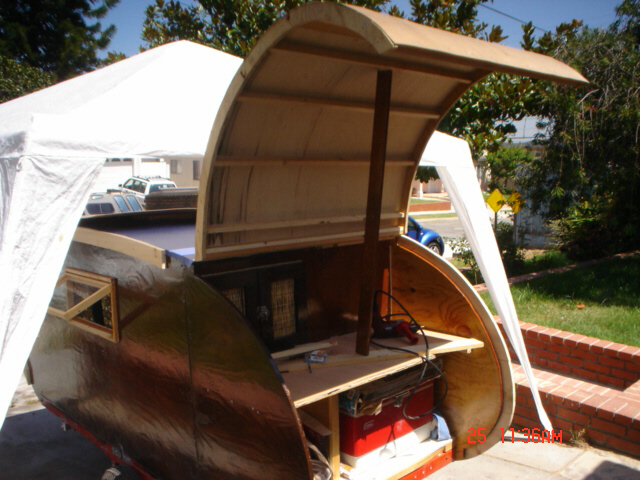
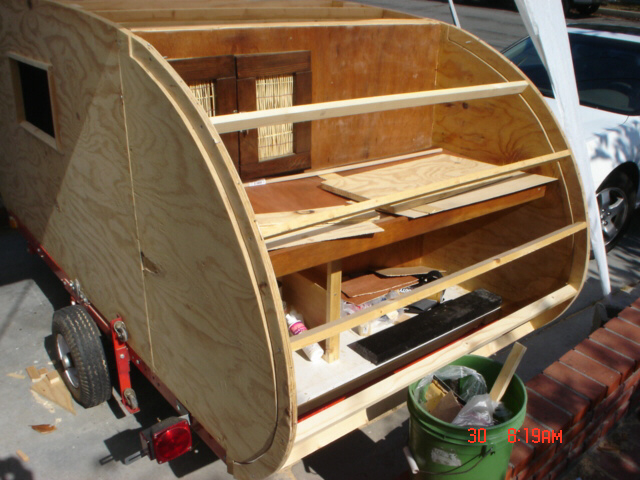
I have been holding off on getting all the trim done on my camper because im having a hatch problem. It looks like i need to do a rebuild. ;o( My hatch has a lot of flex right now. Long story short.. i have a crack in the left side frame, and two horizontal cracks on the skin. Due to the shape and size i need to come up with a way to keep the new hatch from having so much flex. Here are the best pix i have of my hatch. Old pix but you get the idea of how its built. Any ideas?

Image
Image
Image
Last edited by Nic on Sat Jul 07, 2007 5:54 pm, edited 1 time in total.
Im not lazy. I just hang out a lot.
User avatar
Nic
500 Club
 
Posts: 679
Images: 169
Joined: Fri Jun 30, 2006 7:29 am
Location: Los Angeles, California

Postby Boodro » Fri Jul 06, 2007 9:56 pm

Nic , I had kinda the same on my TD. I am just finishing up my hatch rebuild. My hatch was almost 5 ft long & was pretty heavy. The hinge area leaked too. What I did to make it lighter , When I rebuilt it I cut about 12 to 18 inches from the bottom of the hatch , them put a hinge on the bottom section & the floor , then put latches on it. The upper hatch is much lighter & easier to open. So now I have an upper & lower hatch. Sems to work well so far . I will know more this weekend as I will be camping then. I will post some pics soon. Good luck!
We are all travelers in this world , from the sweet grass to the packin house , birth till death , we travel between the eternities . ( Robert Duvall as Prentiss Ritter)
User avatar
Boodro
1000 Club
1000 Club
 
Posts: 1052
Images: 101
Joined: Sun Oct 10, 2004 9:35 pm
Location: Sylvania, Ohio

Postby Podunkfla » Fri Jul 06, 2007 10:19 pm

Nic... Yeah, you could make a new hatch and build it stronger; but that one looks fixable to me. About a quart of epoxy and some fiberglass or use some fumed silica or milled fiber filler in the epoxy... making some fillets in all the joints will make for some very strong joints. Then skin the inside, gluing it to the spars with PL urethane... And, add a new skin on top of the outside the same way.

I'm sure others will chime in with good ideas too, but that's about how I would do it. Good luck with your project... Nice lookin tear. :thumbsup:

http://www.raka.com/Fillers.html
<B>~ Brick
<I>... I've done so much with so little for so long... Now I can do almost anything with nothing! </I></B>
Image...Lots more pix here!
User avatar
Podunkfla
ol' noodle haid
 
Posts: 2261
Images: 5
Joined: Fri Aug 04, 2006 9:25 pm
Location: North Florida near the Suwannee River
Top

Postby asianflava » Sat Jul 07, 2007 2:26 am

I don't have a skin on the inside I have a lot of flex in my hatch too. I think an interior skin would fix a lot of it.
User avatar
asianflava
8000 Club
8000 Club
 
Posts: 8412
Images: 45
Joined: Mon Aug 02, 2004 5:11 am
Location: CO, Longmont
Top

Postby toypusher » Sat Jul 07, 2007 6:18 am

I think that an interior skin(and rigid insulation) would help alot, but I also think that you should use some vertical bracing between the horizontal ribs that you have.

If you decide to rebuild, try using verticle ribs for all the main and putting some horizontal bracing between them. Also use an interior skin.
User avatar
toypusher
Site Admin
 
Posts: 43040
Images: 324
Joined: Fri Jan 28, 2005 12:21 pm
Location: York, PA Area
Top

Postby mikeschn » Sat Jul 07, 2007 6:29 am

Something like this would work...

Image

Mike...
The quality is remembered long after the price is forgotten, so build your teardrop with the best materials...
User avatar
mikeschn
Site Admin
 
Posts: 19202
Images: 475
Joined: Tue Apr 13, 2004 11:01 am
Location: MI
Top

Postby SteveH » Sat Jul 07, 2007 7:53 am

mikeschn wrote:Something like this would work...

Image

Mike...


That's the way I built mine. I have no skin on the inside, and it's plenty ridgid.
SteveH
Calling an illegal alien an "undocumented immigrant"is like calling a drug dealer an "unlicensed pharmacist ".
User avatar
SteveH
2000 Club
2000 Club
 
Posts: 2101
Images: 42
Joined: Mon Nov 01, 2004 8:28 am
Location: Bexar Co, TX
Top

Postby SaGR » Sat Jul 07, 2007 8:41 am

Mike's framing plan would result in a much stronger hatch.


That's the way we'll be building ours. Of course the plans call for it to be built that way, but I'd initially thought of the side to side framing in order to fit some storage pockets in. But when I played with it and mocked it up in cardboard it was very weak.
Building a small bowtop Vardo
Build thread: http://tinyurl.com/yk4hnmd

Generic Benroy: Sold to FIL/MIL
User avatar
SaGR
The 300 Club
 
Posts: 487
Images: 21
Joined: Fri May 25, 2007 9:29 am
Location: Illinois, Lisle
Top

Postby doug hodder » Sat Jul 07, 2007 9:19 am

Nic...you might try just putting in some gussets at all the ends of the hatch stringers before you start all over. I think that would add a lot of stiffness to the whole thing and help prevent it from racking. The longer the gusset, the more strength will be picked up...and an interior skin of 1/8" using the glue of your choice wouldn't add that much weight to it. Just an idea...Doug

Image
doug hodder
*Snoop Dougie Doug
 
Posts: 12625
Images: 562
Joined: Tue Dec 14, 2004 11:20 pm
Top

Postby SteveH » Sat Jul 07, 2007 10:34 am

The main problem as I see it with omitting the vertical frames and just using horizontal spars is the spring-back problem....it's the vertical frames that prevent spring-back.
SteveH
Calling an illegal alien an "undocumented immigrant"is like calling a drug dealer an "unlicensed pharmacist ".
User avatar
SteveH
2000 Club
2000 Club
 
Posts: 2101
Images: 42
Joined: Mon Nov 01, 2004 8:28 am
Location: Bexar Co, TX
Top

Postby Miriam C. » Sat Jul 07, 2007 10:45 am

Morning Nic,
Perhaps the cracks and splits are more a result of the hatch not being secured well. Yes you should fix it but your support poles need to be held in one place. Something that keeps it steady. Hinges or bolts...

You can always skin over the top and sister side ribs on the ends. Then add some bracing like Mike has pictured. Glue and/or pocket screws will do it.

Image
“Forgiveness means giving up all hope for a better past.â€
User avatar
Miriam C.
our Aunti M
 
Posts: 19675
Images: 148
Joined: Wed Feb 15, 2006 3:14 pm
Location: Southwest MO
Top

Postby Alphacarina » Sat Jul 07, 2007 12:21 pm

I agree that you're really asking a lot of the only 2 vertical framing members you have

I would think 3 would be an absolute minimum for a hatch with not much curve to it - As much as you have, I would use a minimum of 4 but more preferably 5 if you really want it to last

Don
User avatar
Alphacarina
500 Club
 
Posts: 826
Images: 4
Joined: Tue Jun 19, 2007 3:26 pm
Location: Ocean Springs MS
Top

Postby Nic » Sat Jul 07, 2007 12:36 pm

SEE i knew you guys would come up with some good ideas for me!! lol When i built the hatch i had help from a guy i kinda look up to when it comes to wood working. BUT... i think he thought he was the stuff because he rushed getting the skin nailed on. THe skin didnt have much time to bend and it cracked. So i put another skin on it to cover the crack and now the new cracks are in the same spot. So its heavy as it is i dont want three skins on the outside. I had plans to skin the inside of the hatch but i was having problems with the hatch so i held off. Speaking of having an upper and lower hatch! I was thinking maybe i could do that but split the bottom hatch into two sides and make each side be the face of slide out storage for food and my ice chest. I LOVE having my hatch up over my head though because i want to add some cool lights one day. So i dunno. The crack that i have on the frame is right at a screw hole. I thought about a brace on the inside of some kind. All this thinking of things to add to my hatch makes me think i should just build a new one. Anyone wanna build it for me!? HAHAHA! :? I think im going to take my time looking at all of the good ideas and end up with one great hatch one way or another! Wish me luck!
Im not lazy. I just hang out a lot.
User avatar
Nic
500 Club
 
Posts: 679
Images: 169
Joined: Fri Jun 30, 2006 7:29 am
Location: Los Angeles, California
Top

Postby toypusher » Sat Jul 07, 2007 3:18 pm

Nic wrote:.......... Anyone wanna build it for me!? HAHAHA! :? .........


Just send a ticket and give me a couple weeks to arrange vacation!!! :lol: :lol:
User avatar
toypusher
Site Admin
 
Posts: 43040
Images: 324
Joined: Fri Jan 28, 2005 12:21 pm
Location: York, PA Area
Top

Postby Ira » Sat Jul 07, 2007 3:24 pm

If there are horizontal cracks in the skin, that doesn't mean it has anything to with the ribs and springback:

Unless they're REVERSE cracks.

My guess is that because of that tight curve/radius there, it's just the skin material being used that didn't hold up, and the epoxy fix seems like the best solution.

Where exactly is it cracking?
Here we go again!
User avatar
Ira
Forum Storyteller
 
Posts: 5652
Images: 118
Joined: Tue Nov 29, 2005 2:16 pm
Location: South Florida
Top

Next

Return to Teardrop Construction Tips & Techniques

Who is online

Users browsing this forum: No registered users and 7 guests