48 Rob Your Expertise and Advice Needed

Anything to do with mechanical, construction etc

48 Rob Your Expertise and Advice Needed

Postby Classic Finn » Wed Jul 11, 2007 9:26 am

Dear Rob.. this pertains to the window in front of our tear..

I got the windows figured out from the outside meaning I have the plexi or whatever its called nicely cut and it fits the outside edge real nicely..

Now my question is how can that inside be done and completed?

The thickness of the window area is 50mm which is the thickness of styro..

Classic Finn :thinking:
Last edited by Classic Finn on Wed Jul 11, 2007 1:05 pm, edited 1 time in total.
Royal Teardrop Society Scandinavian Bureau Chief of Staff

Image
User avatar
Classic Finn
Midnight Sun Voyager
 
Posts: 17488
Images: 146
Joined: Fri Apr 29, 2005 4:29 am
Location: Country of Finland

Postby SSchumacherCO » Wed Jul 11, 2007 11:52 am

How did you handle the windows with aluminium skin? I have been trying to figure out how to put custom size fixed windows.
User avatar
SSchumacherCO
Teardrop Advisor
 
Posts: 50
Images: 3
Joined: Wed Mar 07, 2007 11:10 pm
Location: Colorado, Longmont

Postby Classic Finn » Wed Jul 11, 2007 11:59 am

SSchumacherCO wrote:How did you handle the windows with aluminium skin? I have been trying to figure out how to put custom size fixed windows.


Hi there... I used the simple method.. for a simple guy... :lol: :lol:

I cut the window template to the shape I liked... in my case it would be a
cross between an old Beetle or Ford truck windows.. similar also to the Camp Inn ...

The gasket I have is good for 6mm thickness in all. the plexi or acrylic whatever its called is 3 mm. the fiberglass im using is 1.5 mm. so it fits tightly into the gasket itself, the gasket has a seperate locking gasket that gets installed inside of the main gasket or moulding that locks and seals the glass tightly so water cant get in it..

However I now have a not so nice opening inside of the tear on the window portion so Im trying to figure out the inside now unless I do the same to that as the outside..

Classic Finn ;)

I,ll take a photo of the template for you...
Royal Teardrop Society Scandinavian Bureau Chief of Staff

Image
User avatar
Classic Finn
Midnight Sun Voyager
 
Posts: 17488
Images: 146
Joined: Fri Apr 29, 2005 4:29 am
Location: Country of Finland
Top

Postby Classic Finn » Wed Jul 11, 2007 12:06 pm

Im not sure but I think this window install is from the Mexican Tear ???
Dont take my word for it but ... in any case its nice work on this...
so Im following his install a bit...

I sure wish he would chime in to give us more detail on how he worked his window..

Image

My window is about the same style except the opposite position as to this
photo.

Classic Finn
Last edited by Classic Finn on Wed Jul 11, 2007 12:58 pm, edited 1 time in total.
Royal Teardrop Society Scandinavian Bureau Chief of Staff

Image
User avatar
Classic Finn
Midnight Sun Voyager
 
Posts: 17488
Images: 146
Joined: Fri Apr 29, 2005 4:29 am
Location: Country of Finland
Top

Postby Classic Finn » Wed Jul 11, 2007 12:20 pm

Here are a couple of photos of how I started...

give me a few minutes to upload them..

On this there is the main template on only...I 1st drew the shape on a seperate piece of thin ply I had laying around. to get measurements of the location..and so on.

However I had to redraw the main template to put the radius,s in since the rubber gasket does need a radius of some type to sit properly.

Image

Image
The photo below is where Im shaping the styro.. I did kerf it also so it bends a lil on the radius.. Also I made the entire piece out of 1 section
after this try, shaped the windows out in the styro also. with knife and sander..In the center I did make the radius, s on the styro as well

Image
2nd photo has the lock moulding groove showing below.

Image

The photo below has the groove showing that the plexi and fiberglass or aluminum will slide into. This groove is on both the inside and outer sides of the gasket.

Image

And here is the shape I finally liked that has the template now made to place on the plexi or equivalent to be used with the rubber gasket around it.

Image

This is my way of doing it.. hope it helps a little.

Classic Finn
Royal Teardrop Society Scandinavian Bureau Chief of Staff

Image
User avatar
Classic Finn
Midnight Sun Voyager
 
Posts: 17488
Images: 146
Joined: Fri Apr 29, 2005 4:29 am
Location: Country of Finland
Top

Postby 48Rob » Wed Jul 11, 2007 3:06 pm

Heikki,

I see your problem... :thinking: but an easy answer is not in reach...

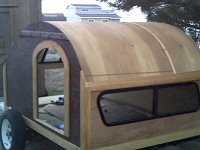
The rubber window channel is designed (as you know) to fit over a relatively thin body panel.
The thickest I found, and used, was for a 3/4" panel.

In other words, the rubber gasket, once installed, forms both the exterior and interior trim.

If this is the plan, and you want to add to, but not change the window design, I think I'd use a thin strip of black flexible material, maybe aluminum or plastic, inside the cut to cover the styrofoam.
It would have to butt up against the rubber, or be just slightly larger.

Then on the interior, a nice wood frame just slightly larger than the window opening to cover the edge of the thin material.

I'm off on a camping trip, back Sunday.

Rob

PS.
After you make your cutout for the windows, install the rubber, then make a template for the glass.
Then use dividers or some other tool to re mark the line 1/8" smaller, or the glass will never go in...
Waiting for "someday" will leave you on your deathbed wondering why you didn't just rearrange your priorities and enjoy the time you had, instead of waiting for a "better" time to come along...
User avatar
48Rob
Super Lifetime Member
 
Posts: 3882
Images: 4
Joined: Thu Nov 17, 2005 6:47 pm
Location: Central Illinois
Top

Postby Classic Finn » Wed Jul 11, 2007 4:13 pm

Rob thank you... :thinking: :thinking:

What would you :thinking: think if I did another set of windows the same way for the inside... :QM since as we both know the gasket is made for thin surfaces... so the interior will have the Birch Ply as the interior skin.

so therefore as silly as it may sound - I make another set the same for the inside identically...unless (a small chance) I could find a rubber gasket 3/4 inch in thickness then I would take and totally redo the windows but using that instead for the entire window frame... and make as you say a nice window frame around it for the inside...

I did find a premade set of boat windows however rectangular with an aluminum or plastic window frame that can be installed up to 50 mm in thickness ....

And in my opinion it doesnt fit the tear shape as nicely... but it would delete the problem totally..

So I think I,ll do the search for a thicker rubber moulding that can handle the 3/4 inch and do that panel in ply with routered window edges...

I,ll keep you posted... Im determined to make it work.... :cry:

Classic Finn ;)
Royal Teardrop Society Scandinavian Bureau Chief of Staff

Image
User avatar
Classic Finn
Midnight Sun Voyager
 
Posts: 17488
Images: 146
Joined: Fri Apr 29, 2005 4:29 am
Location: Country of Finland
Top


Return to Teardrop Construction Tips & Techniques

Who is online

Users browsing this forum: No registered users and 8 guests