My offroad Camper

Did you just design your very own teardrop or tiny trailer? Want to discuss it? Here's the place to post your design for discussion!

Postby Steve F » Thu Jan 10, 2008 5:14 am

No problem always plenty of pics :)

Recieved my 12 Volt distribution panel today, although I'm over 1000ks away for a few days working in Brisbane.

Anyway, this is what I got from ebay for $45 instead of the next best store price of $95

Image

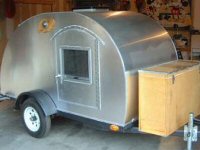
It will mount under the bench in the rear, the good thing is it also has a built in cigarette style point which will run my 60LED work lamp which can be hung anywhere and a hella style plug which is perfect for my fridge which will plug in there when out of the Jeep. The other three circuits (switched) will run lights, other accessories and entertainment :) It also has a voltmeter which can be switched between two batteries so I can also monitor the second battery in the jeep when the trailer is plugged into it. Not sure how good the gauge will be though.

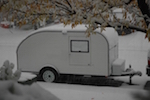
Also took out every external screw last night, about 150 of them, and counter sunk each hole, put a dob of glue on each screw and put it back in again for a smooth surface when filled and sanded. A lot of work but I used an air powered drill to take them out, counter sink and put back in, much smaller and lighter than my electric drill (bit noisey though) Afterwards I think it was worth it for a nice smooth painted finish.

Anyway, more to go this weekend with a big push to get it on the road by mid march.

Cheers
Steve
User avatar
Steve F
The 300 Club
 
Posts: 489
Images: 25
Joined: Fri Feb 02, 2007 8:12 am
Location: Sydney, Australia

Postby Steve F » Sun Jan 13, 2008 1:17 am

Working hard to get the exterior done so I can go get the trailer registered :) Cut the back off today after I attached the basic frame for the hatch. The neoprene hinge will move the hatch back about 1" leaving room for a nice think rubber seal, possibly one on the hatch and one on the wall for a good seal.

Image

I'm thinking of leaving the overhang on the rear of the hatch at the roof line after its tidied up, like a small spoiler, and mount a high mount stop light up there. I think that would look pretty cool and be functional.

Image

Image

The good thing about a flat faced hatch is no chance for spring back as the outside skin will be two flat pieces so the frame can be quite light (not finished yet though) and the skin supplies a lot of strength.

Also started to fiberglass the seams and then use filler over the top to get them smooth. Did some mounting lugs for my fenders as well. Anyway got a little done and then a Summer storm hit so it was time to get cleaned up.

Cheers
Steve
User avatar
Steve F
The 300 Club
 
Posts: 489
Images: 25
Joined: Fri Feb 02, 2007 8:12 am
Location: Sydney, Australia

Postby bve » Sun Jan 13, 2008 12:22 pm

First off I have to say I appreciate the pictures and level of detail you have put into documenting your build, it's really helpful.

On your hatch, that's an interesting twist to the way most are built. Did you attach all of the framing then remove it to cut the ends or leave it in place and cut - which appears would have been a bit tricky?
Burke

KISS > COMPLEX
Image
Image

Build threads converted to PDFs.
As of 2008-08-08 I have added more build threads to the pdf collection
User avatar
bve
500 Club
 
Posts: 694
Images: 98
Joined: Sat Aug 25, 2007 1:44 am
Location: Edmonton, Alberta, Canada
Top

Postby Steve F » Sun Jan 13, 2008 2:59 pm

I attached the framing and cut the hatch off with the framing in place. I left a gap between hatch and wall framing that a handsaw could fit down and a little to spare. The cut didn't have to be spot on as once the hatch was cut off I ran the router with the trimming bit around hatch and body to trim the skin to match the framing. It was quite easy really and the hatch is a great fit :)

Cheers
Steve
User avatar
Steve F
The 300 Club
 
Posts: 489
Images: 25
Joined: Fri Feb 02, 2007 8:12 am
Location: Sydney, Australia
Top

Postby Steve F » Fri Jan 18, 2008 7:29 am

Spent some more time/money (not much :) ) on ebay in preparation for some more weekend building. Got some LED lights for the hatch and an LED number plate light, all at about 1/4 of the normal price :)

Should have some pics of the hatch etc on Sunday as I plan to finish the frame and skin it this weekend also possibly put a couple of screws in for a test mount :)

Cheers
Steve
User avatar
Steve F
The 300 Club
 
Posts: 489
Images: 25
Joined: Fri Feb 02, 2007 8:12 am
Location: Sydney, Australia
Top

Postby Steve F » Sat Jan 19, 2008 4:46 am

Had summer storms all day today so couldn't go pick up the ply for the hatch, ended up filling all the screw holes and making some more framing on the hatch as well as picking up some more LED stuff from ebay.

Joins have been epoxied and then used two part filler to smooth everything out and fill the screw holes, just need to do the ones around the hatch, left those as I have been working on it.

Image

Decided to leave part of the roof hanging over the back as a small spoiler, most likely I'll have a high mount stop/tail light under here in the center. You can just see the spoiler here. It curves out towards the center and breaks up the straight lines as well.

Image


And the hatch frame so far. With it being a flat hatch it doesn't need a lot of framing so is very light at the moment. I will add one more cross spar in the lower section and so upright between the spars and along the edges but I'll keep them to a minimum.

Image

Also have locating points for the Jeep flares I'm using, means both sides can be lined up nicely before bolted on.

Image

Cheers
Steve
User avatar
Steve F
The 300 Club
 
Posts: 489
Images: 25
Joined: Fri Feb 02, 2007 8:12 am
Location: Sydney, Australia
Top

Postby Steve F » Sun Jan 20, 2008 1:06 am

Hatch is done :) At least the outside anyway, it's light and strong and I'm real happy with the way it came out.

The flat framed area all the way around is for the rubber seal.

Image

Image

Image

And the other side, you can see the small spoiler in this one.

Image

And on the camper

Image

It was great to get it done and I think it looks good too :)

Cheers
Steve
User avatar
Steve F
The 300 Club
 
Posts: 489
Images: 25
Joined: Fri Feb 02, 2007 8:12 am
Location: Sydney, Australia
Top

Postby SeaFlea » Sun Jan 20, 2008 1:30 pm

Hey Steve, it looks better than "good"... "outstanding" LEAPS to mind! :beautiful:
Nice job, verry, very, nice indeed!! :clapping hands:
User avatar
SeaFlea
Teardrop Advisor
 
Posts: 65
Images: 10
Joined: Sat Sep 22, 2007 6:19 pm
Location: Deptford, NJ
Top

Postby bve » Sun Jan 20, 2008 2:35 pm

That's really coming together nicely. :thumbsup:

Looking forward to seeing more progress for sure, even though I suspect there are lot's of little details to take care of you must be getting hyped about how close to 'campable' it is getting.

Kudos to you on the great documentation, pictures and for answering the questions posted.
Burke

KISS > COMPLEX
Image
Image

Build threads converted to PDFs.
As of 2008-08-08 I have added more build threads to the pdf collection
User avatar
bve
500 Club
 
Posts: 694
Images: 98
Joined: Sat Aug 25, 2007 1:44 am
Location: Edmonton, Alberta, Canada
Top

deflectors

Postby 4123 » Wed Jan 23, 2008 12:40 pm

Hi Steve,
I've been looking at your drawings. How about if you extend the diagonal braces on your tongue all the way to the tires? This way if you mis-judge a squeeze between trees or rocks, the extended braces would 'deflect' your trailer and you would avoid tearing your wheel off or doing damage to your fender. Ron
~~~Ron & Olga Christianson~~~
http://www.museumphones.com
"Consider It ALL entertainment"
ImageImageImage
User avatar
4123
The 300 Club
 
Posts: 340
Images: 50
Joined: Thu Dec 13, 2007 11:54 pm
Location: Cave Junction Oregon
Top

Re: deflectors

Postby Steve F » Wed Jan 23, 2008 4:55 pm

4123 wrote:Hi Steve,
I've been looking at your drawings. How about if you extend the diagonal braces on your tongue all the way to the tires? This way if you mis-judge a squeeze between trees or rocks, the extended braces would 'deflect' your trailer and you would avoid tearing your wheel off or doing damage to your fender. Ron


I thought of a step/slider in front of the wheels but I'll wait and see how the weight is before I put one on, most likely if I do I'll use my bender and make a tubular bolt on one that matches the style I made for my Jeep, as in the pic below, but taper them in more at the front so it pushes the trailer around the object.

Image


Cheers
Steve
User avatar
Steve F
The 300 Club
 
Posts: 489
Images: 25
Joined: Fri Feb 02, 2007 8:12 am
Location: Sydney, Australia
Top

Postby Steve F » Thu Jan 24, 2008 3:49 am

After the success with the two internal LED downlights I bought a bunch more LED lights :)

Two taillights, a 30LED light in an aluminium housing to go on the inside of the hatch as a light for the galley area, two 15cm (6") LED strip lights that will be mounted below the doors flush with the wall (tested these last night and they're great) and an LED number plate light. I'm starting to get a bit addicted to LED's they work so well with a great amount of light and use such a small amount of power. I also have a 60LED light thats not in the pic that has a hook and can be hung wherever I need the most light.

Image

Cheers
Steve
User avatar
Steve F
The 300 Club
 
Posts: 489
Images: 25
Joined: Fri Feb 02, 2007 8:12 am
Location: Sydney, Australia
Top

Postby Steve F » Sat Feb 02, 2008 2:45 am

Got my charger/power supply (16AMP max), it brought this battery back to life, it's 4 stage. The battery will be used in the TD for the LED lights.

Image

Lined both sides of the galley and insulated, the insulation is really to stop the interior lining get punctured if hit hard, haven't done inside the cupboard area though. Also attached the hinge with a few screws to get it lined up

Image

Trimmed the edge ready for the seal. Need to do the other side and the same on the hatch.

Image

Cheers
Steve
User avatar
Steve F
The 300 Club
 
Posts: 489
Images: 25
Joined: Fri Feb 02, 2007 8:12 am
Location: Sydney, Australia
Top

Postby Gerdo » Sat Feb 02, 2008 8:04 pm

Looking good!
User avatar
Gerdo
1000 Club
1000 Club
 
Posts: 1361
Images: 156
Joined: Mon Apr 25, 2005 12:02 am
Location: Littleton, Colorado
Top

Postby Steve F » Sun Feb 03, 2008 3:04 am

Got the galley started today, I now have some framing and a bench top :)

The top is only 7mm thick but is plenty strong enough, I may need to add an extra brace on the two longer sections. I've set it up so I can put my 50lt Waeco fridge on the bench top if I need to while traveling, it just fits under the upper cupboards. The smaller section is for the battery and fuse box, the two larger sections are the same size and I'll either use plastic tubs or have one a draw and one a pair of cupboards.

Image

Image

Image

Cheers
Steve
User avatar
Steve F
The 300 Club
 
Posts: 489
Images: 25
Joined: Fri Feb 02, 2007 8:12 am
Location: Sydney, Australia
Top

PreviousNext

Return to Member Designs

Who is online

Users browsing this forum: No registered users and 1 guest