(Revised 10-May-2005 to allow for sidewalls to cover trailer frame)
(Revised 13-Sep-2005 to cut walls separately)
The walls are 4’x8’x ¾” Birch plywood. The good surface will be the inside of the teardrop.
Layout the position of the bulkheads and cabinets on both inside walls, using a 4’ t-square. Refer to the drawing below…

Next, layout the positions of the joists.

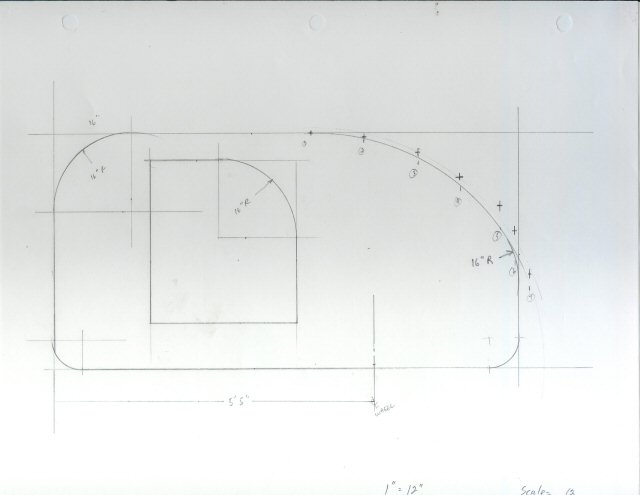
Then place the first sheet of plywood, good side down, and layout the Benroy profile using 2 homemade beam compasses. A beam compass is just a length of wood with a nail in one end, and a hole for a pencil in the other end. The short compass will have a 19” radius, and the long compass will have a 48” radius. At this time you’ll also want to layout the door, and the window.

Using a Jigsaw, cut out the profile and the doors Use a belt sander to sand the profile and the door openings smooth.
Now let’s layout the other wall. Remove the first wall. Set the second piece of plywood good face down on the saw bench. Layout the door and window. Now place the first wall on top of the plywood, good side up. Using this as a template to trace the wall profile on the plywood. Remove the template and cut the profile and the door opening. Use a belt sander to sand the profile and door openings smooth
Tip: Initially the plan was to cut both pieces of plywood at the same time. But when I tried that using ¾” plywood, the blade angled, making the underneath piece quite a bit smaller than the top piece. So even though it sounds like more work, you’ll end up with a better quality teardrop if you cut each piece separately!
Drill and countersink holes xxx” from the bottom edge of the wall, every 8”. (The countersink should be on the outside of the wall.) The xxx” should be equal to the height of the trailer side rail, plus 3/8”.
Drill and countersink a hole at one of the spar locations towards the center of the wall.. Drill and countersink a hole at the final spar location where the hatch will start. These will be used for temporary spars in the next step.