So without further adieu, pics!


![]() by looped » Mon Jun 02, 2008 12:22 am
by looped » Mon Jun 02, 2008 12:22 am


![]() by satch » Mon Jun 02, 2008 10:26 pm
by satch » Mon Jun 02, 2008 10:26 pm

![]() by looped » Mon Jun 02, 2008 10:33 pm
by looped » Mon Jun 02, 2008 10:33 pm
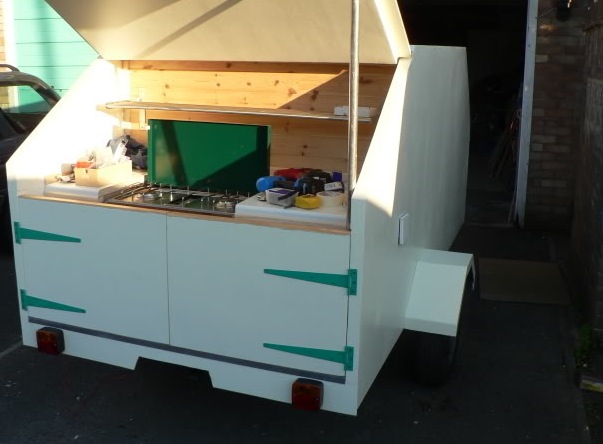
satch wrote:What size is going to be? Looks alittle short to me, love the burned router bit, spray on some oven cleaner, the foaming stuff, let it set about 5 min, then wash with water, lube it, and your ready to rock some more
![]() by bdosborn » Mon Jun 02, 2008 10:36 pm
by bdosborn » Mon Jun 02, 2008 10:36 pm


![]() by looped » Mon Jun 02, 2008 10:54 pm
by looped » Mon Jun 02, 2008 10:54 pm
bdosborn wrote:Where did you get the white draw latches? I think I'm using the same taillights as you are. I always seem to burn up my router bits too.
Bruce

![]() by satch » Mon Jun 02, 2008 11:00 pm
by satch » Mon Jun 02, 2008 11:00 pm
![]() by looped » Mon Jun 02, 2008 11:22 pm
by looped » Mon Jun 02, 2008 11:22 pm
![]() by satch » Mon Jun 02, 2008 11:35 pm
by satch » Mon Jun 02, 2008 11:35 pm
![]() by looped » Mon Jun 02, 2008 11:57 pm
by looped » Mon Jun 02, 2008 11:57 pm
![]() by satch » Tue Jun 03, 2008 7:22 am
by satch » Tue Jun 03, 2008 7:22 am
![]() by doug hodder » Tue Jun 03, 2008 8:41 am
by doug hodder » Tue Jun 03, 2008 8:41 am
![]() by looped » Sat Jun 28, 2008 12:48 am
by looped » Sat Jun 28, 2008 12:48 am
![]() by del » Sat Jun 28, 2008 1:04 am
by del » Sat Jun 28, 2008 1:04 am
I used to have that excuse, but my new cell phone has a camera, and hey it take ok pics for a digital camera.looped wrote:as my sig says i keep forgetting the camera.
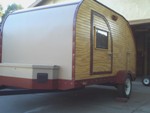
the inner walls are 90% built.. the poplar spars are cut. seeing that i am mounting the lights high off the frame i will be running a continuous ground and will be using the trailer type splicers to tap the loom for the lights also will be having access panels at the junctions should a light break or need some attention.
Good News! i now have a variable speed jigsaw.. the difference is night and day compared to the single speed number and the roller guide is a great help as well!
a friend is moving from minna sohta back to dallas area and the moving truck was dropped off at my friends house for us to unload overnight.. well her stuff was held to the front of the truck bed with some plywood and stretcher bars.. seeing that they were the only plywood sheets in the truck i am guessing that she had to buy them,, so we have 2 semi new sheets of 3/8 ply to play with. one will come in handy for making a copy of the inner wall for the 3rd support when the inner skin is applied and the other for another outer profile when making the edging.
aside from the 2 sheets (maybe 3) of bendy birch for the outer skin and the edging material i have all i need to get this done,, as soon as i get my TARDIS fixed i might actually have more time to actually get this done..
this 30 minutes of working on it a few times a week is getting torturous..
One running change has been made. i was going to do the overlapping hatch sides like on the lil diner project but after some milling around on the idea i saw that i am not quite ready for that method.. i will be getting some of the T molding to do the hatch like the gen benroy.. i am thinking of getting it a lil wider than needed to bend the lip over a bit on an english wheel to make a better seal as well.
also i will be making the hatch spars in a way that i think will almost guarantee no flexback. with the lowest part of the radius being a 5 1/4" radii this was a concern to me..
i will be getting pics soon,, i just gotta remember to tote the camera with me. i swear, i would forget my own head if it wasnt attached to my shoulders.

![]() by looped » Tue Jul 08, 2008 12:46 am
by looped » Tue Jul 08, 2008 12:46 am


Users browsing this forum: No registered users and 4 guests
 You have a great start. Keep that saw dust flying.