(Revised 10-May-2005 to allow for sidewalls to cover trailer frame)
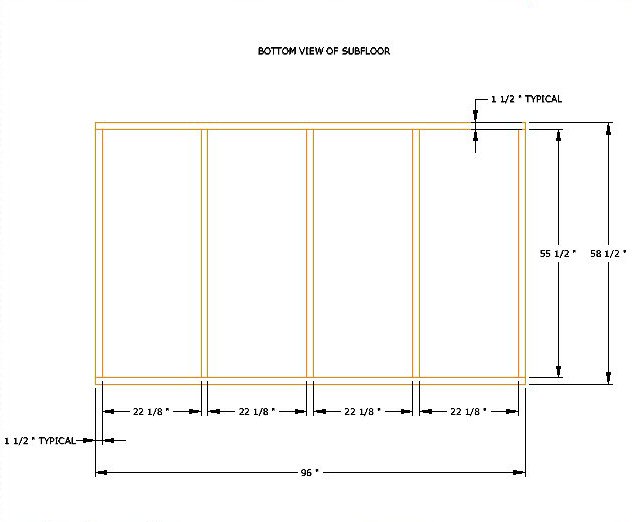
The floor is built from 2 sheets of 5’x5’x1/2” Baltic birch., and xx 1x2s. Cut both sheets of Baltic birch to 48” x 58 ½. Place the two sheets together on a flat surface, so that you end up with a rectangle 96”x58 ½”. (The trailer is 58” x 96”. The floor should hang over the trailer by about ¼” on each side.
Using Gorilla glue /polyurethane glue, and 1 ¼” stainless steel screws, glue and screw the first 8’ long piece of 1x2 to the long edge of the floor.
Glue and screw the (5) 55 ½” subfloor studs to the plywood as shown in the drawing below.

Here's a pdf of that drawing...
http://www.mikenchell.com/images/subfloor.pdf
Glue and screw the last 8’ long piece of 1x2. Let the glue dry overnight.
The floor can be uninsulated for 3 seasons camping, or insulated for 4 seasons camping. If you decide to insulate, cut the ¾” extruded polystyrene on the table saw to fit into the floor recesses. Have all 4 pieces prepared before coating the floor with roof tar.
Use roof tar to coat the underside of the floor, making sure not to get any tar on the sides where the walls will be attached.
Press the EPS into the wet tar and screw the EPS into the recesses with 1 ¼” stainless steel panhead screws and fender washers. Use about 12 screws per panel. Let dry. Drying could take several days or more, depending on the temperature.
The stainless steel hardware is used because it has a fine thread and a controlled length, to help prevent you from breaking thru the floor. (If you break thru the floor, remove that screw, grind off the tip, and screw it back in.)
Bolt the floor to the trailer with 3/8” bolts, (5) bolts per side. Use flat washers and nylock nuts.


