Clear coat...painting issues...errrrg

Anything to do with mechanical, construction etc

Clear coat...painting issues...errrrg

Postby Juneaudave » Sat Oct 04, 2008 6:17 pm

Life is a journey and one of the things I've wanted to do is learn how to paint with a HPLV. Fenders turned out well...but the doggone hatch has issues with clear coat...

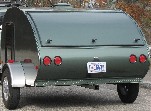
On the first coat..I sprayed too dry...not enough paint and too much air...

Next coat...too much paint and too little air...eerrrg sags...

And on it goes (hats off to the guys who really know how to do this)...

Image
Image

You can see the orange peel and sags...what's my next step...

Sand and recoat or buff and polish???
User avatar
Juneaudave
Super Duper Lifetime Member
 
Posts: 3237
Images: 380
Joined: Sun Jul 03, 2005 12:11 pm
Location: Juneau, Alaska

Postby Mary K » Sat Oct 04, 2008 7:58 pm

I dont know what to tall ya, but it look beautiful to me anyway. :beautiful:

Mk ;)
Mary K

I don't know half of you half as well as I should like; and I like less than half of you half as well as you deserve. Bilbo Baggins
User avatar
Mary K
6000 Club
6000 Club
 
Posts: 6425
Images: 44
Joined: Wed Aug 02, 2006 3:07 pm
Location: Florida, Pensacola

Postby madjack » Sat Oct 04, 2008 8:34 pm

JD, the only way to get rid of the sags and orange peel is to sand and repaint...all I can say is damnitman and practice, practice, practice......
madjack 8)
...I have come to believe that, conflict resolution, through violence, is never acceptable.....................mj
User avatar
madjack
Site Admin
 
Posts: 15128
Images: 177
Joined: Thu Dec 02, 2004 5:27 pm
Location: Central Louisiana
Top

Postby Boodro » Sat Oct 04, 2008 10:35 pm

JD , orange peel can be buffed out with some aggressive rubbing compound & a good random orbit polisher. My son's car had it when we repainted it & he spent the time do some wet sanding then buff it with compound , then polished it with a polishing compound after he had it smooth. The sags will have to be sanded out then maybe touched up with another clear coat. Good luck! :thumbsup: :thumbsup:
We are all travelers in this world , from the sweet grass to the packin house , birth till death , we travel between the eternities . ( Robert Duvall as Prentiss Ritter)
User avatar
Boodro
1000 Club
1000 Club
 
Posts: 1052
Images: 101
Joined: Sun Oct 10, 2004 9:35 pm
Location: Sylvania, Ohio
Top

Postby cuyeda » Sun Oct 05, 2008 12:16 am

What they said... wetsand... Like you, I need some practice shooting, but watching my dad paint a few cars in the day, I learned the sanding part. ha ha. I used a wet sand paper, and a small thin rubber block squigee (sp) as a backer. After wet sanding an area down, I then used the rubber squigee to pull the water away from the surface. A quick look across the surface will reveal any imperfections. Repeat as necessary, then polish.

Good luck!
Why just dance, when you can Salsa!
Cliff & Vanessa
User avatar
cuyeda
Platinum Donating Member
 
Posts: 1924
Images: 17
Joined: Fri Sep 22, 2006 12:09 am
Location: California, Long Beach
Top

Don't cut cornrs now!

Postby RICHARD FURROW » Sun Oct 05, 2008 1:11 am

I agree. It would not hurt to be lightly sanding between coats anyway. It would be less apt to run, and you can build up more protection and gloss. You have one beautiful Teardrop, and this is just a minor setback. Don't accept nothing but the perfection you have been striving for. Don't cut any corners now. You have been very inspirational to me. I've truly enjoyed your build.

Ricky
User avatar
RICHARD FURROW
Teardrop Master
 
Posts: 138
Joined: Wed Jun 20, 2007 10:16 pm
Location: BOONES MILL, VA
Top

Postby Juneaudave » Sun Oct 05, 2008 9:45 am

A sanding we will go :M

A sanding we will go :M

Hi ho the merry oh :M

A sanding we will go :M
:whistle:
User avatar
Juneaudave
Super Duper Lifetime Member
 
Posts: 3237
Images: 380
Joined: Sun Jul 03, 2005 12:11 pm
Location: Juneau, Alaska
Top

Postby doug hodder » Sun Oct 05, 2008 12:28 pm

Dave...the sanding is a lot easier if you do it in the first 72 hours or so. After that, it becomes much more difficult. For me, usually the first coat is only a tack coat. Just get some material on to cover it, don't worry about orange peel or gloss, let it flash off a bit, then put on the next couple of coats, letting it flash off in between, just a couple of minutes. The next coats will melt into the first ones. I think a person is better off trying to do several coats of lighter sprays than a heavier one.

Don't be hard on yourself...you gotta learn and this is only the 2nd thing you've painted isn't it? I painted a lot of beasts before I got a beauty! I still paint a lot of beasts... :oops: Doug
doug hodder
*Snoop Dougie Doug
 
Posts: 12625
Images: 562
Joined: Tue Dec 14, 2004 11:20 pm
Top

Postby Juneaudave » Sun Oct 05, 2008 4:12 pm

doug hodder wrote:Dave...the sanding is a lot easier if you do it in the first 72 hours or so. After that, it becomes much more difficult. For me, usually the first coat is only a tack coat. Just get some material on to cover it, don't worry about orange peel or gloss, let it flash off a bit, then put on the next couple of coats, letting it flash off in between, just a couple of minutes. The next coats will melt into the first ones. I think a person is better off trying to do several coats of lighter sprays than a heavier one.

Don't be hard on yourself...you gotta learn and this is only the 2nd thing you've painted isn't it? I painted a lot of beasts before I got a beauty! I still paint a lot of beasts... :oops: Doug


I'm on it and yea...so far, I've painted a burn barrel and a set of fenders!!! That clear is hard stuff to sand (even at 24 hours) but I have pretty much got it down to 600 grit so far. Even at 600, it looks alot better. I think my mistake was too dry on the first coat and I never recovered being a "painter want to be". I'm optomistic that I'm going to be ok on my next try. We'll see!!! If this don't work, I'm flying you up, or moving to spar varnish!!!!
:lol: :lol: :lol:
User avatar
Juneaudave
Super Duper Lifetime Member
 
Posts: 3237
Images: 380
Joined: Sun Jul 03, 2005 12:11 pm
Location: Juneau, Alaska
Top

Postby doug hodder » Sun Oct 05, 2008 5:46 pm

Dave...unfortunately (in my opinion) a mistake that some new painters make is to pile on more paint and make it smoother, trying to get the perfect coat in 1 shot, get a good gloss then blupppp...it sags or runs...next thing you're doing is mopping it off the floor. I haven't had any "official" instruction or education on it all, just what I've found as I went along. If you haven't dragged the hose through it, you're still ahead of the game!

I don't think you'd need to go to 600 on the sags. The clear can cover a 320 scratch. It might be wise to contact your paint supplier and check with them to see how long it needs to cure prior to a recoat. If done early, you can just spray...if it goes too long, it needs to have an entire scuff on it, then shoot it. At least that's what they tell me on the Transtar Euroclear. Others opinions may differ. Doug
doug hodder
*Snoop Dougie Doug
 
Posts: 12625
Images: 562
Joined: Tue Dec 14, 2004 11:20 pm
Top

Postby Juneaudave » Sun Oct 05, 2008 5:55 pm

Well, try number 2 went better than try number 1...then I ran out of clear!!!!

Image

Image

No sags...but a bit dry...I'm a thinking it is close enough for rubbing compund, polishing compound and of course...wax on..wax off...grasshopper!!!! Shucks...by the time I get this done... Earl Schieb is going to be looking good!!! It has been entertaining though!!!
User avatar
Juneaudave
Super Duper Lifetime Member
 
Posts: 3237
Images: 380
Joined: Sun Jul 03, 2005 12:11 pm
Location: Juneau, Alaska
Top

Postby doug hodder » Sun Oct 05, 2008 6:04 pm

That looks great Dave!!!....give it a while and then look to see if you want to do any polish on it. I wouldn't bother...if anyone gives you heat on it, poke them in the eye and when it's all watery...ask them how it looks now!!! :lol: I'm sure most will agree it looks great! It will change some as it cures and all the solvents evaporate....but considering your experience...you ought to be very happy. Yup...running out of material is a drag, been there, done that! and your material is a lot better than Earls. Everyone is going to be so wowed by your trailer that they will never notice any dry or orange peely areas. I give it..... :thumbsup: :thumbsup: :thumbsup: :thumbsup: :thumbsup: Doug
doug hodder
*Snoop Dougie Doug
 
Posts: 12625
Images: 562
Joined: Tue Dec 14, 2004 11:20 pm
Top

Postby doug hodder » Sun Oct 05, 2008 6:09 pm

PS, if you decide to do a polish on it...I'd mask off the vertical edges of the "straps" running full length, before you hit it with a polisher. It'll save you from burning through those areas. Doug
doug hodder
*Snoop Dougie Doug
 
Posts: 12625
Images: 562
Joined: Tue Dec 14, 2004 11:20 pm
Top

Postby del » Sun Oct 05, 2008 6:15 pm

Juneaudave wrote:Image

Image


(insert a really great comment here, cause I am speechless) :applause: :applause:

del
User avatar
del
5000 Club
5000 Club
 
Posts: 5674
Images: 410
Joined: Fri Sep 08, 2006 3:27 pm
Location: washington, yakima but tell Mary K Fairbanks
Top

Postby hiker chick » Sun Oct 05, 2008 7:49 pm

Gorgeous!!

:thumbsup:
Hot Stuff Today, Dog Stuff Tomorrow

www.thegidg.com
User avatar
hiker chick
1000 Club
1000 Club
 
Posts: 1501
Images: 621
Joined: Sat Aug 18, 2007 6:26 pm
Location: Washington, D.C.
Top

Next

Return to Teardrop Construction Tips & Techniques

Who is online

Users browsing this forum: Google [Bot] and 4 guests