I'm a newbie here and am inpressed by the method you used. I'm curious which brand of foam insulation you used as well as if you did some testing to figure out which types don't dissolve from epoxy. If you did testing, did you consider polyester resin to reduce costs? if so did all the different types dissolve from the resin?
I used owens corning foamular 150 extruded polystyrene insulation (the standard cheap pink stuff that home depot sells). I did some tests on it using 3 or 4 different types of epoxy, bought from the local hobby shop. Since Aircraft Spruce Co. sells polystyrene for aircraft composite use, i figured that it's probably good enough for a non life or death application like a camper.
Aircraft spruce had warnings not to use polyester resin with polystyrene without using a special foam sealer. In order to avoid that hassle and because epoxy is stronger than polyester, i just went with the more expensive stuff. If things didn't work out, i didn't want to say "if only i had used...."
What type of glass did you use? I can't really tell from the pics but it seems that you didn't glass the inside, is the product balanced? ie as strong pressing from the outside as from the inside? When researching the build for my fuel tank hatch, I was given the advice to put 2 layers of glass on the top and 3 layers on the bottom and the product would be strong because the 3 layers on the bottom are where the strength is needed yet the top only needs enough glass to protect the foam from being crushed.
if my memory serves me correctly, i used 5.85 Oz/Yd e-glass cloth (#7533 from aircraft spruce). Right now, most of the inside of the cap is not glassed. This will be rectified when the weather warms up. Everything on the base unit of BUB is glassed, and is needed to be for structural reasons.
There are 2 ways to look at the compression/tension strength issue with composits. One is to view the foam as a spacer with negligible strength (polystyrene), in which case you would need more layers of fiberglass in compression than you have in tension. The other way is to view the foam as lending some strength and rigidity of it's own (divinicell) to the composite.
Having my 14 year old nephew destroy test samples, i noticed that EVERY one of them failed when the compression side delaminated from the foam and buckled. More layers of glass in compression would have given that side more rigidity and prevented the buckling. An experimental aircraft builder at my local EAA chapter showed me a test sample of fiberglass over divinicell, which had broken in tension. The compression side of the sample didn't even have a crease where he had his test weight hung. I think that the strength and rigidity of divinicell may have made the results of the boat builder's method match his expectations, but not for anything like the reasons that he explained in the link.
I was thinking of building my side walls by gluing pieces of insulation to make one large panel. From there a router could be used to create a slot to run a pvc tube for a wire chase. When ready the outside could be laminiated with 1 layer of 1708. In a second glassing session the inside could receive a layer of 1708 with the mat side down on the insulation, a second layer of 1.5oz mat could then be added on the inside and be put on quite wet and 1/4" birch ply could be added for a pleasing interior. Once the panel was cured it could be cut to whatever size/shape you wanted. I have no idea how the pink insulation bends but it could probably be helped out with a heat gun and one could come up with some interesting shapes and unusual design ideas.
I'm considering a traditionally shaped teardrop build next, and that pretty much describes, how i would make the walls. I would cut the walls using a circular saw, and sand everything smooth with a belt sander. Glass is really hard stuff, and would dull even a carbide router bit pretty quickly. The router bit would still be able to cut, but a dull bit creates a lot of heat which the foam would contract away from.(move the belt sander a lot to avoid melting foam with it(learned the hard way)). I've also cut composite panels with a jig saw and sawzall. The reciprocating motion causes things to delaminate.
As for the top, it would be a lot more difficult to glass each side and I'm still trying to figure out how I'd do it but for now I'm thinking of connecting the pieces with 1/4" birch ply then adding the insulation on the outside radiusing the corners then glassing 2 layers of 1708 on the top with the first layer covering over the side quite a bit. The whole thing could then be faired to fill in the weave and then shot with one of the high build primers to create a pretty smooth surface ready for paint.
As for the top, i would keep the heat gun away from it. Polystyrene doesn't really soften very much before it just melts or collapses.
My plan is to set my wall panels in vertical jigs, then bend a 1/2" foam roof panel over the profile, securing it with wet micro and coarse drywall screws. I would then apply another layer of 1/2" foam over the first, connecting them with a layer of wet micro, and more drywall screws. After the micro dries, remove the screws, fill the screw holes, then apply fiberglass. Once the outside is glassed, the whole thing can be stood on end(it's not connected to a floor yet), and the inside of the roof can be glassed while standing semi-vertically.
By the way, 1" foam with 2 layers of fiberglass on each side weighs 8 OZ. per square foot. a 4" thick deck with 4 layers of glass on each side would weigh about 20 OZ. per square foot. Using these numbers, a 4x8 traditional teardrop trailer shell and deck could be made weighing just 95 LBS.
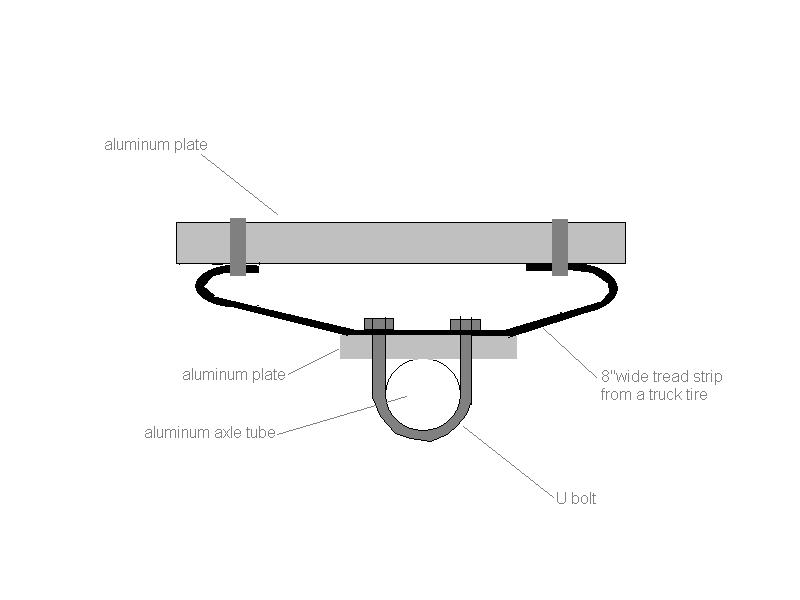
Here is a drawing of the suspension i would propose for a trailer this light.