Special kind of silicon for external wood trim?

Anything to do with mechanical, construction etc

Special kind of silicon for external wood trim?

Postby IraRat » Sun Jul 17, 2005 10:22 am

Well, the side skins are up, and one coat of varnish on the exterior roof. (Will post pics later--my kids have other ideas for my time today.)

I wanted to give the roof coat two whole days to dry, because I did it at dusk Friday, it's HOT here, and I want to make sure the varnish isn't the least bit tacky when I start to sand.

And yes, I entered the 21st Century on Friday and broke down and bought a B&D orbital sander. (Happy, Tom!?) It's still in the box, because I'm afraid to open it.

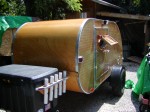
But I gotta tell you, the way the grain came out on that roof is INTENSE! Real wild, like vertical FLAMES right down the middle.

Anyway, working with aluminum trim along the roof scares the hell out, and no amount of "It'll be all right, Ira...just give it a try..." will console me. So I bought a piece of pine outside angle trim and threw it in the pool, where it's been soaking since Friday night.

It appears to be getting bendy enough, but until I get it on there, I won't know for sure. I figure I would temporarily tack it on, if it works, let it stay there for a day or two to dry, remove it , stain/varnish, and install it permanently.

So far, does this sound like a legitimate plan? In other words, is this way out of line in any way?

If not, what kind of silicon should I use, or am I better off with a wood epoxy? Keep in mind that it's pretty wide, (I think each edge is 11/16, don't remember.)

Sorry for the length of this post, but it was a long Saturday and this is the only thing that will help me forget about how much money I've been spending.


:?
--Ira

"My HD and Wal-Mart have been out of Titebond for weeks, and I think it's a communist conspiracy."
User avatar
IraRat
Forum Storyteller
 
Posts: 1573
Joined: Wed Apr 06, 2005 8:43 am
Location: South Florida

Postby madjack » Sun Jul 17, 2005 10:41 am

...Ira, I am personally not a fan of silicones, years of personal experience has left me without kind feelings toward them. I have found they tend to fail over the years will mildew and attact dirt and will wick moisture until they finaly fail...I am sure others will disagree. I would recommend something like Sikaflex 252 (available from Austin Hdw and possibly your local marine or RV dealer).

If you have been soaking PINE trim in the pool for several days, then your plan to attach and allow to dry is a good one, however it may take more than a day or two for it to dry properly especially in the Fl. humidity I would give it quite a spell of bakeing in place before I tried to finish/seal/attach it

madjack 8)
...I have come to believe that, conflict resolution, through violence, is never acceptable.....................mj
User avatar
madjack
Site Admin
 
Posts: 15128
Images: 177
Joined: Thu Dec 02, 2004 5:27 pm
Location: Central Louisiana

Postby IraRat » Sun Jul 17, 2005 11:07 am

Thanks, Jack. Yep--let it dry a LONG time. (Besides, if it actually goes up this afternoon without breaking, I have to buy a piece for the other side anyway.)

What exactly is that Sikaflex? Is it a fiberglass epoxy?
--Ira

"My HD and Wal-Mart have been out of Titebond for weeks, and I think it's a communist conspiracy."
User avatar
IraRat
Forum Storyteller
 
Posts: 1573
Joined: Wed Apr 06, 2005 8:43 am
Location: South Florida
Top

Postby madjack » Sun Jul 17, 2005 11:13 am

...Sikaflex makes a number of adhesives used widely in the marine and transportation industry. Sikaflex252 is a 1 part polyurehthane adhesive...here is a PDF giving all the info on it
madjack 8)
...I have come to believe that, conflict resolution, through violence, is never acceptable.....................mj
User avatar
madjack
Site Admin
 
Posts: 15128
Images: 177
Joined: Thu Dec 02, 2004 5:27 pm
Location: Central Louisiana
Top

Postby doug hodder » Sun Jul 17, 2005 8:21 pm

Ira...If it were me I wouldn't mess with silicone in this application...Your best bet is an epoxy, 2nd best is a urethane glue...Silicone will not bond the materials as well and since it is rubbery when cured, it won't hold the curve you want....just my opinion....Another killer adhesieve that no one here has ever talked about is 3M Marine Adhesieve Sealant 5200...mostly used in the marine industry, but it is made for below waterline use. Most people use this stuff to seal up transom plugs in a boat....It takes about 5 days to fully cure but is bullet proof. I used it to seal the outer edges on my tear when I overlaid it with aluminum...I also sealed up the underside of the top trim overhang before I applied the wood framing on my woody tear. 1 tube goes a long way, but it's about 15-18$ a tube..don't know if it is available in colors, I think only white...It really bonds well to materials and doesn't want to peel away like a silicone can..Ask Destin Dave on this one, he has a lot of marine experience....Just an idea....Doug Hodder
doug hodder
*Snoop Dougie Doug
 
Posts: 12625
Images: 562
Joined: Tue Dec 14, 2004 11:20 pm
Top

Postby IraRat » Sun Jul 17, 2005 9:42 pm

"I poot zee vood in water. Take vood from water. Try bend vood. But vood...she no vant to bend eenuf."


"Ayyyy, Boris! Is it dat Zat stupid moose and crazy squirrel again!?"

"No, no Natasha. Zis vood, zis angle pine, it no can bend to zis curve. It go crack, snapple, pop--plus bulge and kink. Zen it go snap again."

"Poor Boris. Time to zink of a Plan B!!!!"

In English, this was a total bust. You can't bend this outside angle pine trim to that Cubby curve. If I decided to do it in two sections, yes. But I really don't think I want to do that.
--Ira

"My HD and Wal-Mart have been out of Titebond for weeks, and I think it's a communist conspiracy."
User avatar
IraRat
Forum Storyteller
 
Posts: 1573
Joined: Wed Apr 06, 2005 8:43 am
Location: South Florida
Top

Postby doug hodder » Mon Jul 18, 2005 12:43 am

Hokey Smokes bullwinkle even Professor Peachfuzz knows that dog ain't gonna hunt!! I could be completely wrong on this and I'm sure someone will let me know, But I don't think you'll ever get that material to bend the way you want and seal....that's a 2 piece operation....It's gonna need some kerfs cut into the outer vertical edge to make it happen.....Doug Hodder :shock:
doug hodder
*Snoop Dougie Doug
 
Posts: 12625
Images: 562
Joined: Tue Dec 14, 2004 11:20 pm
Top

Postby IraRat » Mon Jul 18, 2005 8:07 am

Here's the piece that wouldn't bend, so I think my Plan B is to use 2 strips. One on the top (no problem) and one on the side, kerfed--if I can figure out how to do that.

Image

Here's my right-side skin. Gonna cut the outside hole of the AC later:

Image

Here's the left skin, and although it's hard to tell from these lousy photos, the tones don't exactly match. (Maybe exposure to sunlight will do something, since they've always been indoors.) Also, I haven't rasped this door opening out yet, like I did on the other side. It was really easy and nice working with that rasp, and I'll be doing the same for galley edges, now that the skins are up.
Image

Here's the roof after just one coat of varnish, still wet. After this photo was taken on Friday, two days later I sanded and applied the second coat. Will post when it's totally done, about 4 coats, but I wanted to post this now to show how this same bendy birch that I used for the interior took the varnish. I had an extra piece of it (1/4" thick), so I used it here for the roof to save money. It's gonna be dark, which is okay, but I want to test what I'll use for the interior for something lighter. I love the cool patterns here!

Image

Well, that's it. She ain't perfect, but she's mine!
--Ira

"My HD and Wal-Mart have been out of Titebond for weeks, and I think it's a communist conspiracy."
User avatar
IraRat
Forum Storyteller
 
Posts: 1573
Joined: Wed Apr 06, 2005 8:43 am
Location: South Florida
Top

Postby toypusher » Mon Jul 18, 2005 8:24 am

Ira,

Looking good to me! Looks especially good since you are self claimed non-builder of any kind! :shock: Keep up the great work and it will be done in no time.

I'm kind of doing small odds and ends right now because I have to wait for my interior reading lights to get here before I can insulate the roof and put the aluminum on.

Again, great job!

Kerry
User avatar
toypusher
Site Admin
 
Posts: 43040
Images: 324
Joined: Fri Jan 28, 2005 12:21 pm
Location: York, PA Area
Top

Postby IraRat » Mon Jul 18, 2005 9:15 am

Thanks for the encourgement, Kerry. It hasn't been easy, and lately, my energy level to START a day's work is low, but then it picks up again. Just getting a little impatient, which is not a good thing with so much more left to do.

I'll have the roof done this week, because at least I can do that after work, if the weather holds up. Tonight, gonna go look for some alternate trim ideas. Get that up, and then it's time to close up the galley walls and start on that dreaded hatch.

Again, thanks for the support. Me and my hammer appreciate it.
--Ira

"My HD and Wal-Mart have been out of Titebond for weeks, and I think it's a communist conspiracy."
User avatar
IraRat
Forum Storyteller
 
Posts: 1573
Joined: Wed Apr 06, 2005 8:43 am
Location: South Florida
Top

Postby Woody » Mon Jul 18, 2005 9:54 am

IraRat,
Looks good, what a great idea on the sidewall skins. I hadn't thought of using that material before :thumbsup: Looks like you are getting ready to do some camping pretty soon. I think you played us all with that "I have no idea what I am doing" stuff. Looks like you figured it out
Woody
The Tear Jerker's, Florida Chapter Director
E-mail: [email protected]
Tear jerker chapter site http://www.tearjerkers.net/forums/
Check the SE section for gathering information
Tear Jerkers new site http://www.tearjerkers.net/forums/
Enjoying life in 12 ounce increments is what it's about
User avatar
Woody
2000 Club
2000 Club
 
Posts: 2006
Images: 26
Joined: Tue Jun 15, 2004 11:07 pm
Location: Ft. Lauderdale, Florida
Top

Postby IraRat » Mon Jul 18, 2005 10:12 am

Woody wrote:IraRat,
Looks good, what a great idea on the sidewall skins. I hadn't thought of using that material before :thumbsup: Looks like you are getting ready to do some camping pretty soon. I think you played us all with that "I have no idea what I am doing" stuff. Looks like you figured it out


Thanks, Woody--but we ain't talking master craftsmanship here.

Thank God for molding, and I just hope the wheels don't fall off when I first pull outt. (I just gotta remember to check those lug nuts and my grease!)

And yeah, thanks for the great idea on the skins!!! Glad you thought of it!!!

Onto the rest of the galley framing and the hatch. Gonna wait to do the doors until I have the cabin varnish and cabin cabinets done. Figure it will be more comfortable working in there WITHOUT doors.

I'm curious to see how this roof varnish plays out. I think I'm gonna have a crazy contrast with the sides, whereas I'm really gonna need that trim stained with a particular tone to bring it all together. And since I don't have enough of that bendy birch left for the hatch skin, we're talking a THIRD material for this.
--Ira

"My HD and Wal-Mart have been out of Titebond for weeks, and I think it's a communist conspiracy."
User avatar
IraRat
Forum Storyteller
 
Posts: 1573
Joined: Wed Apr 06, 2005 8:43 am
Location: South Florida
Top

Postby Woody » Mon Jul 18, 2005 10:28 am

IraRat,
The wooden trim thing was frustrating I know. Take your time with it and you will get it down. I was dodging last years tropical storms and hurricanes trying to put the wooden trim on mine. I gave up on the first one and went with metal. The second one is going to be wood like I wanted originally. I built fullsize bending jigs for this one and the trim is already forming as we speak. Now hope the weather wiil hold this year for the second attempt. :thumbsup:
Woody
The Tear Jerker's, Florida Chapter Director
E-mail: [email protected]
Tear jerker chapter site http://www.tearjerkers.net/forums/
Check the SE section for gathering information
Tear Jerkers new site http://www.tearjerkers.net/forums/
Enjoying life in 12 ounce increments is what it's about
User avatar
Woody
2000 Club
2000 Club
 
Posts: 2006
Images: 26
Joined: Tue Jun 15, 2004 11:07 pm
Location: Ft. Lauderdale, Florida
Top

Postby mikeschn » Mon Jul 18, 2005 12:25 pm

Hey Ira,

It's looking really good. You've got yourself something you'll be proud of, eh?

Are you going to hide that beautiful woodgrain on the roof?

Mike...
The quality is remembered long after the price is forgotten, so build your teardrop with the best materials...
User avatar
mikeschn
Site Admin
 
Posts: 19202
Images: 475
Joined: Tue Apr 13, 2004 11:01 am
Location: MI
Top

Postby IraRat » Mon Jul 18, 2005 1:40 pm

mikeschn wrote:Hey Ira,

It's looking really good. You've got yourself something you'll be proud of, eh?

Are you going to hide that beautiful woodgrain on the roof?

Mike...


Nope--as I progress in the project, I'm not only getting a lot lazier, I'm getting a lot CHEAPER. So for better or worse and after a few coats of my ridiculously expensive Pratt & Lambert Spar varnish, that's my roof.

Won't know about proud until I'm finished. I think it will be more like RELIEVED.

And I have some ideas for bottom trim that extends the look of those sidewalls coming down. so the steel frame is totally covered.

Been on eBay this morning looking at like 4" diameter BAMBOO, the tiki hut effect, but I'm just not sure yet. Gonna leave this for later.
--Ira

"My HD and Wal-Mart have been out of Titebond for weeks, and I think it's a communist conspiracy."
User avatar
IraRat
Forum Storyteller
 
Posts: 1573
Joined: Wed Apr 06, 2005 8:43 am
Location: South Florida
Top

Next

Return to Teardrop Construction Tips & Techniques

Who is online

Users browsing this forum: Bing [Bot] and 1 guest