40's Homebuilt with Metal Framing - Need Suggestions

Anything to do with mechanical, construction etc

40's Homebuilt with Metal Framing - Need Suggestions

Postby vintagetrailergal59 » Fri Jan 02, 2009 10:08 am

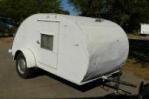
Looking for suggestions from those with more experience...we have a 40's teardrop that has all metal framing...there is no wood paneling or insulation inside. The elderly folks that we bought it from said it never had it...i think that they may be right. The interior door handle was welded on. The only wood inside is a closet area at the front of the teardrop. Any suggestions how to add insulation and birch paneling inside? Has anyone had to deal with this situation before? The whole trailer is riveted and solid....other than some water damage in the lower rear on one side. We appreciate the forum and any expertise that anyone can offer! I've posted an album of photos of the interior....Thank you! Margaret and Steve - Northern CA


http://www.freewebs.com/vintagetrailergal/apps/photos/
There's no place like home, unless it's in your vintage trailer!
User avatar
vintagetrailergal59
Teardrop Inspector
 
Posts: 13
Joined: Sat Aug 02, 2008 12:30 am
Location: Northern California

Postby angib » Fri Jan 02, 2009 11:01 am

I would be tempted to thin down some wood strips so that they fitted into the channel sections as grounds for pinning the panelling to. You might need to push the strips in place, give them a thump with a mallet, take them out and then use a countersink to relieve the back face - the body rivets will leave a mark where the holes are needed. When they're ready, stick them in with a good adhesive/sealant.

But before adding panelling, you'll want to stop the rust on the roof channels and, most importantly of all, make a permanent fix to that blocked-up ventilator over the driver's side window - that vent will like nothing more than to let a dribble of water in to rot the back of your panelling.

Andrew
User avatar
angib
5000 Club
5000 Club
 
Posts: 5783
Images: 231
Joined: Fri Apr 30, 2004 2:04 pm
Location: (Olde) England

Postby vintagetrailergal59 » Fri Jan 02, 2009 11:14 am

Thank you Andrew for some good advice. I agree that those vents might have the potential for leaking water... hadn't thought of that before!
There's no place like home, unless it's in your vintage trailer!
User avatar
vintagetrailergal59
Teardrop Inspector
 
Posts: 13
Joined: Sat Aug 02, 2008 12:30 am
Location: Northern California
Top

Postby Dale M. » Fri Jan 02, 2009 11:22 am

Another possible would be to add a furring strip along side angles that support sides and top and add a few well placed screws through angles into strips (not through sheet metal/surface of sides but through angles).. this can give you some extra space for insulation and some place to tack or screw interior paneling to...

IF you were to use strips that are not much wider than angles or just enough to add insulation panels ( foam sheet from home improvement store) you can avoid losing to much interior space...

Dale
Lives his life vicariously through his own self.

Any statement made by me are strictly my own opinion.
You are free to ignore anything I say if you do not agree.

Image
User avatar
Dale M.
2000 Club
2000 Club
 
Posts: 2693
Images: 18
Joined: Thu Jun 09, 2005 8:50 pm
Location: Just a tiny bit west of Yosemite National Park
Top

Postby bobhenry » Fri Jan 02, 2009 11:49 am

Being in Sunny California you may not be enlightened on ice dam membrane but it is great stuff if you want to permanently seal out water. It is an ultra flexable rubber roll that is stickey as hell. You get one shot at applying it so it better be right , stretched tight , and where you want it. Blue sheet foam in the stud cavities would add ridgity without weight and a 3/8 to 1/2 " birch plywood could be added to the existing vertical wall "studs" with self drilling sheet metal screws. Rosettes could be added to dress them up with screw cap inserted in the head of the screw after installation. The roof has me scratching my head Those tiny spare do not appear to have any depth you may have to remove a few rivits and screw a wood 1x2 to them allow a ceiling to be applied. I bet it sounds like you are in an oil drum right now when you are inside.
Growing older but not up !
User avatar
bobhenry
Ten Grand Club
Ten Grand Club
 
Posts: 10368
Images: 2623
Joined: Fri Feb 09, 2007 7:49 am
Location: INDIANA, LINDEN
Top

Postby dreadcptflint » Fri Jan 02, 2009 12:25 pm

Margaret and Steve,
Please post your progress. I ran into a similar one last year from Kennawick that I could see again. (this time for a reasonable price).
The quickest way to find me is on my business site. Yes, I do answer questions and provide quotes for free. Find me at: http://www.wenatcheefarmers.com
User avatar
dreadcptflint
1000 Club
1000 Club
 
Posts: 1080
Images: 19
Joined: Fri Jul 13, 2007 3:38 pm
Location: Wenatchee, WA
Top

Postby Jiminsav » Fri Jan 02, 2009 7:48 pm

I say cut the wood to fit between the angles/channels and use velcro to hold it up..
Jim in Savannah
If you can read this bumper sticker, my camper fell off.
User avatar
Jiminsav
3000 Club
3000 Club
 
Posts: 3059
Images: 40
Joined: Sat Apr 17, 2004 8:49 pm
Location: Georgia, Savannah
Top

Postby doug hodder » Fri Jan 02, 2009 8:31 pm

I'm partial to Andrews suggestion. If you use the wood strips, they could be sealed on the exterior side to close up the wood grain then install them using a commercial grade VHB foam tape from 3M. KW and Peterbuilts use that tape on their cabs in a variety of places as well as in the RV and sign industry. The sealing of the wood will give it a better bonding surface for the tape. It will then give you a surface that you can either glue to, or shoot screws into. Fill the openings with foam board. Just an idea, other opinions may vary. Doug
doug hodder
*Snoop Dougie Doug
 
Posts: 12625
Images: 562
Joined: Tue Dec 14, 2004 11:20 pm
Top


Return to Teardrop Construction Tips & Techniques

Who is online

Users browsing this forum: No registered users and 4 guests