Bending glue and laminating strips

Anything to do with mechanical, construction etc

Bending glue and laminating strips

Postby starleen2 » Wed Jan 28, 2009 10:46 pm

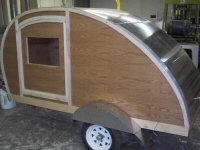
Ok folks, I’m getting ready to do another build and need some info. This is the first time I’m going with a rounded front. I’m trying to keep the weight down. I need to do some “bending “of some framing members and do not have a steamer to do it (not the plywood, I know how to do that) The finished dimension of the wood will be 3/4 “ thick. I do not want to kerf it. I’m thinking of glue and laminating strips together to make the needed bends on a full size jig. How thick should I cut the strips to get a good bend without breaking? Glue? Have you built a home made steamer ? Pics would be most helpful :thinking:
User avatar
starleen2
5th Teardrop Club
 
Posts: 16272
Images: 224
Joined: Sat May 12, 2007 8:26 pm
Location: Pea Ridge ,AR

Postby halfdome, Danny » Wed Jan 28, 2009 11:11 pm

The thickness of your strips would depend on the species of the wood your attempting to bend and how tight a radius you'd be doing. Try a few practice pieces between 1/16" to 1/4" to determine the best thickness for your profile. Popular is a good bending hardwood and isn't that expensive. If you have access to a planer or an overhead automatic sander it will make the task much easier. A home made steamer could be a simple four sided pine box sealed at one end and a simple plug door at the other. Drill holes through the sides and insert thick dowels to hold the wood while steaming. Your heat source could be any variety of methods of boiling water from a kettle on a stove to a electric water heater element in a can with piping to your box. I think stripping will give you the best results and less chance of spring back. :D Danny
ImageImage
"Conditions are never just right. People who delay action until all factors are favorable do nothing". William Feather
Don't accept "It's Good Enough" build to the best of your abilities.
Image
Teardroppers Of Oregon & WashingtonImage
User avatar
halfdome, Danny
*Happy Camper
 
Posts: 5894
Images: 252
Joined: Sun Aug 14, 2005 11:02 pm
Location: Washington , Pew-al-up

Postby Roly Nelson » Wed Jan 28, 2009 11:35 pm

I simply flipped my 3/4" pine molding members, up on edge and cut them into 3 equal pieces. They ended up slightly less than 1/4" thick and I glued and clamped them to the curved roof and it was a snap. You can see my method and results in my construction pages below.
Roly :thumbsup:
See the little 1/2 Nelson Woody constructions pics at: http://gages-56.com/roly.html
User avatar
Roly Nelson
L'il Ol' Woody Builder
 
Posts: 2971
Images: 13
Joined: Sun Jan 30, 2005 12:45 pm
Location: Wildomar, Calif
Top

Postby Juneaudave » Thu Jan 29, 2009 12:15 am

Doesn't take much...I like 1/4 inch strips at about 15 minutes steaming in my coleman stove, teapot, recycled gutter downspout stuffed with rags contraption. For 3/4 inches of total thickness, I'd run the strips long, put all three 1/4 inch thick strips in the steamer at once for about 20 minutes...

Image
Pick straight grained wood, use lots of clamps on the jig, let the strips dry at least 24 hours in the jig before glue up, and you are there!!! Remember, you have only minutes after you take them out of the steam box before they cool...so have your clamps ready and get'em in the jig!!!
:thumbsup:
User avatar
Juneaudave
Super Duper Lifetime Member
 
Posts: 3237
Images: 380
Joined: Sun Jul 03, 2005 12:11 pm
Location: Juneau, Alaska
Top

Postby Mary K » Thu Jan 29, 2009 12:34 am

Ooo Ooo!! Steve Cox's is your man Scott!!! Go check out his Gypsy Caravan thread. He did some amazing laminating on both his builds. :thumbsup: :thumbsup:
Mary K

I don't know half of you half as well as I should like; and I like less than half of you half as well as you deserve. Bilbo Baggins
User avatar
Mary K
6000 Club
6000 Club
 
Posts: 6425
Images: 44
Joined: Wed Aug 02, 2006 3:07 pm
Location: Florida, Pensacola
Top

Postby Juneaudave » Thu Jan 29, 2009 2:12 am

Mary K wrote:Ooo Ooo!! Steve Cox's is your man Scott!!! Go check out his Gypsy Caravan thread. He did some amazing laminating on both his builds. :thumbsup: :thumbsup:


Yep MK...you have a good memory (duh...you must have missed the sixties) ...here is a recent Newby thread that went out of control on steam bending...Poor Lyn got more advice than requested :cry: It has some good pics on what builders have done!!!
:thumbsup: :thumbsup:
User avatar
Juneaudave
Super Duper Lifetime Member
 
Posts: 3237
Images: 380
Joined: Sun Jul 03, 2005 12:11 pm
Location: Juneau, Alaska
Top

Postby PaulC » Thu Jan 29, 2009 2:19 am

Hi Scott, Did'nt Mike do a laminating procedure on the lightweight he built. I can't find the thread he posted it in but he did have pics and all on how he did it.
Cheers
Paul :thumbsup:
Time is the only real capital we have. Money you can replace but time you cannot.
User avatar
PaulC
3rd Teardrop Club
 
Posts: 4439
Images: 36
Joined: Mon May 24, 2004 7:27 am
Location: Laura, SouthernFlinders Ranges, South Australia
Top

Postby Steve_Cox » Thu Jan 29, 2009 6:38 am

Juneaudave wrote:
Mary K wrote:Ooo Ooo!! Steve Cox's is your man Scott!!! Go check out his Gypsy Caravan thread. He did some amazing laminating on both his builds. :thumbsup: :thumbsup:


Yep MK...you have a good memory (duh...you must have missed the sixties) ...here is a recent Newby thread that went out of control on steam bending...Poor Lyn got more advice than requested :cry: It has some good pics on what builders have done!!!
:thumbsup: :thumbsup:


:roll: I missed the 60's too! and I was there :lol:
Steve
User avatar
Steve_Cox
4000 Club
4000 Club
 
Posts: 4903
Images: 196
Joined: Sun Apr 03, 2005 8:46 am
Location: Albuquerque New Mexico
Top

Postby Mark McD » Thu Jan 29, 2009 7:54 am

To make a steamer you can get a 10' length of schedule 40 PVC, cap one end and drill a small hole in end to relieve pressure. Use a threaded cap on the other end, the end you load . Get a NEW metal gas can and radiator hose and connect the hose to the can and the other end to a hole cut in the pvc pipe. Fill the can with water and put it on a burner, the burners from turkey fryers work well because the can can sit on top of it, but any heat source works. Load the steamer box and cap it. It only takes a few minutes to make the wood pliable enough to bend.And use tongs and gloves when unloading the pieces.

P.s. If you can leave your pieces a little long and trim off the excess later because the wood will shrink a bit after it dries out and may cause joints to open.
I like turtles
Mark
I don't feel tardy
User avatar
Mark McD
The 300 Club
 
Posts: 427
Images: 63
Joined: Sat Jan 19, 2008 12:53 am
Location: Northeast Ohio
Top

Postby Elumia » Thu Jan 29, 2009 11:26 am

I've made some curved pieces by laminating 1/8 pieces of Luan ply. Bends easy without steaming. Can make a pretty tight radius with it too.

Mark
User avatar
Elumia
500 Club
 
Posts: 641
Images: 15
Joined: Tue Jan 17, 2006 2:02 am
Location: Napa, CA
Top

Postby Steve Frederick » Thu Jan 29, 2009 12:16 pm

Elumia wrote:I've made some curved pieces by laminating 1/8 pieces of Luan ply. Bends easy without steaming. Can make a pretty tight radius with it too.

Mark

this is how I would go, especially if your doing a 5'-er. You will have lots of left-over 1/4' or 1/8" ply that you don't use for the roof. :thinking:
Blessings, Steve
Adirondacks, Upstate New York
Building Journals
The Shop Manual's 8-years old!! Thank's everyone!
New! 'Rondack Lodge Plans!Order Here!
Image
User avatar
Steve Frederick
Custom Teardrop Builder
 
Posts: 1984
Images: 29
Joined: Thu Apr 15, 2004 5:02 pm
Location: Upstate New York, Adirondacks (Great Sacandaga Lake)
Top

Postby Rock » Thu Jan 29, 2009 12:19 pm

I followed Mike's lead and ripped/planed common 2X framing lumber to 1/8" by 1". I just happened to have a few gallons of epoxy laying around, so I laminated everything at once. As long as they're mostly knot free they should bend to a rather small radius.

Image

Image

I butt-jointed 8' long sections with epoxy and fiberglass tape to give me full 16' pieces to work with. Worked great.

Eric
Rock
Teardrop Master
 
Posts: 273
Images: 48
Joined: Tue Oct 14, 2008 10:38 am
Location: Fremont, OH
Top

Postby Elumia » Thu Jan 29, 2009 1:14 pm

I forgot to mention, by using plywood, you are pretty assured that the width of your stock will be consistant, thus the laminated curve will have a consistant thickness too. It's not fun trying to cut a bunch of 8' lengths to 1/8" thick strips either, unless you have a real good table saw set up. It was much easier to cut 1/8" ply to 1-1/2" wide strips. A belt sander will clean up the edge nicely. I just used titebond to glue it up.

Buying thin stock gets you into the molding department and that is more costly than plywood. A $10-$20 sheet of ply will give you lots of strips.

Mark
User avatar
Elumia
500 Club
 
Posts: 641
Images: 15
Joined: Tue Jan 17, 2006 2:02 am
Location: Napa, CA
Top

Postby mikeschn » Thu Jan 29, 2009 4:16 pm

PaulC wrote:Hi Scott, Did'nt Mike do a laminating procedure on the lightweight he built. I can't find the thread he posted it in but he did have pics and all on how he did it.
Cheers
Paul :thumbsup:


That's exactly right. You can see those pics in this thread...

http://tnttt.com/viewto ... ultralight

Mike...
The quality is remembered long after the price is forgotten, so build your teardrop with the best materials...
User avatar
mikeschn
Site Admin
 
Posts: 19202
Images: 475
Joined: Tue Apr 13, 2004 11:01 am
Location: MI
Top


Return to Teardrop Construction Tips & Techniques

Who is online

Users browsing this forum: No registered users and 8 guests