Open framed hatch...how to finish inset taillights?

Anything to do with mechanical, construction etc

Open framed hatch...how to finish inset taillights?

Postby Juneaudave » Sat Jan 31, 2009 10:51 pm

I mounted the taillights and license plate holder on the back of the SlumberMAX this weekend...the lights and plate I chose needed to be drilled into the hatch, which has exposed spars...
;)
Image

So now on the underside of the hatch...I've got unsightly holes and bolts sticking through. I'm sure my wiring expertise will add to the beauty of what is sure to look like a mess...
:roll:
Image

So...for those open spar hatch builders...how did you finish? Or did you? I'd like some elegant inspiration here...please oh please...Pics would be appreciated!!!
User avatar
Juneaudave
Super Duper Lifetime Member
 
Posts: 3237
Images: 380
Joined: Sun Jul 03, 2005 12:11 pm
Location: Juneau, Alaska

Postby dhazard » Sat Jan 31, 2009 11:11 pm

I would make a wooden cover and install galley lights and a towel holder to hide it.
Image
ImageImageImage
Many miles and many tears. Times were hard but now they're changing.
You should know that I'm not afraid.
User avatar
dhazard
Donating Member
 
Posts: 1070
Images: 122
Joined: Fri Nov 04, 2005 11:08 pm
Location: Manteca CA

Postby Juneaudave » Sat Jan 31, 2009 11:27 pm

Thanks Dan, good idea...I don't have hatch lights yet...I was sort of thinking individual covers as opposed to something that stretches acroos the entire hatch. But I'm having a hard time visualizing...including the best way for the taillight wiring to pass through the bulk head. I'm pretty sure I can build it if I can figure out how I want it to look.
:thinking: :thinking: :thinking:
User avatar
Juneaudave
Super Duper Lifetime Member
 
Posts: 3237
Images: 380
Joined: Sun Jul 03, 2005 12:11 pm
Location: Juneau, Alaska
Top

Postby Wolffarmer » Sat Jan 31, 2009 11:35 pm

I am thinking if you want to leave it open to keep the weight down and to show the construction I would make the bolts short enough to use acorn nuts on. To hide the wires maybe route some channels in wood strips.

Though the back of the lights is going to be hard to hide. Maybe a light weight wooden box inbetween the spars?
"these guys must be afraid of the dark"
User avatar
Wolffarmer
Donating Member
 
Posts: 4612
Images: 309
Joined: Wed May 02, 2007 1:32 pm
Location: Idaho Rupert
Top

Postby aggie79 » Sat Jan 31, 2009 11:47 pm

Don't want to create a lot of work for you, but you might do some removable inset panels using woven cane like your shelves on the interior.
Tom (& Linda)
For build info on our former Silver Beatle teardrop:
Build Thread

93503
User avatar
aggie79
Super Duper Lifetime Member
 
Posts: 5405
Images: 686
Joined: Tue Aug 07, 2007 5:42 pm
Location: Watauga, Texas
Top

Postby madjack » Sat Jan 31, 2009 11:58 pm

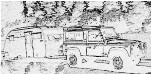
Dave, this is not the best pic but just the one I could run down...
Image

the section the bottom(top of pic) of the hatch was boxed in to both contain the light and latch hardware...the panelede section in the center was to hide the wiring...you could build boxes to hide the hardware and give a place to mount additional interior lighting and either use wire loom to hide/dress up the wiring runs...you could also build a wooden conduit to hide the wiring...not as clean as "nothing" but since you have the lights in the hatch, you will havvta come up with something......
madjack 8)
Last edited by madjack on Sat Jan 31, 2009 11:59 pm, edited 1 time in total.
...I have come to believe that, conflict resolution, through violence, is never acceptable.....................mj
User avatar
madjack
Site Admin
 
Posts: 15128
Images: 177
Joined: Thu Dec 02, 2004 5:27 pm
Location: Central Louisiana
Top

Postby Juneaudave » Sat Jan 31, 2009 11:58 pm

Good Ideas!!!! Nicer hardware or carry the caning theme with inset panels!!! I didn't think of either of those and either would work!!!!!
:thumbsup: :applause: :applause:
User avatar
Juneaudave
Super Duper Lifetime Member
 
Posts: 3237
Images: 380
Joined: Sun Jul 03, 2005 12:11 pm
Location: Juneau, Alaska
Top

Postby Nitetimes » Sun Feb 01, 2009 12:01 am

Too late, ya already drilled the holes. 8) :thinking: :lol:

Image[/url]
Rich


Image
ImageImage
-
The strongest reason for the people to retain the right to
keep and bear arms is, as a last resort, to protect themselves
against tyranny in government.
- Thomas Jefferson -
Personally, I carry a gun because I'm too young to die and too old to take a butt kickin'.
User avatar
Nitetimes
7000 Club
7000 Club
 
Posts: 7909
Images: 194
Joined: Sat Feb 12, 2005 12:44 am
Location: Butler,PA
Top

Postby Juneaudave » Sun Feb 01, 2009 12:41 am

Nitetimes wrote:Too late, ya already drilled the holes. 8) :thinking: :lol:

Image[/url]


Smartass...I debated for months about those lights and drilling those holes...But ya know...once you drill the first one...your kinda SOL aren't ya!!!!
:lol: :lol: :lol:
User avatar
Juneaudave
Super Duper Lifetime Member
 
Posts: 3237
Images: 380
Joined: Sun Jul 03, 2005 12:11 pm
Location: Juneau, Alaska
Top

Postby Nitetimes » Sun Feb 01, 2009 12:45 am

Juneaudave wrote:
Nitetimes wrote:Too late, ya already drilled the holes. 8) :thinking: :lol:


Smartass...I debated for months about those lights and drilling those holes...But ya know...once you drill the first one...your kinda SOL aren't ya!!!!
:lol: :lol: :lol:


Yup ya sure be SOL now!! :lol: :lol: They do look good on the outside tho!! :thumbsup: I kinda like the cane idea someone mentioned.
Rich


Image
ImageImage
-
The strongest reason for the people to retain the right to
keep and bear arms is, as a last resort, to protect themselves
against tyranny in government.
- Thomas Jefferson -
Personally, I carry a gun because I'm too young to die and too old to take a butt kickin'.
User avatar
Nitetimes
7000 Club
7000 Club
 
Posts: 7909
Images: 194
Joined: Sat Feb 12, 2005 12:44 am
Location: Butler,PA
Top

Postby bobhenry » Sun Feb 01, 2009 2:47 am

Wolffarmer wrote:I am thinking if you want to leave it open to keep the weight down and to show the construction I would make the bolts short enough to use acorn nuts on. To hide the wires maybe route some channels in wood strips.

Though the back of the lights is going to be hard to hide. Maybe a light weight wooden box inbetween the spars?


I liked this idea there are a few things these little decorative boxes could do for you ac and dc galley lighting ~speaker housings ~ tissue . napkin or paper towl dispenser. Dang it ya got me thinkin about my rat nest of wires under my hatch guess I have another project now.
Growing older but not up !
User avatar
bobhenry
Ten Grand Club
Ten Grand Club
 
Posts: 10368
Images: 2623
Joined: Fri Feb 09, 2007 7:49 am
Location: INDIANA, LINDEN
Top

Postby xrover » Fri Feb 13, 2009 5:48 pm

How about a checkerboard them instead of open spars? Match the light and dark wood on the outside by covering up the spar sections with alternating dark and light wood.
1988 Cadet
2006 Argo Avenger
User avatar
xrover
Teardrop Master
 
Posts: 276
Images: 22
Joined: Sun Feb 01, 2009 12:06 am
Location: Brampton, Ontario
Top

Postby bdosborn » Sat Feb 14, 2009 7:33 pm

I/8" plywood skin on the inside of the hatch?

Image

Bruce
2009 6.5'X11' TTT - Boxcar
All it takes is a speck of faith and a few kilowatts of sweat and grace.
Image
Boxcar Build
aVANger Build
User avatar
bdosborn
Donating Member
 
Posts: 5596
Images: 806
Joined: Wed May 05, 2004 11:10 pm
Location: CO, Littleton
Top

Postby Ken A Hood » Sat Feb 14, 2009 7:37 pm

What about mounting a plaque with the build date where the plate bolts are; as for the wiring there's wire loom available in several different colors (at least it would dress up the exposed wiring.)
Disclaimer: I in no way resemble the avatar shown. Furthermore, I in no way have any affiliation to the Trailer Park Boys and more specifically Bubbles!
User avatar
Ken A Hood
500 Club
 
Posts: 841
Images: 42
Joined: Sun Apr 18, 2004 8:15 pm
Location: ON CANADA
Top

Postby halfdome, Danny » Sat Feb 14, 2009 10:55 pm

Dave, I use 50 Pontiac tail lights too. I do fill my hatch with insulation and then a sheet of 1/8" plywood with 6" x 6" pieces of ply for removable covers. You could make 1/8' covers just for the areas you want to hide with a screw in each corner for bulb replacement. Maybe just cover the very lower portion all the way across so it's not so obvious but removable. The lights look great. :thumbsup: :D Danny
ImageImage
"Conditions are never just right. People who delay action until all factors are favorable do nothing". William Feather
Don't accept "It's Good Enough" build to the best of your abilities.
Image
Teardroppers Of Oregon & WashingtonImage
User avatar
halfdome, Danny
*Happy Camper
 
Posts: 5894
Images: 252
Joined: Sun Aug 14, 2005 11:02 pm
Location: Washington , Pew-al-up
Top

Next

Return to Teardrop Construction Tips & Techniques

Who is online

Users browsing this forum: No registered users and 7 guests