Trailer Repair (updated - done)

Anything to do with mechanical, construction etc

Trailer Repair (updated - done)

Postby rainjer » Mon Mar 09, 2009 6:26 pm

A few week back I discovered my seam in the front of my trailer was coming apart. So last week I was able to get my garage cleaned up enough to dive into the repair. At first I thought all I need to do was trim a little wood back & put some fiberglass tape & epoxy over it. Well I was wrong.

Image

This part of the roof delamininated only a little bit.
Image
I cut this section out thinking this was all I need to patch.
Image
I cut this patch & fit it in. As the trailer dried, more wood began to delaminate as seen on the lower left.
Image
I am now replacing the entire front of the trailer. The plywood was all damp. The spars are wet also but they should dry out in a few days.
Image

When I get he repairs done, I will be putting an aluminum roof on the entire trailer.

Jeremy
Last edited by rainjer on Fri Apr 17, 2009 9:49 pm, edited 3 times in total.
User avatar
rainjer
King Koleman
 
Posts: 2092
Images: 11
Joined: Mon Feb 27, 2006 11:38 pm
Location: Everett, WA

Postby halfdome, Danny » Mon Mar 09, 2009 6:37 pm

Wow Jeremy it's good you caught it before the insides got wet. Do you think the snow soaked through your paint? You could use that light saber thingie Jane bought called a Verilux. I will kill any bacteria/mold that may have started to grow in there. Costco sells them. An aluminum roof will hold up better and add to the look of your teardrop :thumbsup: .
Like everyone says "Their never finished". :) Danny
ImageImage
"Conditions are never just right. People who delay action until all factors are favorable do nothing". William Feather
Don't accept "It's Good Enough" build to the best of your abilities.
Image
Teardroppers Of Oregon & WashingtonImage
User avatar
halfdome, Danny
*Happy Camper
 
Posts: 5894
Images: 252
Joined: Sun Aug 14, 2005 11:02 pm
Location: Washington , Pew-al-up

Postby rainjer » Mon Mar 09, 2009 6:51 pm

I do think the snow had a big part of it . I knew building it the seam was a weak spot. The snow piled up on my tongue box and sat on the front for weeks. I noticed when the snow melted that the seam had opened up a little.

I was able to pull the top layer of insulation off & the spars are only wet 1/4 of the way thru. No moisture in the interior wood. I have a heater drying t now. I will see how it looks in a few days & decide from there what to do next.

BTW. You are making good progress on trailer # 3. When did you start it?

Jeremy
User avatar
rainjer
King Koleman
 
Posts: 2092
Images: 11
Joined: Mon Feb 27, 2006 11:38 pm
Location: Everett, WA
Top

Postby halfdome, Danny » Mon Mar 09, 2009 8:24 pm

rainjer wrote:BTW. You are making good progress on trailer # 3. When did you start it?

Jeremy

Jeremy, I started welding the chassis in December. Haven't worked on it for two weeks as I'm making new cabinets for our rental house. We gutted the 28 yr old house, will put it up for sale when were done. Hope to get back to #3 in April. I'd recommend using 1/8" Baltic Birch on the repair, much better than Luan. :D Danny
ImageImage
"Conditions are never just right. People who delay action until all factors are favorable do nothing". William Feather
Don't accept "It's Good Enough" build to the best of your abilities.
Image
Teardroppers Of Oregon & WashingtonImage
User avatar
halfdome, Danny
*Happy Camper
 
Posts: 5894
Images: 252
Joined: Sun Aug 14, 2005 11:02 pm
Location: Washington , Pew-al-up
Top

Postby rainjer » Wed Mar 25, 2009 9:30 pm

After several weeks of work, I am beginning to see progress. The weather has been not cooperating so I have been doing as much as possible in the garage. We did have a break in the weather last Friday & Saturday so I was able to go pick up wood & the aluminum.

On Friday I was able to get the wood replaced on the front & get the inside of my galley hatch skinned.

Saturday I was able to get all for the repair seams epoxied with cloth & I also skim coated the rest of the wood I replaced. I let it bake in the sun for a couple hours before I put it back in the garage with the heat on. By

Sunday morning it was ready to sand. I decided to fit my galley hatch back on Sunday afternoon & discovered had move after I skinned the inside & it would no longer close. It had "flattened out" 3/16 in length & was hitting on the floor.

So after lots of head scratching I came up with the solution while at work Monday. So Monday evening I decided to trim some material off the top edge of the hatch. No problem! Well it took 45 minutes to get the hatch hinge off without any damage. (good caulk) I set up a straight edge & with my trusty Skill saw I trimmed the hatch. I screwed the hinge back on (without caulk) and put the hatch back on the trailer for a fit. It closed great. I then noticed the the gap between the hatch & the side wall was not even over the entire length of the hatch. More head scratching.

Yesterday evening I decided to scribed the profile of the hatch on the sidewall & use my belt sander to "revise" the profile on the wall. After about a hour of sanding & fitting I now have a even gap.

Tonight the weather was great so I rolled the trailer out an glued the roof on.

A couple more week & I should be done with all my repairs & modifications.

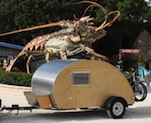
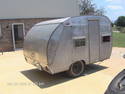
Here are a couple pictures.

Image

Image
User avatar
rainjer
King Koleman
 
Posts: 2092
Images: 11
Joined: Mon Feb 27, 2006 11:38 pm
Location: Everett, WA
Top

Postby Juneaudave » Wed Mar 25, 2009 10:00 pm

Looks good, all that head scratching paid off!!! The aluminum ought to work well.
:applause: :applause:
User avatar
Juneaudave
Super Duper Lifetime Member
 
Posts: 3237
Images: 380
Joined: Sun Jul 03, 2005 12:11 pm
Location: Juneau, Alaska
Top

Postby kennyrayandersen » Thu Mar 26, 2009 2:52 am

Nice little trailer. It looks like a bit of moisture got in there. One thing I’d like to mention that I’ve seen on a few trailers is that sometimes people put the seams in highly curved areas. This puts a lot of stress on the joint. IMO if that is absolutely unavoidable; I would scarf join the two pieces together before I wrapped the trailer with it, then I’d button that down. Otherwise, I would put the joint in an area of low curvature which will reduce the stress in the joint and it will be less likely to want to pop off.
User avatar
kennyrayandersen
1000 Club
1000 Club
 
Posts: 1750
Images: 38
Joined: Sun Apr 29, 2007 10:27 pm
Location: TX
Top

Postby rainjer » Sun Mar 29, 2009 11:10 pm

I am making good progress even though I have been fighting a cold. I have all of the roof trim fit & screwed down. I still need to do some touch-up painting and then I can put sealant on and put them down permanently. I also started my 3rd galley remodel.

The canvas is now blank again.
Image

This is my current plan.
Image

I need to finish painting the rest of galley and then I can put it back together.

Jeremy
User avatar
rainjer
King Koleman
 
Posts: 2092
Images: 11
Joined: Mon Feb 27, 2006 11:38 pm
Location: Everett, WA
Top

Postby rainjer » Fri Apr 03, 2009 9:10 pm

More progress. I got my new shelves built & sanded.

Image

Here is the waffle iron shelf & the stove storage. As you can see, I made a recessed area for the stove to drop into to prevent the stove from sliding around.
Image

I am still trying to figure out the center doors.

Jeremy
User avatar
rainjer
King Koleman
 
Posts: 2092
Images: 11
Joined: Mon Feb 27, 2006 11:38 pm
Location: Everett, WA
Top

Postby doug hodder » Fri Apr 03, 2009 9:35 pm

Looks great Jeremy!!!...got all the important stuff in there...a 500, waffle iron, coleman lantern and a 2 burner....Gonna have it done in time for the Dam? See ya there!!! We can set up an abbreviated "Gas pressure appliance museum"! :lol: Doug
doug hodder
*Snoop Dougie Doug
 
Posts: 12625
Images: 562
Joined: Tue Dec 14, 2004 11:20 pm
Top

Postby rainjer » Fri Apr 03, 2009 9:47 pm

I am not sure if I will be 100% done but it will be water tight. :D I have a little sanding to do & I can get a coat of paint on the the shelves tomorrow.

Jeremy
User avatar
rainjer
King Koleman
 
Posts: 2092
Images: 11
Joined: Mon Feb 27, 2006 11:38 pm
Location: Everett, WA
Top

Postby bmacke » Sat Apr 04, 2009 3:45 pm

rainjer,
where did you get your 'boomerang' laminate countertop? I've been thinking about one of the colors of that style when I get to counters but I don't know the best place to get it.


Brian
Image
User avatar
bmacke
Teardrop Advisor
 
Posts: 64
Images: 37
Joined: Wed Nov 29, 2006 12:26 pm
Location: Missouri, St. Louis
Top

Postby rainjer » Sat Apr 04, 2009 4:15 pm

It is Formica brand #6959. You should be able to order it from Lowe's or Home Depot.

Jeremy
User avatar
rainjer
King Koleman
 
Posts: 2092
Images: 11
Joined: Mon Feb 27, 2006 11:38 pm
Location: Everett, WA
Top

Postby greg755 » Sat Apr 04, 2009 4:15 pm

Jeremy it is looking good.

On the bright side you get to add all the extras that you didn't have before.

Waffle Iron, I never thought of that, mmmmm :coffee:
"It is a cruel thought, that, when we feel ourselves standing on the firmest ground in every respect, the cursed arts of our secret enemies, combining with other causes, should effect, by depreciating our money, what the open arms of a powerful enemy could not." --Thomas Jefferson to Richard Henry Lee, 1779. ME 4:298, Papers 2:298
User avatar
greg755
Grand Poobah
 
Posts: 439
Images: 65
Joined: Sun Dec 21, 2008 2:08 pm
Location: NY, Seneca Falls.... The Fingerlakes
Top

Postby rainjer » Sat Apr 04, 2009 7:11 pm

A little more progress. One more drawer to build & it is down to sanding and painting & the galley will be "done".

I got my slide out tray above cooler done. It has the same Formica as the counter top.It will hod my dish drainer & cutting mats.
Image

I also plan in making a knife block on the left side of the pull out shelf. Some thing like this one but smaller.
Image

Jeremy
User avatar
rainjer
King Koleman
 
Posts: 2092
Images: 11
Joined: Mon Feb 27, 2006 11:38 pm
Location: Everett, WA
Top

Next

Return to Teardrop Construction Tips & Techniques

Who is online

Users browsing this forum: No registered users and 6 guests