Update/More Camping: Weekender-for-5

...ask your questions in the appropriate forums BUT document your build here...preferably in a single thread...dates for updates, are appreciated....

Postby Miriam C. » Thu Apr 09, 2009 7:21 pm

:thinking: Don't cut yet! When you drop the sides down you will have to move the whole thing forward! The back will need to be fitted :D Only cut after you have dry fit it and studied it all day and night! :) ;)

Dry fit can save you a lot of grief even if it does take longer. :thumbsup:

Image
“Forgiveness means giving up all hope for a better past.â€
User avatar
Miriam C.
our Aunti M
 
Posts: 19675
Images: 148
Joined: Wed Feb 15, 2006 3:14 pm
Location: Southwest MO

Postby Juneaudave » Thu Apr 09, 2009 8:12 pm

Miriam C. wrote::thinking: Don't cut yet! When you drop the sides down you will have to move the whole thing forward! The back will need to be fitted :D Only cut after you have dry fit it and studied it all day and night! :) ;)

Dry fit can save you a lot of grief even if it does take longer. :thumbsup:


Good idea M!!! Drop the sides down a bit!!! If that don't work...we'll need to get out the ole board stretcher!!!
:lol:
User avatar
Juneaudave
Super Duper Lifetime Member
 
Posts: 3237
Images: 380
Joined: Sun Jul 03, 2005 12:11 pm
Location: Juneau, Alaska

Postby planovet » Thu Apr 09, 2009 8:30 pm

Miriam's right, I didn't didn't see the dropped part. :roll: I was assuming that the sides were sitting on the floor. Wait and see how it looks after you have dropped it, it may not be as bad as you thought. :thinking:
ImageMark (& Cindi)
Visit our website: Little Swiss Teardrop

I was wondering why the water balloon was getting bigger... and then it hit me.

ImageImageImageImage
User avatar
planovet
The Cat Man
 
Posts: 5583
Images: 3
Joined: Tue Nov 27, 2007 4:48 pm
Location: Plano, Texas
Top

Does Harbor Freight sell Board Stretchers

Postby Alfred » Thu Apr 09, 2009 8:54 pm

Hey Gang,

Does Harbor Freight sell any of those board stretchers???!!!

Doh!

Thanks everyone for your help. I am thinking as per Miriam's thoughts, perhaps when I actually drop it down on the frame and shift it forward a little, it won't be as pronounced.

AL.
4 minute video of our build - A 5x8 Camper for a family of 5 - http://youtu.be/CYGTlkfpIhY
How we built a 5x8 camper for a family of 5, using a utility trailer with an incorporated bunk bed for the kids.
From plain trailer to campground!

ImageImageImage
Also - More pictures here: http://flic.kr/ps/225piC
User avatar
Alfred
Silver Donating Member
 
Posts: 1633
Images: 368
Joined: Sun Jun 03, 2007 9:18 pm
Location: NC, Asheville
Top

Postby Dean in Eureka, CA » Thu Apr 09, 2009 9:56 pm

Yaa... A lot of builders hang the wall lower than the floor intentionaly.
The wall then "Skirts" and hides the frame from view.
In your case, you'll do nothing except gain length, which you want to do, if you drop the walls down a bit. :thumbsup:
User avatar
Dean in Eureka, CA
The Fogcrawler
 
Posts: 4997
Images: 69
Joined: Thu May 11, 2006 8:44 pm
Top

Postby mikeschn » Fri Apr 10, 2009 3:45 am

Don't drop those sides. You need every inch of headroom you can muster... Especially when trying to fit 3 growing kids in the bunk above your feet.

Image

Mike...
The quality is remembered long after the price is forgotten, so build your teardrop with the best materials...
User avatar
mikeschn
Site Admin
 
Posts: 19202
Images: 475
Joined: Tue Apr 13, 2004 11:01 am
Location: MI
Top

Postby S. Heisley » Fri Apr 10, 2009 9:34 am

Hi, Alfred:

For what it's worth, here are a couple ideas. You will already have a seam in your wall. If you put your doors where that seam will be so that the edges of the plywood cuts hit at each edge of the doors, you will only need to add a small piece of plywood above the doors. If you add trim at the seams there, it will look like you intended to do it that way, like a design feature. It would be sort of like an 'H' shape, with the trimmed doors being the bottom of the 'H' and the trimmed, added piece being the top of the 'H'. You probably already have enough scrap left over from the cut to do this; and, if you don't, they sell small, cut pieces of plywood at the big box stores that would work for that little area. Even it you decide to put a piece at the top and at the bottom of the doors, it won't look odd and won't take a lot of plywood to do.

By moving one of the plywood sheets to the edge of the door, one of your pieces will be moved forward or back and that piece will need to be trimmed again, to adjust to your size and design.

Another idea is to cut the front piece on the diagonal from where you need the extra length to the top. Then, add a diagonal piece there and color/paint that area differently, to make it look like a part of the planned design. Some of the best brain-storming ideas start with little flub-ups. :thumbsup:

Thanks for sharing your building adventure. :applause:
User avatar
S. Heisley
Super Lifetime Member
 
Posts: 8866
Images: 495
Joined: Mon Sep 17, 2007 10:02 am
Location: No. California
Top

Postby S. Heisley » Fri Apr 10, 2009 9:43 am

PS. If the fender is in the way of repositioning the door to where the plywood cut is, you might be able to just use wider trim boards around the doors, to cover up an added piece there.
User avatar
S. Heisley
Super Lifetime Member
 
Posts: 8866
Images: 495
Joined: Mon Sep 17, 2007 10:02 am
Location: No. California
Top

Postby starleen2 » Fri Apr 10, 2009 9:55 am

I agree with Mike about just adding the extra three inches into the middle seam - _ If the ply is not joined together yet - you could route a spline, cut and glue biscuits in, or just brace behind the whole thing with a 1x6, whatever. To drop the whole thing may rob you of precious needed sleeping area. It may not seem like much, but it will all add up when you begin to close things up. :thinking:
User avatar
starleen2
5th Teardrop Club
 
Posts: 16272
Images: 224
Joined: Sat May 12, 2007 8:26 pm
Location: Pea Ridge ,AR
Top

On 2nd thought...Dumb mistakes and Dumb luck

Postby Alfred » Fri Apr 10, 2009 10:42 pm

Hey gang,

Tonight, I went down to the garage and took a 2nd look at my wall situation. I had always planned on attaching them to the side of the 2x4 floor frame, of which about 1 1/2 inches is above the trailer rim. This means I have to drop the walls 1 1/2 inches anyway.

Mike, if I set them on top of the floor, I won't be able to get it into my low garage, which is one of the things we had talked about initially. So, just dropping this 1 1/2 inches stays consistent with our original plan. Anyway, it looks as if the 1 1/2 inch drop just about compensates for the shortage I saw. I had forgotten to factor the 1 1/2 inch drop in.

So basically, it looks like dumb luck is going to trump my dumb mistake, or probably more accurately, I have two dumb mistakes that are going to cancel each other out...

But, alls well ends well. We are going down to Tampa this week for Spring Break. I won't be able to work on the camper again until next week (Darn it)!

Al in Asheville. :thumbsup:
Last edited by Alfred on Sat Apr 11, 2009 6:18 am, edited 1 time in total.
4 minute video of our build - A 5x8 Camper for a family of 5 - http://youtu.be/CYGTlkfpIhY
How we built a 5x8 camper for a family of 5, using a utility trailer with an incorporated bunk bed for the kids.
From plain trailer to campground!

ImageImageImage
Also - More pictures here: http://flic.kr/ps/225piC
User avatar
Alfred
Silver Donating Member
 
Posts: 1633
Images: 368
Joined: Sun Jun 03, 2007 9:18 pm
Location: NC, Asheville
Top

Postby mikeschn » Fri Apr 10, 2009 11:01 pm

Yep, screwing it to the floor was the original plan. Sounds like you are back on track. too bad you'll be out of town. :(

Mike...
The quality is remembered long after the price is forgotten, so build your teardrop with the best materials...
User avatar
mikeschn
Site Admin
 
Posts: 19202
Images: 475
Joined: Tue Apr 13, 2004 11:01 am
Location: MI
Top

Postby Micro469 » Sat Apr 11, 2009 7:48 am

ya gotta admit ...it's a whole lot easier cutting a little off than adding a little on............. ;)
John
Image
User avatar
Micro469
Super Lifetime Member
 
Posts: 3185
Images: 382
Joined: Mon Nov 07, 2005 10:46 pm
Location: Brampton,Ontario,Canada
Top

Wall/Window/Door...Weekender for 5

Postby Alfred » Thu Apr 23, 2009 9:49 pm

Hey gang,

Making progress! Cut-out the doors/windows! See pix below!


Image


Image

Al in Asheville :thumbsup:
4 minute video of our build - A 5x8 Camper for a family of 5 - http://youtu.be/CYGTlkfpIhY
How we built a 5x8 camper for a family of 5, using a utility trailer with an incorporated bunk bed for the kids.
From plain trailer to campground!

ImageImageImage
Also - More pictures here: http://flic.kr/ps/225piC
User avatar
Alfred
Silver Donating Member
 
Posts: 1633
Images: 368
Joined: Sun Jun 03, 2007 9:18 pm
Location: NC, Asheville
Top

Framing

Postby Alfred » Sat Apr 25, 2009 11:41 pm

Hey Gang!

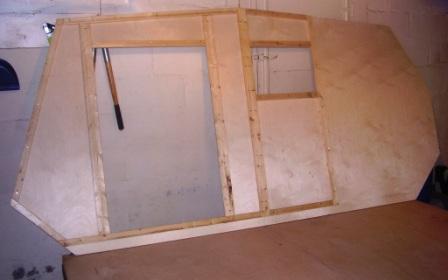
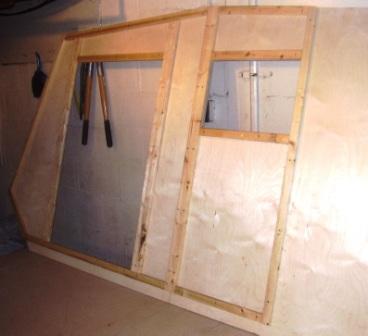
Started framing the walls today. Man oh man, this took a lot longer than I thought, and I did not even complete one whole side, but still I made some progress. I've never framed anything before, so I am thinking I did not do so bad for a first attempt. I am fairly certain I did not get everything quite square, so I am hoping it is close enough not to cause major problems down the road.

Thank goodness I bought a miter saw before I started, I never would have gotten the angles even close. There was still a learning curve on the miter saw, too and I did better on some cuts than others.

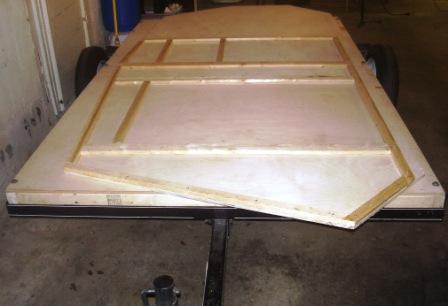
I forgot about the bolt-heads sticking up from the floor and I am going to need to cut clearance where the bolts are, from the bottom of the 1x2 framing. (You can see the bolt-heads in picture 3 below). The plywood below the 1x2 framing is going to be screwed into the side of the floor framing that rises above the rim of the trailer. As far as trimming clearance for the bolt-heads, I am thinking I can do this with a router, but I've never used a router before, so I am unsure how exactly to do this. I might wait until I go back to the community center woodshop next Thursday.

I did this part in my garage this afternoon and tonight.

I also have a question about notching the galley lid. I am thinking I notch it AFTER I have framed it, so when I cut I am cutting both the plyboard and the framing together? Is this correct? If so, I am going to frame the back with a wider plank (1x3 or 1x4?).

Here are some pictures...

Image


Image


Image

Thanks for any feedback. Kids had baseball this morning, then I worked on this all afternoon and tonight. Boy oh boy am I tired!

Al in Asheville :thumbsup:
4 minute video of our build - A 5x8 Camper for a family of 5 - http://youtu.be/CYGTlkfpIhY
How we built a 5x8 camper for a family of 5, using a utility trailer with an incorporated bunk bed for the kids.
From plain trailer to campground!

ImageImageImage
Also - More pictures here: http://flic.kr/ps/225piC
User avatar
Alfred
Silver Donating Member
 
Posts: 1633
Images: 368
Joined: Sun Jun 03, 2007 9:18 pm
Location: NC, Asheville
Top

Postby Miriam C. » Sun Apr 26, 2009 8:24 am

:applause: :thumbsup: Looks great! You are correct with the notching. Definitely do it and the framing together.

The bolt heads can be done two ways. You can use a paddle drill bit and make an inset the bolts to the bottom or you can use the same bit and make room in the sides. I would choose which ever board is thickest.

I definitely would not use the router without lots of practice on you almost finished side.

Image
“Forgiveness means giving up all hope for a better past.â€
User avatar
Miriam C.
our Aunti M
 
Posts: 19675
Images: 148
Joined: Wed Feb 15, 2006 3:14 pm
Location: Southwest MO
Top

PreviousNext

Return to Build Journals

Who is online

Users browsing this forum: No registered users and 12 guests