Stick a fork in 'er, she's done!

Anything to do with mechanical, construction etc

Stick a fork in 'er, she's done!

Postby dguff » Wed Aug 31, 2005 8:25 pm

My new modernistic style teardrop which I have named a "Riviera" by Guffkraft, is now finished. I resumed construction after returning from Minden and a Riviera convention in Arkansas. It took about 150 hours spread over eight weeks but we got 'er done.
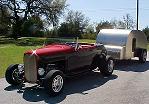
I took a little test tow yesterday and she pulls just great. Stopped by the scales and she weighs a relatively svelte 925 lbs. with the battery. I have added about a dozen more photos to my build album which you can see at http://pg.photos.yahoo.com/ph/guffdrop/my_photos

Our first outing is scheduled for the TOW group gathering at Camp Lane outside of Florence OR on the 9th and 10th of Sept. After that we are headed on a 7500 mile journey cross country to Philadelphia and back.

Jerome :D
Jerome


2008 Guffman
User avatar
dguff
Platinum Donating Member
 
Posts: 989
Images: 69
Joined: Tue Feb 08, 2005 12:46 pm
Location: Eureka CA

Postby Chris C » Wed Aug 31, 2005 9:00 pm

Congratulations! :applause: Looks great. :thumbsup: Glad you finally got it finished........................now go use it. :lol:
Chris :D

The tension between what is good enough and what is beyond that creates the space for character to become our work.

Teardrop Trailer Build Pictures: http://tinyurl.com/px5cd
Chris C
.
 
Posts: 3302
Joined: Sun May 15, 2005 7:24 pm
Location: Norman, Oklahoma

Postby s4son » Wed Aug 31, 2005 10:33 pm

Jerome,
That is absolutely beautiful! Great job!


Scott F. :awesome:
Are we there yet?
ImageImage
User avatar
s4son
Donating Member
 
Posts: 1399
Images: 180
Joined: Sat Mar 05, 2005 12:29 am
Location: Smithville, MO
Top

Postby madjack » Thu Sep 01, 2005 12:42 am

...absolutely marvelous :thumbsup: .................................
madjack 8)
...I have come to believe that, conflict resolution, through violence, is never acceptable.....................mj
User avatar
madjack
Site Admin
 
Posts: 15128
Images: 177
Joined: Thu Dec 02, 2004 5:27 pm
Location: Central Louisiana
Top

Postby asianflava » Thu Sep 01, 2005 2:35 am

Looks great! What did you use to give it the riveted look. I thought they were screws but I couldn't make out the slots.
User avatar
asianflava
8000 Club
8000 Club
 
Posts: 8412
Images: 45
Joined: Mon Aug 02, 2004 5:11 am
Location: CO, Longmont
Top

Postby toypusher » Thu Sep 01, 2005 5:26 am

Congratulations! Looks Great :thumbsup: :applause: and I bet that it feels Great too! Time to enjoy!

Kerry
User avatar
toypusher
Site Admin
 
Posts: 43040
Images: 324
Joined: Fri Jan 28, 2005 12:21 pm
Location: York, PA Area
Top

Postby SteveH » Thu Sep 01, 2005 7:16 am

Awesome, Jerome! :thumbsup:
SteveH
Calling an illegal alien an "undocumented immigrant"is like calling a drug dealer an "unlicensed pharmacist ".
User avatar
SteveH
2000 Club
2000 Club
 
Posts: 2101
Images: 42
Joined: Mon Nov 01, 2004 8:28 am
Location: Bexar Co, TX
Top

Postby dguff » Thu Sep 01, 2005 8:28 am

The "rivets" are actually aluminum drive nails that have a spiral shank. They screw themselves in as they are hammered down. I got them from George at the Teardrop Fixit Shop in Victor MT.

Jerome :)
Jerome


2008 Guffman
User avatar
dguff
Platinum Donating Member
 
Posts: 989
Images: 69
Joined: Tue Feb 08, 2005 12:46 pm
Location: Eureka CA
Top

Postby Guest » Thu Sep 01, 2005 11:24 am

Jerome,
That is a beautiful trailer!!!
Excellent!!!
Guest
 
Top

Postby TRAIL-OF-TEARS » Thu Sep 01, 2005 1:57 pm

great job Jerome,
Are your fenders painted, or stainless?
Steve J.

Image
Home built Camp-Inn clone.
GO SPURS GO
User avatar
TRAIL-OF-TEARS
Donating Member
 
Posts: 854
Images: 41
Joined: Tue Sep 21, 2004 11:09 am
Location: Spring Branch, Texas (north of San Antonio)
Top

Postby dguff » Thu Sep 01, 2005 5:41 pm

Those are steel fenders, 11" wide, bought from ebay. The finish is paint in a color called "cast aluminum", an engine enamel from Dupli_Color.

Jerome :)
Jerome


2008 Guffman
User avatar
dguff
Platinum Donating Member
 
Posts: 989
Images: 69
Joined: Tue Feb 08, 2005 12:46 pm
Location: Eureka CA
Top

Postby purplepickup » Thu Sep 01, 2005 6:11 pm

You certainly have a right to be proud. The modernistic is my favorite style and you did it very well. I especially like the way you kept it clean and simple but still have well thought out basic functionality. I've been saving some of your pictures into my "ideas folder". Good luck on your cross country trip.
:thumbsup:
George
:)
User avatar
purplepickup
Silver Donating Member
 
Posts: 413
Images: 3
Joined: Thu Jan 27, 2005 11:20 pm
Location: SW Michigan
Top

Postby greasywheats » Fri Sep 02, 2005 11:52 am

Looks great! I am starting a TD with a similar profile. How did you join the front aluminum skin to the chassis where it meets the tongue? My TD will also cover the chassis frame, and I can't really figure out how the front and back skins attach to the frame....do you have any pictures maybe of the underside of the front and back...maybe a picture is worth a thousand words! :thinking: :?

Thanks for the help for a Newbie!
User avatar
greasywheats
Teardrop Master
 
Posts: 176
Images: 25
Joined: Mon Jul 11, 2005 3:31 pm
Location: Portland, OR
Top

Postby dguff » Fri Sep 02, 2005 12:26 pm

The bottom middle of the front skin is not physically attached. It is held on by screws at the outside edges and then secured by the top edge molding. In the middle it is a tight friction fit between the floor framing edge and the top of the tongue so it can't go anywhere. The bottom of the back curve is also held by screws at the edge into the sidewalls and the edge molding. In the middle section it is stuck to the bottom of the back floor edge by an extremely sticky moisture barrier tape normally used to waterproof door and window openings in homes. The tape is also secured by screws into the floor framing.

Jerome :)
Jerome


2008 Guffman
User avatar
dguff
Platinum Donating Member
 
Posts: 989
Images: 69
Joined: Tue Feb 08, 2005 12:46 pm
Location: Eureka CA
Top

Postby greasywheats » Fri Sep 02, 2005 1:46 pm

DGuff- Thanks for the help...I have been trying to figure out a way to make the front and back skins cover the frame, but offer an easy way to create a lasting seal to keep moisture from sneaking up between the aluminum skin and the body...the sides are easy, as I can simply wrap the aluminum over the bottom of the sidewalls and under the chassis (the sidewalls come down to cover the chassis sides) and use a weatherstrip of some type along the underside. But the front ellipse is more difficult as it needs to wedge between the chassis frame and the tongue...

I would be interested if anyone else has other ideas...
Thanks again! :thumbsup:
User avatar
greasywheats
Teardrop Master
 
Posts: 176
Images: 25
Joined: Mon Jul 11, 2005 3:31 pm
Location: Portland, OR
Top

Next

Return to Teardrop Construction Tips & Techniques

Who is online

Users browsing this forum: No registered users and 1 guest