Now it begins.

Anything to do with mechanical, construction etc

Now it begins.

Postby SmokeyBob » Fri Sep 02, 2005 10:05 pm

I finally got the trailer I wanted, the 1175 lb capacity. The trailers at HF in Ft. Worth, Tx were on back order. Fortunately there were other HF stores in my area. The one in Irving, TX had one. Tomorrow morning I'll get started, now if I can just remember where I put that bag of nuts and bolts. :thinking:
Last edited by SmokeyBob on Wed Sep 07, 2005 11:25 am, edited 3 times in total.
Pics for Building the Alegria I
To view video click Here

Bob & Judith
User avatar
SmokeyBob
2000 Club
2000 Club
 
Posts: 2950
Images: 161
Joined: Thu Jun 23, 2005 12:06 am

Postby stjohn » Fri Sep 02, 2005 11:09 pm

I TOO AM JUST GETTING STARTED GOOD TO FIND A FELLOW TEXAN ON THIS SITE GOOD LUCK WITH YOUR TEAR

FAT MIKE
LAKE FORK TX
P.S.IF YOU SEE MY HAMMER WHILE LOOKING FOR YOUR NUTS AND BOLTS DROP ME A LINE
Only he who attempts the ridiculous
Can achieve the impossible
User avatar
stjohn
The 300 Club
 
Posts: 444
Images: 68
Joined: Thu Sep 01, 2005 9:34 pm
Location: Lake fork Tx.

Postby IraRat » Tue Sep 06, 2005 9:21 am

I'm impressed, Bob--you even bought a spare tire!!! I used the same trailer.

But that photo--are those the 12" tires? In that photo, they look larger.
--Ira

"My HD and Wal-Mart have been out of Titebond for weeks, and I think it's a communist conspiracy."
User avatar
IraRat
Forum Storyteller
 
Posts: 1573
Joined: Wed Apr 06, 2005 8:43 am
Location: South Florida
Top

Postby SmokeyBob » Tue Sep 06, 2005 12:07 pm

IraRat
They are 12" tires. The photo just makes them look bigger.

Putting this trailer together has been a learning experience. The first minor problem I encountered was with the 3/8"x3/4" & the 3/8"x1" bolts. The head of the bolt is 5/8" US standard but the 3/8" Nylon nut is 17mm. Lucky for me I have both US and Metric tools.

Since I can only use one arm, tightening these nylon nuts is a real pain in the backside. With my wife holding a wrench on the nut and me using a socket wrench on the bolt we finally got most of the trailer put together.

Then I encountered my second problem. After attaching the springs I noticed the axle didn't line up with the springs. This round peg on the axle didn't line up with hole in the springs. It was about a half inch off. The thought of loosening those nlyon nuts on the trailer frame so I could move the spring was the last thing I wanted to do. Then I thought of useing this comealong to pull the springs together. I only needed to pull it about a half an inch and it worked. :)

Today I'll look for some shocks for the trailer. I don't like the idea of this camper bouncing all over the place. With my other trailer if it's not really loaded down it bounces. I would rather put the shocks on now while I have room to work on it.

I going to build the Simple design for this camper. It has a lot to do with my physical condition. Since I can only use one arm and I'm not that strong I figured building a TD would be to difficult. If I can keep everything square and stay away from the curves I should be OK. And I only have the basic tools to work with. I did buy a Kreg pocket jig the other day, for me that's fancy. Thought it might come in handy for building the cabinets inside the camper. I've added some more pics to my album.

Can someone tell me how you include a link to your album in a post. :thinking:
Pics for Building the Alegria I
To view video click Here

Bob & Judith
User avatar
SmokeyBob
2000 Club
2000 Club
 
Posts: 2950
Images: 161
Joined: Thu Jun 23, 2005 12:06 am
Top

Postby SteveH » Tue Sep 06, 2005 12:21 pm

Can someone tell me how you include a link to your album in a post.


SmokeyBob,

Click on the "Help with photos" icon at the top of any page and it will walk you thru it. And, welcome...it's good to have some other Texans building tears.
SteveH
Calling an illegal alien an "undocumented immigrant"is like calling a drug dealer an "unlicensed pharmacist ".
User avatar
SteveH
2000 Club
2000 Club
 
Posts: 2101
Images: 42
Joined: Mon Nov 01, 2004 8:28 am
Location: Bexar Co, TX
Top

Postby IraRat » Tue Sep 06, 2005 1:44 pm

Bob, you'll get it done--but I had a NIGHTMARE with mine and was bitching nonstop the first weekend:

I didn't know what the heck I was doing. (Still don't most of the time.) I also followed the Cubby plans for modifying/strengthening this fold-up trailer. If what I'm saying here is totally Greek to you, send me a private message and I'll walk you through it.

Basically, because this is a folding trailer, it's not ideal for TDs right out of the box. You have to move cross members to different places, drill a few holes here and there, and that's it.

Believe me, my two good arms are no better than your ONE good one, and I did it. Those nylock nuts are a blessing, and you DON'T/SHOULDN'T tighten them all that much..less than you think.

As far as shocks go, are you really sure you need them?
--Ira

"My HD and Wal-Mart have been out of Titebond for weeks, and I think it's a communist conspiracy."
User avatar
IraRat
Forum Storyteller
 
Posts: 1573
Joined: Wed Apr 06, 2005 8:43 am
Location: South Florida
Top

Postby SmokeyBob » Tue Sep 06, 2005 5:48 pm

IraRat, Most of my life the old saying "Necessity is the mother of invention" has been my motto for being able to do things. I'm always inventing ways to do things. But sometimes I will need help and that's when you and the other great people in this forum will come in handy.

Since there is no rear hatch in what I am going to build. I plan on leaveing the axel in it's original position. I'll adjust the tongue weight by moving things around in the camper. I do that all the time for my other trailer and it seems to work out.

The top front of the camper will have a slope to it, kinda like Mike Schneider's Weekender. While it will help reduce the wind drag I'm mainly doing it for looks. The back of the camper will be square with a window in it. There will also be a window in each door and a vent on top. Inside there will be a shelf at the front end. In the back Im installing a porta potty in the center, with storage cabinets on each side. One side will be for extra supplies, the other side will house the electrical stuff. I'll run the shore power hook-up through the wall into this area. I'm also thinking about installing a small door opening in the back from the outside to make it easier to take the battery in and out. I like the way Tom Swenson did his electrical. Only I don't plan on using an inverter.

As for using shocks, I'm not really sure if I will need them. I do know that without a lot of weight on these trailers they do bounce. Will the camper be heavy enough, I just don't know. I figure it couldn't hurt and it will be a lot easier, physically for me, to put shocks on now while there is nothing on the frame as opposed to doing it later.

I'm going to attach an awning outside the camper for shade. I'll make the frame from PVC pipe. I'm planing on using shower curtains for the sides and front around this awning. Just open and close them like in your shower. When you need a little privacy for getting dressed and other things. :twisted:
Pics for Building the Alegria I
To view video click Here

Bob & Judith
User avatar
SmokeyBob
2000 Club
2000 Club
 
Posts: 2950
Images: 161
Joined: Thu Jun 23, 2005 12:06 am
Top

Postby davel » Tue Sep 06, 2005 6:33 pm

Bob,

Congratulations on getting your trailer. I used the same trailer on the Bluebonnet Tear and it has worked just fine. I don't know what my final weight will be but the trailer doesn't bounce much at all, only on large bumps. We have over 4,000 miles on it now and it has proven to be a good trailer.

I ended up moving my axle back about 4" and wish now that I had left it where it was orignally.
User avatar
davel
Donating Member
 
Posts: 1369
Images: 32
Joined: Mon Apr 26, 2004 9:42 pm
Location: Ennis, Texas
Top

Postby IraRat » Wed Sep 07, 2005 8:22 am

Wow, Bob--I like the way you thought this out. It's gonna be cool seeing this come together. The layout sounds VERY practical. (Can I use your toilet?)

I'm also curious about your awning, how it's going to be permanently mounted, how you set it up, etc. This is something a lot of us want, and are interested in clever ways to get it done. To date, I haven't seen anything that really impressed me yet.

Do you have a link to a photo or a drawing to give us an idea?

--Ira
--Ira

"My HD and Wal-Mart have been out of Titebond for weeks, and I think it's a communist conspiracy."
User avatar
IraRat
Forum Storyteller
 
Posts: 1573
Joined: Wed Apr 06, 2005 8:43 am
Location: South Florida
Top

Postby WarPony » Wed Sep 07, 2005 12:11 pm

Bob when I get home tonight, I'll give you a link to my Yahoo! album.I kind of did what you are planning to do except I have one door in the rear with closets on each side. I'm on my lunch right now and have to leave soon.
ImageImage

Still a million dollars away from being a millionaire!!
User avatar
WarPony
Donating Member
 
Posts: 2089
Images: 289
Joined: Tue Sep 14, 2004 12:10 pm
Location: Kansas, Topeka
Top

Postby SmokeyBob » Wed Sep 07, 2005 12:55 pm

Ira
The layout sounds VERY practical. (Can I use your toilet?)


If you're in the neighborhood and mother nature call's, you're welcome to use the porcelain throne. :lol:


Keeping the cost down is a big factor for my project. While I want the camper to look nice I'm more concered with functon and cost. If I had the money I could go out and buy one of those roll out awnings like you see on RV's. But for me my definition of a awning is a plastic tarp.

Now it's going to be a nice looking plastic tarp. :lol:

I'm sorry I don't have a picture or a drawing to show you. Right now it's all up in my head. As soon as I can get something I'll post it.

The following measurements are adjusted for your own TD size.

For now think of a box frame made from PVC pipe. Around 6' tall, 8' wide and it would extend out from the camper about 8'.

I would sand the side ends of the PVC pipe so you can easily insert and remove the pipe from the connectors for setting up and taking it apart.

To keep it from coming apart just drill a small hole through each connector and pipe, mark the hole location on the pipe and connector with a black magic marker, makes it a lot easier to line up the holes. Put something through these holes to keep it together, I use a small bolt with a wing nut.

The center part of the roof of this PVC frame will need to be a few inches higher so water will run off. A flat tarp will collect water big time when it rains.

I use shower curtains for the sides and front. Just use the shower curtain rings on the PVC pipe to open or close the curtains. Works just like in your bathroom. Buy shower curtains with some type of design on it.

Wife thinks it looks pretty. :D

Also use some type of line to stake down the corners for windy days.

With this PVC frame sitting up against the TD I plan on tying a line to the top of the PVC frame, looping it over the camper and then under the camper and tieing it to the bottom of the PVC frame. I may come up with a different way of attaching it to the camper but for now this is my basic idea.

The type of connections you need for building something like this are hard to find in your local HD or Lowe's. While you can use the PVC connectors at HD or Lowe's, there is a web site that sells PVC connectors made especially for building projects.

http://www.littlegreenhouse.com/accessory/pvc.shtml
Pics for Building the Alegria I
To view video click Here

Bob & Judith
User avatar
SmokeyBob
2000 Club
2000 Club
 
Posts: 2950
Images: 161
Joined: Thu Jun 23, 2005 12:06 am
Top

Postby IraRat » Wed Sep 07, 2005 1:38 pm

Hey, that sounds cool, and inexpensive! What you're basically talking about is like a big Lego set (sort of). Plus very light and easy to transport!

But can you (WE!) actually do this to the sizes you mentioned? 8 by 8, 6 feet high? With PVC?

In other words, is there a certain diameter/grade of PVC that we would use for all of the elements? Like, is a certain diameter/grade/thickness, etc., acceptable for this, while others aren't?

I've worked VERY little with PVC, but it seems that at 6 feet high, you would need horizontal connecting members in the MIDDLE of the vertical legs, as well as at the top and bottom. No big deal here--we're just talking a few more lengths, but I'm trying to get it straight in my head.

I have a 4-foot wide tool box mounted in the bed of my truck that I use for absolutely nothing except to look cool. It's a big black PLASTIC box, so I don't look THAT cool (not diamond plate), but it sounds like all of these pieces would easily fit in there--provided I cut the lengths to 4' (and 3' as needed), and use connectores to make them 8' and 6' respectively.

To be able to pull up to a site, and hook up an 8 by 8 by 6 high enclosure to the side of the TD with just PVC and shower curtains (or maybe another material)..that's pretty damn practical.

Keep us informed! The public has a right to know!
--Ira

"My HD and Wal-Mart have been out of Titebond for weeks, and I think it's a communist conspiracy."
User avatar
IraRat
Forum Storyteller
 
Posts: 1573
Joined: Wed Apr 06, 2005 8:43 am
Location: South Florida
Top

Postby mikeschn » Wed Sep 07, 2005 2:43 pm

SmokeyBob wrote:I'm sorry I don't have a picture or a drawing to show you. Right now it's all up in my head. As soon as I can get something I'll post it.

The following measurements are adjusted for your own TD size.

For now think of a box frame made from PVC pipe. Around 6' tall, 8' wide and it would extend out from the camper about 8'.


I'll bet someone could come up with a drawing or model pretty quick, or even a sketch...

Anyone volunteer?

Mike...
The quality is remembered long after the price is forgotten, so build your teardrop with the best materials...
User avatar
mikeschn
Site Admin
 
Posts: 19202
Images: 475
Joined: Tue Apr 13, 2004 11:01 am
Location: MI
Top

Postby mikeschn » Wed Sep 07, 2005 3:49 pm

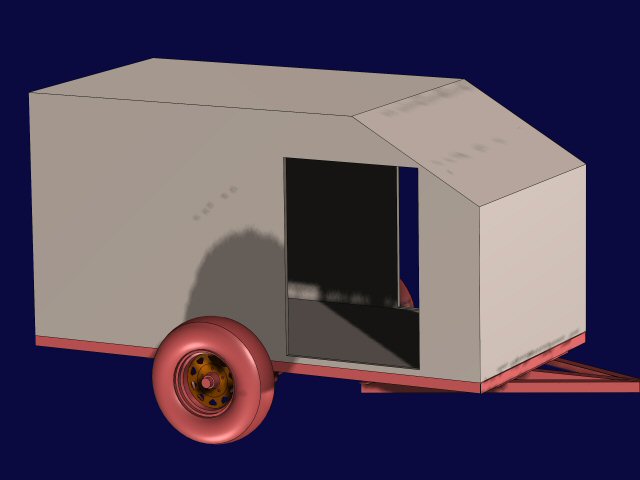
Your trailer is going to look something like this?

Image

Mike...
The quality is remembered long after the price is forgotten, so build your teardrop with the best materials...
User avatar
mikeschn
Site Admin
 
Posts: 19202
Images: 475
Joined: Tue Apr 13, 2004 11:01 am
Location: MI
Top

Postby SmokeyBob » Wed Sep 07, 2005 10:58 pm

Mike
That CAD pic is exactly what it will look like. Thank you for doing it. :applause:

I took Auto Cad in Junior College many years ago but it was nothing like what your doing with these TD drawings, Im impressed.

Ira
Just use the white PVC pipe, get the thicker walled pipe, it's more rigid.

The width would probably be more like 7' so you could put it up against your camper for support. My awning height would be 6 1/2'. Im only 5' 5" and my wife is 5' 7".

1" or 1 1/2" PVC for the diameter. 1/2" pipe will bend too much. Keep in mind that even 2" pipe will bend if it's 20' long.

I will store the PVC in the camper which is almost 8' long and the longest piece of PVC will be under 8'.


Check out my album if you want to see a neat tool to put on your wheel dust caps.
Last edited by SmokeyBob on Thu Sep 08, 2005 10:11 am, edited 1 time in total.
Pics for Building the Alegria I
To view video click Here

Bob & Judith
User avatar
SmokeyBob
2000 Club
2000 Club
 
Posts: 2950
Images: 161
Joined: Thu Jun 23, 2005 12:06 am
Top

Next

Return to Teardrop Construction Tips & Techniques

Who is online

Users browsing this forum: No registered users and 3 guests