Over 80" light setup

Anything to do with mechanical, construction etc

Postby Esteban » Mon Apr 20, 2009 8:22 pm

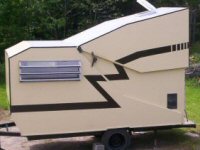
Bill, I'll have a similar light bar on the hatch of the wider than 80" trailer I'm building. I've thought about the best place to locate it. Similar to yours the easiest place to attach it would be right between the tail lights. It would be aimed correctly but probably not as noticeably conspicuous as it could be. To make it really conspicuous I'm contemplating attaching it to the hatch lid a foot or more higher than the tail lights by using an angled and epoxied wood block behind it to aim it correctly to the rear. The light bar I have also has a 3rd brake light function.

Perhaps, an alternative way for you to attach the light bar so it's even more conspicuous would be attach the light bar higher up on the galley hatch. You could make a support from a block of wood cut at an angle. Seal the wood well and paint it to match your TD.
Steve - SLO, CA
Esteban
Donating Member
 
Posts: 1684
Images: 15
Joined: Fri Jul 28, 2006 4:39 pm
Location: California, San Luis Obispo

Postby wlooper89 » Mon Apr 20, 2009 10:55 pm

Steve,

That is a very good suggestion. I do not have any wiring in my hatch at present, but even where the bar light is in this test it might benefit from a wedge of wood to make it vertical.

A center high mount brake lamp might be another project for me. Maybe put it above the galley hatch since it does not need to be on the rear. Where the wires could come up into the cabinet area and then up under the brake lamp. Bargman makes a module to sort out turn and brake signals so the extra brake lamp only comes on with the brakes.

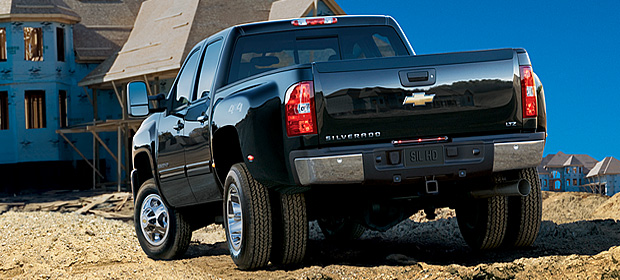
This is a photo of the 80" wide and brake lamp arrangement on a dually pickup; wide ID just above the license plate and clearance lamps on the fenders. Third brake lamp high on the back of the cab. Little Guy put dual tail lamps each side on the 6 wide. All four come on for braking and the pairs blink together for turns. I believe later model 6 wide tail lamps are oval shaped but still in pairs. I like that from the standpoint of being conspicuous.

Bill

Image
User avatar
wlooper89
Gold Donating Member
 
Posts: 581
Images: 75
Joined: Sun Dec 31, 2006 9:47 pm
Location: Atlanta, GA

Postby Esteban » Tue Apr 21, 2009 3:10 am

Bill,

Glad my suggestion was helpful. The light bar I have is about 2" high. If it's located very high up on the hatch, or on the roof, they become nearly horizontal surfaces. Then the "angled block of wood" may become a difficult feature to build and blend in...without it becoming an unsightly hump. There's a sweet spot on the upward curve of the hatch where you can cut a (2"x2" in my case) block at an angle that is more vertical than it's horizontal...so the block isn't too conspicuous.
Hope this makes sense :?
Steve - SLO, CA
Esteban
Donating Member
 
Posts: 1684
Images: 15
Joined: Fri Jul 28, 2006 4:39 pm
Location: California, San Luis Obispo
Top

Postby halfdome, Danny » Tue Apr 21, 2009 9:11 am

I found this third brake light and I think it has some possibilities. It mounts with double sided tape. You could mount it quite high on the radius of your tear with a straight on display of the led lights. It's from Command Electronics. It retails for $29.99 plus shipping. I'm thinking of ordering one to see how it will work. I ordered my third stop light for TD #2 from them and it's very high quality. :D Danny
Image
Dimensions
ImageImage
"Conditions are never just right. People who delay action until all factors are favorable do nothing". William Feather
Don't accept "It's Good Enough" build to the best of your abilities.
Image
Teardroppers Of Oregon & WashingtonImage
User avatar
halfdome, Danny
*Happy Camper
 
Posts: 5894
Images: 252
Joined: Sun Aug 14, 2005 11:02 pm
Location: Washington , Pew-al-up
Top

Postby 48Rob » Tue Apr 21, 2009 12:23 pm

Hi Bill,

I think it looks very nice where it is, or a half inch lower to cover the sticker.

Adding a spacer or block of wood might well be a chore for a non woodworker, as it would have to curve to follow the hatch.

If the light is an LED. the mounting angle may need to be adjusted, as they are only very bright within a few degrees of "straight on".

It might be that you can loosen the circuit board that holds the lights behind the lens, and shim them to "aim" the lights.

If as it appears, you are adding it a little for looks, and a little for safety, then if you like how it looks, go for it!
No rules you have to follow on this one except to please yourself!

Rob
Waiting for "someday" will leave you on your deathbed wondering why you didn't just rearrange your priorities and enjoy the time you had, instead of waiting for a "better" time to come along...
User avatar
48Rob
Super Lifetime Member
 
Posts: 3882
Images: 4
Joined: Thu Nov 17, 2005 6:47 pm
Location: Central Illinois
Top

Postby wlooper89 » Tue Apr 21, 2009 3:38 pm

Rob

Thank you very much. The lamps are incandescent #194 ones on the single lens bar. They do not seem to be aimed very specifically so maybe I could just mount the bar on the angle. All my other trailer lights are incandescent so I am trying to stay with that. These lamps are getting to be a bit retro.

My main objectives are to get legal with the required 80" wide lamps, and also to have it look good, or at least not bad.

This is "plan B" with the bar that has three separate lenses. The single lens bar is more attractive, but in a way I like this because it is mostly out of sight and out of the way when we are camping or at the galley. Unfortunately the single lens bar is too wide for this location. I very much doubt the gendarmes would question it, but I believe one could say this is the only center rearward facing surface available (except for making a wedge or moving the license plate). I really appreciate everyone’s comments. I am still trying to figure out what I want to do about the 3-lamp 80" ID.

Bill

Image
User avatar
wlooper89
Gold Donating Member
 
Posts: 581
Images: 75
Joined: Sun Dec 31, 2006 9:47 pm
Location: Atlanta, GA
Top

Postby Esteban » Tue Apr 21, 2009 4:06 pm

Bill,

Your "plan B" arrangement looks good too. Not sure I understand your objection to it. Is it that the light shown, and/or your other one, interferes with opening the hatch (perhaps because it's too tall)? The location of the "plan B" marker light looks similar to one on a boat trailer.

Command Electronics which Danny pointed out has a large selection of lights. They have several bar lights that are 15.25" x 1.25" that may work for you (if you're looking for a thin light). Here's a thin LED marker light with a continuous lens: Hot-Line LED Marker Light Bar Light

(BTW, thanks Danny for pointing out this supplier. They have a number of lights that interest me.)
Last edited by Esteban on Tue Apr 21, 2009 4:50 pm, edited 1 time in total.
Steve - SLO, CA
Esteban
Donating Member
 
Posts: 1684
Images: 15
Joined: Fri Jul 28, 2006 4:39 pm
Location: California, San Luis Obispo
Top

Postby wlooper89 » Tue Apr 21, 2009 4:47 pm

Steve,

I appreciate your comments. I am leaning toward "Plan B" now. Putting the 3-light bar down on the trailer frame will be easier and meet the requirement. Also it is almost hidden when one walks around the trailer. The boat trailer arrangement was also on my mind. They pretty much have to have the 3-lamp bar on the frame below the boat. A third brake light may come later. The company mentioned by Danny has some nice ones.

Bill
User avatar
wlooper89
Gold Donating Member
 
Posts: 581
Images: 75
Joined: Sun Dec 31, 2006 9:47 pm
Location: Atlanta, GA
Top

Postby Esteban » Tue Apr 21, 2009 5:07 pm

Bill, Here's the light I'm using: LED Trailer Lights 15" LED ID / 3rd Brake Indicator OVER 80 " It's both an over 80" marker light and a brake indicator. It's for surface mounting and looks even better with the chrome trim ring they offer. Dimensions: 15.50" L x 1.60" W x .80" D. Maybe it'll work for you.
Steve - SLO, CA
Esteban
Donating Member
 
Posts: 1684
Images: 15
Joined: Fri Jul 28, 2006 4:39 pm
Location: California, San Luis Obispo
Top

Postby 48Rob » Tue Apr 21, 2009 6:03 pm

Hi Bill,

Plan "B" certainly has several advantages!

The light is not in the way for general use of the galley, and it will be much easier to run wiring to the bumper, than through the body.
You still end up with the triangular shape (odd, attention getting configuration from a distance) and it doesn't require cutting a hole in a place that a leak could cause damage.

The only disadvantage I can think of is that the light isn't as visible up close because it is so low, but you didn't have any center lights before...

It looks nice, sets off the diamond plate, and the lens color matches better than the LED setup.

Rob

<img src="http://www.tnttt.com/gallery/image.php?image_id=49102">
<img src="http://www.tnttt.com/gallery/image.php?image_id=49133">
Waiting for "someday" will leave you on your deathbed wondering why you didn't just rearrange your priorities and enjoy the time you had, instead of waiting for a "better" time to come along...
User avatar
48Rob
Super Lifetime Member
 
Posts: 3882
Images: 4
Joined: Thu Nov 17, 2005 6:47 pm
Location: Central Illinois
Top

Postby wlooper89 » Tue May 12, 2009 8:07 pm

This is the finished installation. Light bar is attached to the frame cross piece with sheet metal screws. The wires go through the same part of the frame and up through the floor into the tail light compartment, home to other wiring. This is the ID lamp location used on boat trailers and is pretty much my only available center rearward facing surface near the rear of the trailer. That will be my story anyway. :) I have never been bothered by the gendarmes about my 90" wide Little Guy and lack of the wide ID bar. There does not seem to be much enforcement in the case of a privately owned RV trailer. But now I feel happy about being a legal beagle. 8)

Image

I got a small project box and barrier strip from Radio Shack to make the connections. Wires for trailer AC and DC also enter this area from the tongue box electrical compartment. Another possible project is a center high mount brake light that would probably go above the galley door. It is not required on a trailer but might improve visibility.

Image

Bill
User avatar
wlooper89
Gold Donating Member
 
Posts: 581
Images: 75
Joined: Sun Dec 31, 2006 9:47 pm
Location: Atlanta, GA
Top

Postby 48Rob » Wed May 13, 2009 7:02 am

Looks great! :thumbsup:

Rob
Waiting for "someday" will leave you on your deathbed wondering why you didn't just rearrange your priorities and enjoy the time you had, instead of waiting for a "better" time to come along...
User avatar
48Rob
Super Lifetime Member
 
Posts: 3882
Images: 4
Joined: Thu Nov 17, 2005 6:47 pm
Location: Central Illinois
Top

Previous

Return to Teardrop Construction Tips & Techniques

Who is online

Users browsing this forum: No registered users and 7 guests