My extra foot/ the plan

...ask your questions in the appropriate forums BUT document your build here...preferably in a single thread...dates for updates, are appreciated....

Postby Miriam C. » Wed Apr 15, 2009 1:01 pm

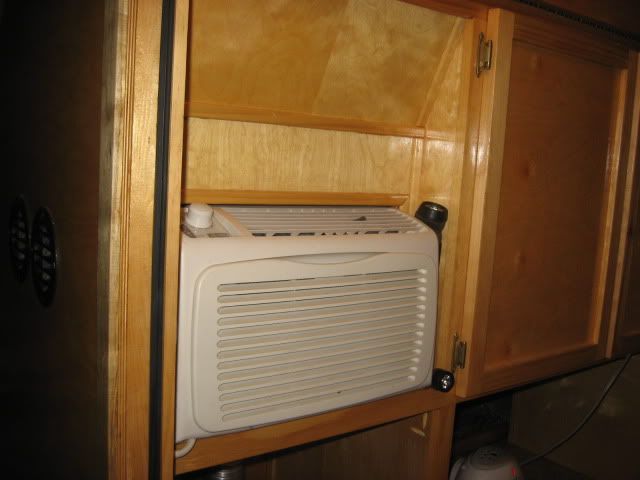
Well I finally got out and took pictures of the finished air conditioner cabinet.
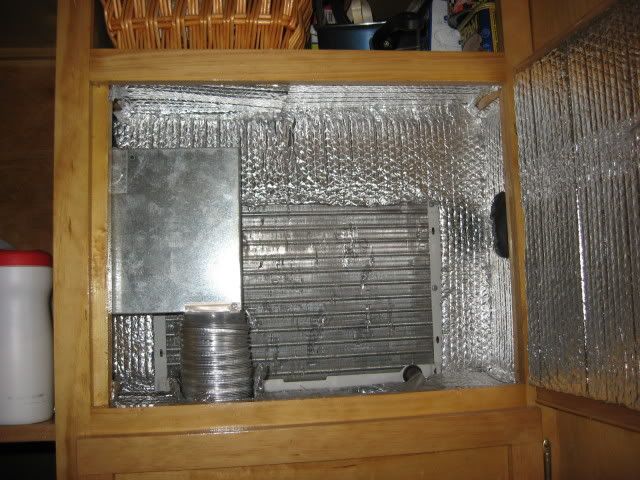
This is the inside cabinet built for the air conditioner.

Image

This is the back of the top cabinet, I put bubble insulation to separate the intake from the out. There is a vent to the galley and the outside for intake that is not visible here. These are the exhaust ports.
Image

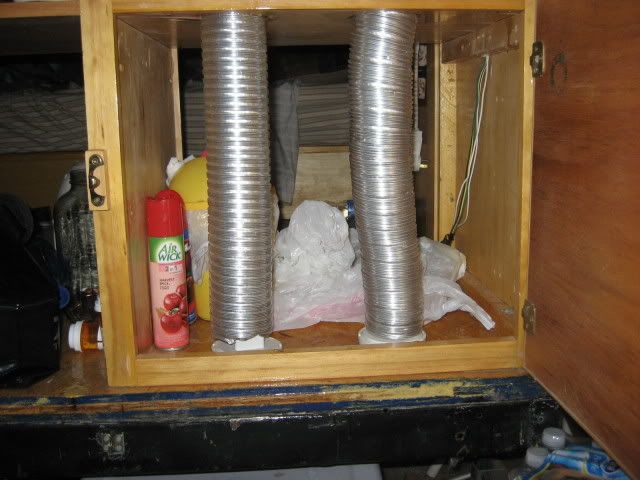
This is the cabinet under the air and the tubes go to holes in the bottom. Takes out an amazing amount of heat. The plumbing parts have screw in caps for winter storage.

Image
Last edited by Miriam C. on Tue May 19, 2009 10:18 am, edited 1 time in total.
“Forgiveness means giving up all hope for a better past.â€
User avatar
Miriam C.
our Aunti M
 
Posts: 19675
Images: 148
Joined: Wed Feb 15, 2006 3:14 pm
Location: Southwest MO

Postby Mary K » Wed Apr 15, 2009 1:11 pm

Wow, that looks great Aunti M!! :applause: :applause: :applause:
Mary K

I don't know half of you half as well as I should like; and I like less than half of you half as well as you deserve. Bilbo Baggins
User avatar
Mary K
6000 Club
6000 Club
 
Posts: 6425
Images: 44
Joined: Wed Aug 02, 2006 3:07 pm
Location: Florida, Pensacola

Re: Auntie M Air Conditioning, Inc.

Postby Prem » Wed Apr 15, 2009 5:25 pm

Wow! Your job looks clean and sharp! Can't wait to see photos of your elevator installation next. And when you get that heli-pad built on the roof, I want the specs so I can install one also! :lol:

Prem
My goal...

_____________________________________________
...is to live in a trailer.
User avatar
Prem
Gold Donating Member
 
Posts: 3222
Images: 144
Joined: Thu Aug 21, 2008 11:25 am
Location: State of Jefferson (Oregon side)
Top

Postby Miriam C. » Wed Apr 15, 2009 9:27 pm

:thinking: Helipad, :thinking: Thanks Prem and Mary K. I really wish I could go back and build it over now that I have some practice. The bubble insulation is held in place with extra strength double sided tape. Works great!
“Forgiveness means giving up all hope for a better past.â€
User avatar
Miriam C.
our Aunti M
 
Posts: 19675
Images: 148
Joined: Wed Feb 15, 2006 3:14 pm
Location: Southwest MO
Top

Postby PaulC » Thu Apr 16, 2009 3:25 am

The Girl just can't help herself, can she :lol: Looks good Miriam :thumbsup: It's nice to see that you just have to be doing something ;)

Cheers
Paul :thumbsup:
Time is the only real capital we have. Money you can replace but time you cannot.
User avatar
PaulC
3rd Teardrop Club
 
Posts: 4439
Images: 36
Joined: Mon May 24, 2004 7:27 am
Location: Laura, SouthernFlinders Ranges, South Australia
Top

Postby greg755 » Thu Apr 16, 2009 5:03 pm

Auntie M.

This is looking good. I don't know how I over looked this post...

Seems like you are giving us guys a run for the money on this build.

I see that you were thinking of an all girl camping trip.

I saw a web site, I think it was "cowgirl caravan"? you can google it.

I think its all women who camp together and they share "women stuff"
what ever that is... I don't know because I cant join. (ok MIKE don't go changing my avatar, I like it as it is)

What I thought was interesting about this group it is that they have a "merit badge" system.

They made up a bunch of (mostly) camp related activities and had badges made up and when the members do X Y Z they earn a badge.

Something you might want to look into.

Lator Gator
G
"It is a cruel thought, that, when we feel ourselves standing on the firmest ground in every respect, the cursed arts of our secret enemies, combining with other causes, should effect, by depreciating our money, what the open arms of a powerful enemy could not." --Thomas Jefferson to Richard Henry Lee, 1779. ME 4:298, Papers 2:298
User avatar
greg755
Grand Poobah
 
Posts: 439
Images: 65
Joined: Sun Dec 21, 2008 2:08 pm
Location: NY, Seneca Falls.... The Fingerlakes
Top

Postby 2bits » Thu Apr 16, 2009 10:47 pm

Thank you Miriam! You reminded me to put in my drain tube!!! Does yours work ok for you? No overflow?
Thomas

Image
User avatar
2bits
2bit Member
 
Posts: 5132
Images: 8
Joined: Thu Dec 27, 2007 6:04 pm
Location: Lake Tawakoni, TX
Top

Postby devigata » Fri Apr 17, 2009 5:12 am

greg755 wrote:I saw a web site, I think it was "cowgirl caravan"? you can google it.

I think its all women who camp together and they share "women stuff"
what ever that is... I don't know because I cant join. (ok MIKE don't go changing my avatar, I like it as it is)

What I thought was interesting about this group it is that they have a "merit badge" system.

They made up a bunch of (mostly) camp related activities and had badges made up and when the members do X Y Z they earn a badge.

Something you might want to look into.

G


http://www.sistersonthefly.com/

If you click on the Caravan Trailers, there are a LOT of pics of old TTTs there.
User avatar
devigata
Donating Member
 
Posts: 282
Images: 82
Joined: Sun Apr 13, 2008 12:01 pm
Location: Orlando, Florida
Top

Postby Miriam C. » Fri Apr 17, 2009 9:21 am

2bits wrote:Thank you Miriam! You reminded me to put in my drain tube!!! Does yours work ok for you? No overflow?


The overflow works great. We have very high humidity here and a quart of water is not unusual here. If you can see it the overflow just hangs in the vent tube and out the bottom of the camper. It is longer than the vent tube so we are not making mold. 8)

Greg, Paul, Cathy and Thomas thank you for the flowers. :D
“Forgiveness means giving up all hope for a better past.â€
User avatar
Miriam C.
our Aunti M
 
Posts: 19675
Images: 148
Joined: Wed Feb 15, 2006 3:14 pm
Location: Southwest MO
Top

Postby Jst83 » Thu May 28, 2009 9:02 pm

Miriam C. wrote:
2bits wrote:Thank you Miriam! You reminded me to put in my drain tube!!! Does yours work ok for you? No overflow?


The overflow works great. We have very high humidity here and a quart of water is not unusual here. If you can see it the overflow just hangs in the vent tube and out the bottom of the camper. It is longer than the vent tube so we are not making mold. 8)

Greg, Paul, Cathy and Thomas thank you for the flowers. :D


Looks nice, I'm moving mine and will need to put in an over flow drain and don't see it in the picture. How'd you do it? As we've sure got the humidity here also.


Thanks
Image
User avatar
Jst83
3000 Club
3000 Club
 
Posts: 3606
Images: 215
Joined: Thu Jul 20, 2006 7:33 pm
Location: Indiana, Greenfield
Top

Postby 2bits » Thu May 28, 2009 9:11 pm

I was also kinda worried about the overflow overflowing the drain pan itself. I have heard stories about when you get up in the morning hook up and take off, water from the pan flows over onto the floor. Any issues with this or is the tube taking care of it ok? Sounds like it is.
Thomas

Image
User avatar
2bits
2bit Member
 
Posts: 5132
Images: 8
Joined: Thu Dec 27, 2007 6:04 pm
Location: Lake Tawakoni, TX
Top

Postby Miriam C. » Thu May 28, 2009 10:11 pm

Guys I put 3 coats of epoxy in the box for the air and ran it about 2" up the wall just in case. One of the other things you can use is shower pan liner. Comes in a sheet and can be seamed the way pvc pipe is.

Scott, I have the over flow hose in the air exhaust tube. It is the clear tube in the bottom right corner of the picture. It just hangs there. If you find you are not getting enough water out fast enough you can always tip it. My air sits at a slight angle too.

Image
“Forgiveness means giving up all hope for a better past.â€
User avatar
Miriam C.
our Aunti M
 
Posts: 19675
Images: 148
Joined: Wed Feb 15, 2006 3:14 pm
Location: Southwest MO
Top

Postby 2bits » Thu May 28, 2009 10:24 pm

Thanks Miriam!

I see now that you have two air exhaust tubes! One out of the fan and one natural flow where the drain tube is. I was confused before. I mounted my AC unit at a slight angle back too, I would rather overflow go back into the exhaust box rather than into the cabin. I will do the same thing and coat the floor of my exhaust box with something and add a tiny drain hole. I like silver "bubblewrap" insulation too, I have some of that exact stuff left over from a car restoration that I think I will use. Thanks! :thumbsup:
Thomas

Image
User avatar
2bits
2bit Member
 
Posts: 5132
Images: 8
Joined: Thu Dec 27, 2007 6:04 pm
Location: Lake Tawakoni, TX
Top

Cabinets

Postby Prem » Wed Jun 10, 2009 1:18 am

Auntie M,

The hard part is the doors.

:) Secret: I buy the cabinet doors first (from Habitat for Humanity's RESTORE) and then build my cabinets to fit them out of matching plywood or painted plywood. The doors are new with hinges, jig-built, beautifully lacquered and not something I care to attempt without a full shop. How about $5 each! Love RESTORE.

One can also buy old cabinet doors, sand them and spray with varnish.

Finding small ones is a bit difficult, but they come around eventually...or sooner if you go to cabinet shops asking for leftovers.

Prem
My goal...

_____________________________________________
...is to live in a trailer.
User avatar
Prem
Gold Donating Member
 
Posts: 3222
Images: 144
Joined: Thu Aug 21, 2008 11:25 am
Location: State of Jefferson (Oregon side)
Top

Oops...

Postby Prem » Wed Jun 10, 2009 1:24 am

Oops...my post above is two years late I now see. Sorry. :(

Prem
My goal...

_____________________________________________
...is to live in a trailer.
User avatar
Prem
Gold Donating Member
 
Posts: 3222
Images: 144
Joined: Thu Aug 21, 2008 11:25 am
Location: State of Jefferson (Oregon side)
Top

PreviousNext

Return to Build Journals

Who is online

Users browsing this forum: No registered users and 14 guests