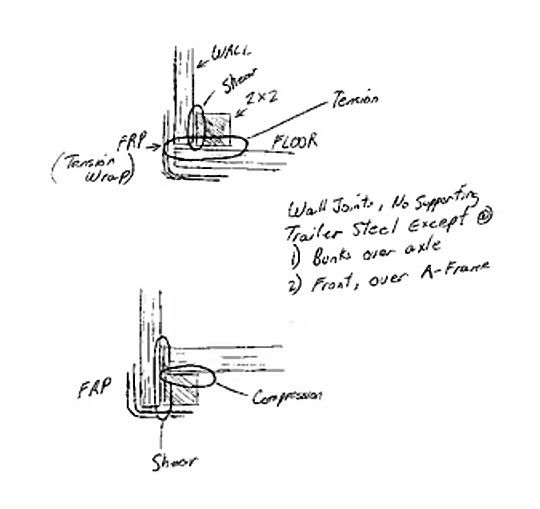
My 5x8 trailer will sit on an A-frame trailer like sqweaka's so I'm depending on good structural performance from the trailer box, particularly aft of the wheels. I'd like to retain interior headroom by having the walls sit on top of the floor but with that arrangement, bumps and other vertical loads will try to pull the floor laminations apart; so is that a wise design? If I attach the wall to the edge of the floor and the perimeter framework underneath then the wall laminations are in shear (better), the floor laminations won't see tensile loads and I'll loose 1-1/2" of headroom.
Have many folks killed the wall into the top of the floor like this, but without a supporting trailer underneath?
I could epoxy a scab around the perimeter to transfer the load from wall to the perimeter framework under the floor. Not pretty to me, but functional.
I could build up a substantial epoxy/fiberglass cloth overlay to take the load in the same way. Adequate?
Any other ideas or feedback welcome.
Thanks,
John
Teardrops n Tiny Travel Trailersor t n ttt for short (tnttt.com) |
Stress Analysis of Wall to Floor Joint, Without Trailer Supp
17 posts
• Page 1 of 2 • 1, 2
Stress Analysis of Wall to Floor Joint, Without Trailer Supp
![]() by jmedclay » Tue Jun 30, 2009 6:44 pm
by jmedclay » Tue Jun 30, 2009 6:44 pm
- jmedclay
- Teardrop Master
- Posts: 107
- Images: 104
- Joined: Fri Dec 15, 2006 7:08 pm
- Location: North Florida
![]() by Miriam C. » Tue Jun 30, 2009 8:27 pm
by Miriam C. » Tue Jun 30, 2009 8:27 pm
First, you will be bolting the floor to the walls using something as a cleat, I hope.
Second the bolts should go all the way through and have good support from underneath. I used fender washers. Madjack used aluminum angle as a cleat. I used the same but turned it upside down. It has not rattled apart yet.
You do want to cover the end grain of the floor too..........and seal the end grain of the floor and sides first.
Most important is does 1 1/2" matter that much? If it does then you might need your td to be taller? You should end with at least 44"-45" depending on how you do the roof.
“Forgiveness means giving up all hope for a better past.â€
-

Miriam C. - our Aunti M
- Posts: 19675
- Images: 148
- Joined: Wed Feb 15, 2006 3:14 pm
- Location: Southwest MO


 Mark (& Cindi)


 Seems to me with the bottom picture the weight of the wall is supported by the cleat and nothing else.
