Gents,
I've pretty much decided on the Modernaire profile for my build, but after digging thru Andrew's site and others, I'm struggling with the best way to find an accurate way to plot the radii of all the curves, especially the rear, which appears to be a compound/decreasing radius. Any help?
Thanks as always,
Moderaire profile
8 posts
• Page 1 of 1
Moderaire profile
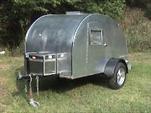
![]() by Jeff Hubbard » Sat Aug 01, 2009 10:00 pm
by Jeff Hubbard » Sat Aug 01, 2009 10:00 pm
- Jeff Hubbard
- Teardrop Inspector
- Posts: 9
- Joined: Wed Jul 29, 2009 7:29 pm
- Location: Erie, Co.
![]() by Keith » Sat Aug 01, 2009 11:08 pm
by Keith » Sat Aug 01, 2009 11:08 pm
Little Bear Teardrops draws templates that work great. Here is the information about them.
Keith
... has full-size templates for the Modernaire/Modernistic/Cub-types, Ken-Skill, Benroy, and KIT Kamper teardrops, as well as its own 8' and 10' designs. Simply put 8'-10' of 4' wide heavy duty paper-stock into an appropriately sized mailing tube along with return postage and a note as to which profile you desire, then mail it to Li'l Bear. I will trace that pattern onto the paper and mail it back to you. Please allow 4-6 weeks for delivery, ...only $5.00 charge! Or, send $35.00 (cash, check, or M/O only, includes US postage) and he'll provide paper & postage. Each profile has cabinet, door, and window locations indicated, as well as galley lid hinge-point and axle centerline location. A simple chassis drawing (of the way I build the frames) that any competent welder can follow for fabrication is available on request at no additional fee. "Morphing" of designs available at nominal charges. These patterns/profiles are produced as ordered and must be worked into the production schedule as time and available floorspace allow. While I'll endeavor to fill the order as soon as possible, please allow up to 4-6 weeks for delivery. Li'l Bear Tag-Alongs, 12442 Maria Dr., Redding, CA 96003-9569 ph 530-275-6728
E-mail: [email protected]
-

Keith - Teardrop Master
- Posts: 196
- Images: 5
- Joined: Sun Feb 27, 2005 4:52 pm
- Location: Northern California Wine Country