Foam Sandwich Construction

General Discussion about almost anything Teardrop or camping related

Foam Sandwich Construction

Postby Mark Mckeeman » Mon Aug 16, 2004 10:02 am

Hi All,

This trailer from happitrails http://www.happitrails.com/ uses a pre manufactured foam sandwich panel for its construction. They are able to produce them with less labor than stick frame and there fore sell them cheaper.

Has anyone produced an original design with this type of construction?

Pre manufactured panels would be expensive but a person could bond up there own panels using;
aluminum/foam/luan,
aluminum/foam/birch ply,
luan/foam/paneling,
luan/foam/luan,
fiberglass sheet/foam/luan…….floor could be…pressure treated ply/foam/luan…etc.

You get the idea.

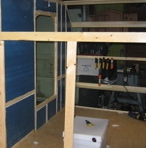
You could use your router and an osb template to rout out the sides and doors. Add a minimum of wood stringers in the roof and sheet with another sandwich. Bulkheads and shelves could use a tab in slot construction and be fitted in place when the sides go up. Trim the doors and corners with aluminum extrusion and use lots of quality adhesive in all joints and corners.

This construction would lend itself to square designs like Mike’s Weekender but could be modified to curved designs as well.

Any body been there done that? I can learn from others mistakes just as well as my own. :lol:
User avatar
Mark Mckeeman
Teardrop Master
 
Posts: 157
Images: 10
Joined: Fri Jul 30, 2004 1:06 pm
Location: Ottawa, Ontario

Postby asianflava » Mon Aug 16, 2004 2:44 pm

Yes I'm thinking about doing a 1/4ply-3/4foam-1/4ply sandwich and then vacuum bagging it. I have been toying around with actually bagging the aluminum skin at the same time but I am still not shure because I'd have to come up with a way to screw the cabinets to the walls from the inside.

A few people on the board have done this and were very helpful with their posts and comments. It was pointed out to me that you still have to install stringers in the walls for hardpoints. This is where you would bolt or screw the cabinets, walls, etc to. I had totally forgotten about these.

I went out and checked prices last week. It doesn't look like it will be inexpensive. $22 for a sheet of birch ply and $10 for the foam, you will be better off buying a sheet of 3/4 marine grade ply. My main concern is weight. My vehicles are all 4-cyl so I want to keep the weight as low as possible.

I am still brainstorming the roof section. I would like to bag it but I don't know if that is going to be possible. I may have to use the "Strap and Tack" method. I'll probably be starting in Oct, hopefully I'll have it figured out by then.
User avatar
asianflava
8000 Club
8000 Club
 
Posts: 8412
Images: 45
Joined: Mon Aug 02, 2004 5:11 am
Location: CO, Longmont

Postby Frank » Mon Aug 16, 2004 3:40 pm

At the risk of being laughed at how do you "bag it"? :oops:
Frank
Let's go camping!
User avatar
Frank
Silver Donating Member
 
Posts: 423
Images: 52
Joined: Wed Apr 14, 2004 9:16 pm
Location: Aiken, S.C.
Top

Postby JamesW » Mon Aug 16, 2004 3:50 pm

Paper or plastic... :D
User avatar
JamesW
Teardrop Master
 
Posts: 127
Joined: Fri Jul 23, 2004 6:32 pm
Location: Everett, WA
Top

Postby mikeschn » Mon Aug 16, 2004 3:54 pm

I think you have to put a huge balloon on the inside of the teardrop, and then vaccuum bag the outside the normal way! Is there such a thing as a "normal way" on a curved surface as huge as a teardrop?

Mike...
The quality is remembered long after the price is forgotten, so build your teardrop with the best materials...
User avatar
mikeschn
Site Admin
 
Posts: 19202
Images: 475
Joined: Tue Apr 13, 2004 11:01 am
Location: MI
Top

Postby JamesW » Mon Aug 16, 2004 4:02 pm

Maybe make a mold out of fiberglass the same contour of the roof...?
User avatar
JamesW
Teardrop Master
 
Posts: 127
Joined: Fri Jul 23, 2004 6:32 pm
Location: Everett, WA
Top

Postby Steve Frederick » Mon Aug 16, 2004 4:25 pm

I like to use miracle whip and oat nut bread! I have to wash it down with lots of milk, though! Pink board has less net carbs too! :twisted:
Blessings, Steve
Adirondacks, Upstate New York
Building Journals
The Shop Manual's 8-years old!! Thank's everyone!
New! 'Rondack Lodge Plans!Order Here!
Image
User avatar
Steve Frederick
Custom Teardrop Builder
 
Posts: 1984
Images: 29
Joined: Thu Apr 15, 2004 5:02 pm
Location: Upstate New York, Adirondacks (Great Sacandaga Lake)
Top

Postby ALAN GEDDES » Mon Aug 16, 2004 8:09 pm

I found ready made panels some time back with I believe a search for plywood or aluminum composite panels as a search. Alan
Alan
User avatar
ALAN GEDDES
1000 Club
1000 Club
 
Posts: 1637
Images: 34
Joined: Fri Apr 16, 2004 8:48 am
Location: NC, Fayetteville
Top

Postby Mark Mckeeman » Tue Aug 17, 2004 8:45 am

Lots of laughs on this one eh!

Ok so it sounds kind of strange to build structure with foam I agree. My background is in aviation and I have a particular interest in home built aircraft. I don’t see any reason why the structural practices and techniques that are capable of handling 100 horsepower engines and keeping 200 lb pilots aloft couldn’t be used to build a teardrop. Basically where building a box which is mounted to a structural frame. The frame is the backbone the box structure gives it torsional rigidity.

So… the box just has to carry the load that is inside it, resist the weather and look pretty.

How do we get there from here? First, in the quest for simpler, cheaper and lighter construction (which we know is impossible if not impractical) we must reduce the design to its simplest basic form.

Simpler:

As a test bed for design I will use a 4X8 layout. The floor would be pressure treated 3/8 plywood with a ¾ x 3 outside edge nail strip. The center portion filled with foam. The top of the floor made of ¼ luan. The entire surface of the foam and wood in both lower and upper skins must be glued together with a suitable adhesive creating a one-piece unit. This is where the strength comes from. And for simplicity and cost I propose to weight the layers down rather than vacuum bag while the adhesive cures.

The simplest side construction is a single plywood sheet. However if you want an insulated, light wall it takes a bit more work. The sides would consist of .032 mill finish aluminum bonded directly to the foam with an inner layer of birch or luan ¼ ply bonded to the inside with no added wood frame inside the wall. Now, this is where you need to think a little differently and borrow a little more from the aviation types of construction. With no interior framing you need to develop a method of creating strong joints simply and quickly. The way they do it is with tab in slot construction. Basically the rear bulkhead is cut oversize and several tabs are routed around the edge. The sidewalls have matching recesses routed about half the wall thickness deep. You glue all the slots, tabs and flat surface areas that contact each other and assemble. For added stability you could glue in a cove molding and attach it with a few brads to really stiffen the joint. Shelves and cabinet bottoms could also be attached with this method. Lighter loaded panels would be attached to a 1x1 nailer glued and nailed to the inner luan side skin.

The top. Simplicity of design will promote simplicity of construction here. I propose a vertical front with a large radius to a slightly sloping flat top that terminates at the rear hatch hinge. The hatch would incorporate the rear radius and also be at a slight angle to the floor. Roof stringers would be limited to three positioned at the points where the front radius starts and finishes and at the rear hatch hinge attach. The top skin/foam/ply sandwich is manufactured using the same method as the sides system except that the inner ply would be left off in the area of the front radius. The foam would have to be relieved with saw kerfs to allow the front radius to be formed, (this method will need to be tested to determine the proper radius and procedure to give a smooth outer skin). Again the flat surface edges and stringer contact points would be thoroughly covered in adhesive and the top applied to the sides. The foam and inner skin on the sides would be routed down from the top edge equal to the thickness of the top. When the top is attached the aluminum skins would just meet at the corner. An aluminum-extruded angle would be attached over the outside corners using pop rivets and sealant/adhesive. The front radius would be filled with additional fiberglass insulation and a flat interior panel attached between the forward and aft radius stringers with glue and brads.

The rear hatch would not require insulation since the rear bulkhead is an insulated sandwich panel. The hatch would be built with a strong outer frame inner battens and skinned with 1/8 luan and aluminum clad.

Cheaper:

The greatest cost saving I have going for me is the purchase of an old tent trailer for $100. I can modify and use the frame, axle and hitch. I have recovered the icebox, two-burner stove, and water tank, sink and hand pump. All of this may not fit in a 4X8 but I will decide what is necessary during galley construction. The next best option from the standpoint of cost would be a Harbor Freight trailer as many out there already are using. When pricing the amount of material used you see that there is much less material using this construction method, therefore less cost and less weight.

Lighter:

Due to the relative lack of structure this model is bound to be lighter than traditionally framed trailers. The construction is identical to the roof construction of the tent trailer I just dismantled after 30 years of use and abuse. Properly stored this trailer could last indefinitely. The key is to build the structure strong enough for the intended purpose without over building it.

Doors and Vent:

The vent is a standard commercial unit mounted in a roof cutout. Pop riveted and sealed to the outer skin and screwed to the inner ceiling.
Doors require a bit of compromise. My initial thought is to purchase pre-manufactured doors like those used on the littleguy. They are self contained units with clamp in type frames windows, screen and locking handles. I would prefer a door in each side but the cost may be a major factor. I intend to do an additional post to find a vender for this type of door and get pricing. Alternately a single door made from the panel cut out of the side and trimmed with aluminum extrusion glued/sealed and riveted/screwed to the door and cutout would be cheaper but not so simple. Double the labor and cost for two doors.

This is my current thinking and is subject to change with your input. Please let me know your thoughts. If there are any believers out there I may make this my winter project and document the results for your viewing pleasure. Thanks, Mark
User avatar
Mark Mckeeman
Teardrop Master
 
Posts: 157
Images: 10
Joined: Fri Jul 30, 2004 1:06 pm
Location: Ottawa, Ontario
Top

Postby R Keller » Tue Aug 17, 2004 1:40 pm

Mark,

I did my Road Toad with composite panels. 5/32" ply/3/4" foam/5/32" ply for the floor and sides (with 3/4" by 1.5" poplar stringers) and 5/32" ply/1.5" foam/5/32" ply roof. Aluminum skin is getting attached separately. Before the aluminum skin, the panels weigh about as much as 1/2" plywood (depending on how much framing I used).

I didn't vacuum bag the panels, though I seriously considered it. I just screwed and weighted.

I've posted a fair amount of information about this construction on this board and my website, but if you have any questions, I'd be happy to try to answer...

Rik
R Keller
Teardrop Master
 
Posts: 187
Images: 1
Joined: Thu Apr 15, 2004 4:01 pm
Location: Sacramento, CA
Top

Postby Mark Mckeeman » Tue Aug 17, 2004 1:56 pm

Thanks Rick,

Since making this post I’ve bounced around the site a bit more and found quite a bit of info on this type of construction. I've also seen your site before and will visit it again to get more ideas.

I have had one contact that feels the aluminum bonded to the foam will not be strong enough in the vertical axis. My thinking is that as long as it's well bonded it should stand up on a 4 foot wall fine. They use this idea in large motor homes with a fiberglass sheet outer wall ten feet high!

Any thoughts? Mark
User avatar
Mark Mckeeman
Teardrop Master
 
Posts: 157
Images: 10
Joined: Fri Jul 30, 2004 1:06 pm
Location: Ottawa, Ontario
Top

Postby R Keller » Tue Aug 17, 2004 2:18 pm

Mark,

That's a very interesting question. You could certainly save a lot of weight that way.

I don't know the answer. My feeling is that it would probably be strong enough as long as it was bonded well. But then again, the high expansion coefficient of the aluminum might break that bond over time....

On the other hand, it seems most teardrop trailers are way over-engineered. Large RV construction is pretty wimpy by comparison.

My sandwich panels with 5/32" ply wind up weighing about as much as 1/2". Granted they're well-insulated and many, many times stronger, but I don't get tremendous weight savings. Enough though to make my trailer 4-cylinder friendly.

I considered what you're talking about at one point, but then decided it was easier to be able to screw through the side walls to attach the bulkhead, countertop, roof, child's platform, etc., and then cover it up with aluminum...


Rik
Last edited by R Keller on Tue Aug 17, 2004 5:12 pm, edited 1 time in total.
R Keller
Teardrop Master
 
Posts: 187
Images: 1
Joined: Thu Apr 15, 2004 4:01 pm
Location: Sacramento, CA
Top

Postby asianflava » Tue Aug 17, 2004 3:03 pm

Mark Mckeeman wrote:I have had one contact that feels the aluminum bonded to the foam will not be strong enough in the vertical axis. My thinking is that as long as it's well bonded it should stand up on a 4 foot wall fine.
Any thoughts? Mark


Structurally it would probably be fine but it won't stay pretty for very long.

The only problem I could think of, having the aluminum bonded to the foam, would be dent resistance. Since both the aluminum and the foam are relatively soft, it would get dented rather easily. Especially in the front where the tow vehicle would kick up road debris. You would need something relatively firm to backup the aluminum.
User avatar
asianflava
8000 Club
8000 Club
 
Posts: 8412
Images: 45
Joined: Mon Aug 02, 2004 5:11 am
Location: CO, Longmont
Top

Postby mikeschn » Tue Aug 17, 2004 3:09 pm

Instead of aluminum what if you used a thin sheet of polished stainless steel! :D It would stay shiny, wouldn't get dinged up like the aluminum, and would stay shiny for a long time.

Mike...
The quality is remembered long after the price is forgotten, so build your teardrop with the best materials...
User avatar
mikeschn
Site Admin
 
Posts: 19202
Images: 475
Joined: Tue Apr 13, 2004 11:01 am
Location: MI
Top

Postby Guest » Tue Aug 17, 2004 3:46 pm

Frank wrote:At the risk of being laughed at how do you "bag it"? :oops:
Frank


Vacuum Bagging is a technique commonly used in boat building.

Vacuum bagging is a technique used to "clamp" two or more materials together, which usually uses epoxy resin as the binder. Materials for the composite wall, as described in this thread, would be placed into a vacuum bag, or a bag would be built to engulf the composite wall. Air is removed from the bag using a vacuum pump, thus "clamping" the stack of composites together, yeilding the composite wall.

For more info on vacuum bagging, go to:
http://www.westsystem.com
Guest
 
Top

Next

Return to General Discussion

Who is online

Users browsing this forum: No registered users and 2 guests

cron