Wes' teardrop - Fiberglass finished Bondo started - Page 9

...ask your questions in the appropriate forums BUT document your build here...preferably in a single thread...dates for updates, are appreciated....

Postby WesGrimes » Sat Sep 12, 2009 6:45 pm

Just drained it and placed a number of scrap squares of plywood in between the tarp and the frame. We will see if that helps.

Good news is, it looks like the build method is pretty strong. I think there was at least a couple of hundred pounds of water up there...
User avatar
WesGrimes
Teardrop Master
 
Posts: 289
Images: 31
Joined: Mon Jun 22, 2009 5:41 pm
Location: Garland, TX

Postby wlivesey » Tue Sep 15, 2009 7:08 am

Arne wrote:I applaud your efforts, but see insulation and interior ceiling build problems. If I were to do a # 3, I would go with 1/8" exterior and interior using conventional building practices and light weight studding, then fiberglass the outside using light weight cloth.

But, I will follow your build with interest...


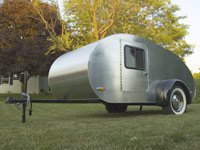
You might do a little research about Casita (and Scamp) wall coverings. Being fiberglass campers, I think they've figured out the insulation and wall covering issues. They both use very similar stuff (see pic). I think that Scamp sells their carpet/insulation online. I don't know about the r-value. It's probably pretty low.

Image
User avatar
wlivesey
The 300 Club
 
Posts: 469
Images: 283
Joined: Sun Aug 12, 2007 1:22 pm
Location: DFW, Texas

Postby WesGrimes » Thu Sep 17, 2009 8:15 pm

Got it out of the rain.
Built a failer (fake trailer) to mount it to.
Squared and leveled everything. The rain was kind of hard on my nice straight plywood...

Image
User avatar
WesGrimes
Teardrop Master
 
Posts: 289
Images: 31
Joined: Mon Jun 22, 2009 5:41 pm
Location: Garland, TX
Top

Postby 2bits » Fri Sep 18, 2009 9:52 pm

Yeah the rain won't stop! Glad you got it out of the rain. It looks good on the failer!
Thomas

Image
User avatar
2bits
2bit Member
 
Posts: 5132
Images: 8
Joined: Thu Dec 27, 2007 6:04 pm
Location: Lake Tawakoni, TX
Top

Postby robertaw » Fri Sep 18, 2009 10:26 pm

when does the fiberglass part start?
Roberta
User avatar
robertaw
500 Club
 
Posts: 523
Images: 56
Joined: Mon Jul 13, 2009 3:02 pm
Location: Lake City, Florida
Top

Postby WesGrimes » Fri Sep 18, 2009 10:55 pm

Roberta,

Next step is to fill in all of the framework with pour and mix polyurethane foam. Then sand the foam to shape. Cover the foam with fiberglass and resin. Sand, fill, shape, smooth, paint. Then you have a plug. Which you use to create fiberglass molds out of.

The part I am building right now will not actually be part of the finished trailer. It is just to hold the shape of the fiberglass material as it sets.

So the real fiberglass part, the one that mounts to a frame and wheels, is a long way off. I expect the plug will take 3-4 more months to finish. The molds will take a couple of months to build. Then the final part will take about a day. The good news is that additional trailer shells can be then made in about a day a piece.
Good thing there is this "teardrop time" I keep reading about. Because I think this is going to be a while...

Thanks,
Wes
User avatar
WesGrimes
Teardrop Master
 
Posts: 289
Images: 31
Joined: Mon Jun 22, 2009 5:41 pm
Location: Garland, TX
Top

Postby robertaw » Fri Sep 18, 2009 11:37 pm

Oh I see. Well this is something I have never seen done before so I'm looking forward to watching as you go through the process.

It's really cool that once the mold is all done you can kick one out in a day. :applause:

Keep the pics coming please. I am really anxious to see this happen!
Roberta
User avatar
robertaw
500 Club
 
Posts: 523
Images: 56
Joined: Mon Jul 13, 2009 3:02 pm
Location: Lake City, Florida
Top

Postby starleen2 » Sat Sep 19, 2009 9:02 am

WesGrimes wrote:Roberta,
. . . The good news is that additional trailer shells can be then made in about a day a piece.


Sounds like the beginning of a new teardrop manufacturer being born :thinking:
User avatar
starleen2
5th Teardrop Club
 
Posts: 16272
Images: 224
Joined: Sat May 12, 2007 8:26 pm
Location: Pea Ridge ,AR
Top

Postby Ageless » Sat Sep 19, 2009 9:10 am

Same thought here. Having worked Tooling for 36 years; pay-back on cost and labor for a mold is a minimum of 100 units.
Strangers on this road we are on; we are not two, we are one - Raymond Douglas Davies
User avatar
Ageless
Platinum Donating Member
 
Posts: 1603
Images: 8
Joined: Tue Aug 04, 2009 8:34 am
Location: Pt. Orchard, WA
Top

Postby WesGrimes » Sat Sep 19, 2009 11:22 am

The largest cost of mold construction is labor costs. Since I am not billing myself for the hours, it is actually pretty cheap.

It is a bit early to start throwing around the idea of a manufacturing company. I am building this for myself. I may build a couple of extras to sell on ebay to repay myself for the materials. I was a part of a start-up bathtub manufacturing company, so I have the been there done that t-shirt and I am not sure I would try another start-up. I would have to do a LOT of forgetting about the pain in order to do that again...

I just have experience in composite manufacturing, and am applying that knowledge to my build. The ROI is a lighter tear that will have no rot issues coupled with the ability to make additional units if I am so inclined.
User avatar
WesGrimes
Teardrop Master
 
Posts: 289
Images: 31
Joined: Mon Jun 22, 2009 5:41 pm
Location: Garland, TX
Top

Postby teardrop_focus » Sat Sep 19, 2009 12:24 pm

I have the been there done that t-shirt


:lol:


I just have experience in composite manufacturing, and am applying that knowledge to my build.


:thumbsup: :thumbsup: :thumbsup:

I'm liking your approach... so far the cost in dollars has been minimal, yet there are some excellent standards demonstrated here. Can't wait to watch this progress, and to see what the finished product weighs!

Myself, if I haven't volunteered the info already (I do have a tendency to repeat myself...) I want to build in a "traditional" method, using simply a scratch-built, mild steel chassis underneath a high-quality plywood monocoque teardrop cabin and galley. Shooting for well below 500 lbs with a 4 X 4 X 9 but wearing full-sized automotive wheels and tires (36 lbs ea ass'y)

I know where I can "add lightness" and it's just about everywhere else...


:twisted:
.
Image

"There is something about these little trailers that brings out the best in people." - BigAl, Scotland, 2010

"Climb the mountains and get their good tidings. Nature's peace will flow into you as sunshine flows into the trees...
The winds will blow their own freshness into you and the storms their energy, while cares will drop away like autumn leaves..." - John Muir, 1898


Chris Squier / teardrop_focus :-)~
User avatar
teardrop_focus
Donating Member
 
Posts: 5975
Images: 127
Joined: Sat Apr 11, 2009 3:18 pm
Location: SoCal
Top

Postby WesGrimes » Sun Sep 20, 2009 7:40 pm

Worked on that thing all weekend, and don't feel like I have anything to show for it....

But here goes:
Started on the sides:
Image

Mounted my brand new trailer wheels: (low speed versions)
Image

And hardest of all, but most important, I finally got all of the lines straight. It is hard to tell by a picture, but the side wall lines are all lined up here:
Image

I am getting kind of tired of this stage of the build. Can't wait to start pouring foam and making this thing fill in a bit...
User avatar
WesGrimes
Teardrop Master
 
Posts: 289
Images: 31
Joined: Mon Jun 22, 2009 5:41 pm
Location: Garland, TX
Top

Postby ktm_2000 » Sun Sep 20, 2009 8:09 pm

Please post plenty of pics and describe what types of foam, fairing compounds used and surface material. I am interested in the techniques as I have a couple of parts that I want to make for my boat and would like to end up with a quality part.
ktm_2000
Teardrop Master
 
Posts: 101
Joined: Tue Nov 18, 2008 8:08 pm
Location: Central, MA
Top

glass, glue, and heat sorry for the long note.

Postby cappy208 » Sun Sep 20, 2009 9:03 pm

Hey Wes:

looking on with interest. I have several years in production and mold experience.

three comments for you to tuck away in your mind bank.

1. when making the plug, when you have sanded it to what you think is perfection, water sand some more! (1200 ain't too fine!)

2. when making your 'skin' on either the plug, mold or on the finished layup: DONT make the first layer too 'hot' MEK wise. The first layer of glass should be wetted out fine cloth with LOTS of resin down first. (this way if you have to sand the surface you sand resin and not the glass fibers.)

the reason to use the fine cloth is so that you don't 'see' the woven roving, fab mat, cs, whatever you use on the surface as much if you use fine cloth. If you start out with a coarse fiber you almost always 'see' the weave even thorough the gelcoat. (especially when learning.)

3. learn how much Catalyst (MEK) to put in per volume of resin. DON'T over do it trying to get a batch to kick quicker so you can get another layer on today. when starting out it is better to use certain exact measures (but throw away extra) than get the mix too hot or cold.

On a personal note, your round front piece is going to be a (*&^%$ to lay up. one of the tricks we use at boat yards is to put the mold on a two or three point rocker so you can roll the mold to one position, to start laying up,, then roll it to the next, then to the final position, so the resin and glass doesn't pool and 'run' down the mold as you are laying up. make sure you lay up with lots of resin on the first layer, on subsequent layers, make sure you get ALL the bubbles out. the tool is called a bubble buster and it has bunches of ridges on it which push out the air through the strands. actually we put the molds on round rockers made up of about 5 lams of 3/4" plywood, so the mold could be rolled all the way from horizontle to verticle. (this was on a 29' and 36' two part boat mold) when you think about it, your three part mold is going to have some glass 'upside down' as you are making it. this is going to be just about impossible to do unless you roll it while laminating. are you going to make the roof sections with a flange and bolt them together? That would simplify the production process. Besides that would make everything alot easier to handle and move in pieces.

It is too bad you arent closer to me, i would love to come down and dukey some with ya, but the wife is already mad im pondering making a teardrop, so i dont want to stir up any more hornets than i have already.

John
User avatar
cappy208
Teardrop Builder
 
Posts: 36
Images: 1
Joined: Sun Sep 20, 2009 6:16 pm
Location: Cape Cod Ma.
Top

Postby WesGrimes » Sun Sep 20, 2009 9:25 pm

John,

Thanks for all the advice. I have always worked on the office side of the plant wall, so keep it coming. I need all the help I can get before I do something foolish.

Which reminds me, you know I had not realized it until you said it. I have an unavoidable upside down section of my mold. I have designed my pieces so that I could handle negative drafts, but did not think about the bottom of the nose going upside down. I am going to have to rig up some kind of 3 axis device to mount the mold to so that I can handle this. That is going to add to the cost of this mold.... Oh well, its only money right :x

I suppose I could make the nose cap a separate piece that I join to the body. I am kind of digging the nose on another design I have seen on here, and that would allow me to have interchangeable noses on my mold.

I wish you lived closer too. I could use some supervision. Never let the IT guy hold the power tools. :R

Thanks,
Wes
User avatar
WesGrimes
Teardrop Master
 
Posts: 289
Images: 31
Joined: Mon Jun 22, 2009 5:41 pm
Location: Garland, TX
Top

PreviousNext

Return to Build Journals

Who is online

Users browsing this forum: No registered users and 14 guests