Wolfgang's 2&2 built updated December 25, 2010

...ask your questions in the appropriate forums BUT document your build here...preferably in a single thread...dates for updates, are appreciated....

Postby S. Heisley » Sun Aug 30, 2009 10:33 am

Wolfgang:

Your tear is going to be beautiful! :thumbsup: I'm surprised at the triple digits in San Diego. I wouldn't expect that, with the ocean breezes and all.... I guess we've all been suffering through the heat this summer.

(PS. Everytime I look at your pics, I am startled by the pic of your neighbor. He looks just like a fellow who used to work in Glendale, CA.)
User avatar
S. Heisley
Super Lifetime Member
 
Posts: 8865
Images: 495
Joined: Mon Sep 17, 2007 10:02 am
Location: No. California

Postby Wolfgang92025 » Sun Aug 30, 2009 1:50 pm

Sharon,

I live about 20 or so miles from the coast. 100 degree days are not that unusual in late summer. When you see the temps on tv for San Diego, that is at the airport. :roll: I think.
Which is less than a mile from the ocean and right along San Diego Bay. As you start going inland, temps start to rise fast.

My next door neighbor work's for a forklift repair company. On rare occasions he does work in the LA area.

Wolfgang
Wolfgang

Image
User avatar
Wolfgang92025
Lifetime member
 
Posts: 1098
Images: 660
Joined: Fri Apr 18, 2008 10:16 pm
Location: Salt Lake City area, Utah

Postby kennyrayandersen » Sun Aug 30, 2009 6:21 pm

Nice progress – I like the windows too – what are you going to fill the holes with?
User avatar
kennyrayandersen
1000 Club
1000 Club
 
Posts: 1750
Images: 38
Joined: Sun Apr 29, 2007 10:27 pm
Location: TX
Top

Postby Wolfgang92025 » Sun Aug 30, 2009 11:04 pm

Kenny,

Bought some 1/4" rubber molding from JC Whittney. Plan on using tinted 1/4" poly carb sheeting for windows. Won't buy that until I have the windows for the doors. Want to try to match the tinting.

Wolfgang
Wolfgang

Image
User avatar
Wolfgang92025
Lifetime member
 
Posts: 1098
Images: 660
Joined: Fri Apr 18, 2008 10:16 pm
Location: Salt Lake City area, Utah
Top

Wolfgang 2&2 built updated 09Sept2009

Postby Wolfgang92025 » Thu Sep 10, 2009 3:33 am

Spend a lot of time in the garage last weekend.
Finished building the spars and routing out the pockets for them to fit into the sides.
Image

Next started to work on the inside fender wells.
Image

Started to think about possible galley layout.
Image

Monday took everything apart and started to sand. Got a couple coats of CEPS on one side today. This will take a while since my brother is doing to do a surprise visit on my mom.
Funny thing is I called her today and asked if she would be home tomorrow night since I would be in the area for business (real reason is to pick up my "little brother" who is flying in from Detroit).
She said, sorry no. :roll:
I'm going to the theater with friends and won't be home till mid night. Guess the surprise is on all of us. We will just have to wait a few extra hours. It will still be lots of fun to be together for a few days.:thumbsup:

Wolfgang
Wolfgang

Image
User avatar
Wolfgang92025
Lifetime member
 
Posts: 1098
Images: 660
Joined: Fri Apr 18, 2008 10:16 pm
Location: Salt Lake City area, Utah
Top

Postby John T. Hodgen » Thu Sep 10, 2009 6:06 am

Hey Wolfgang,
YEA--Parents are always clueless when it comes to surprising them! :lol: They will always throw a wrench in your plans :) But do enjoy the time together once the PARTY GETS STARTED!! :applause: Time with our parents can be great and may not always be there--so enjoy them while you can. By the way--trailer is looking GREAT!!!! :thumbsup:
Til later by the fire--John T. & Linda 8)
User avatar
John T. Hodgen
The 300 Club
 
Posts: 415
Images: 8
Joined: Thu Jul 24, 2008 5:50 am
Location: Summersville, West Virginia
Top

Postby Wolfgang92025 » Thu Sep 10, 2009 2:36 pm

Agree with you 100%.
Mom's 79 year young, and hopefully will be with us for a long tome to come.
I'm very fortunate to be living close by and be able to see her fairly often without having to get on a plane.

Wolfgang
Wolfgang

Image
User avatar
Wolfgang92025
Lifetime member
 
Posts: 1098
Images: 660
Joined: Fri Apr 18, 2008 10:16 pm
Location: Salt Lake City area, Utah
Top

Postby Wolfgang92025 » Sun Sep 20, 2009 2:41 pm

Update,

Had my brother visit from the Detroit area last weekend for 4 days. :) :)

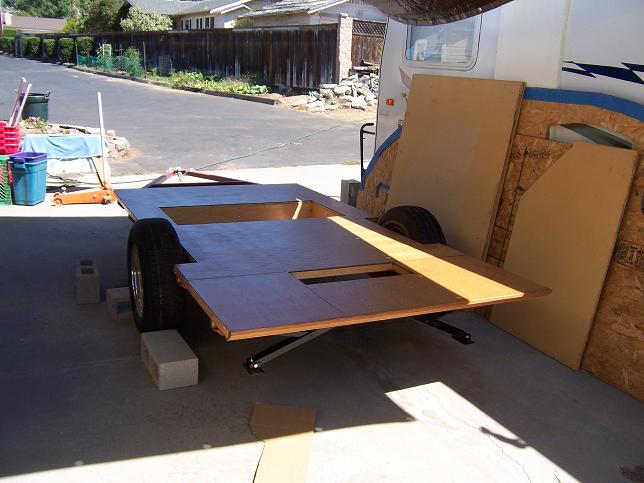
Spend a couple days working on the tear while he was here. It was good to spend time with him. Finally got the floor mounded to the frame. Also installed the foot well permanently.

Image


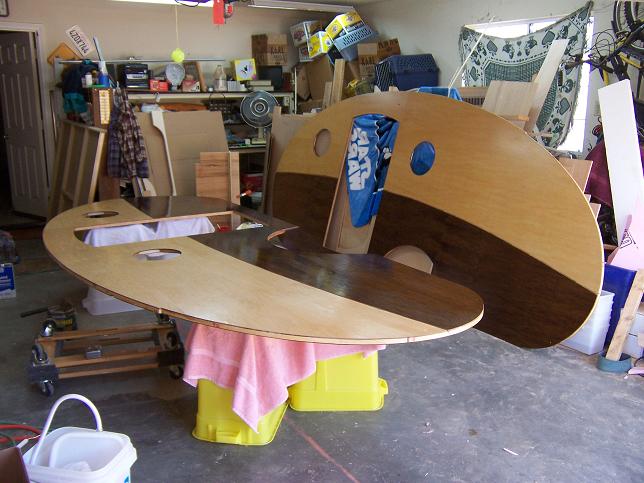
Feels like I have been painting the sides for the last month. 2 coats of CEPS and 2 coats of spar varnish inside and out.
Only two things I would have done differently.
Apply CEPS to both sides and edges before moving on to the varnish.
The other is stir the can of varnish. I bought a gallon of semi-gloss, and after I put on the first coat, it had a gloss finish. I took a while for me to realize I forgot to stir the varnish. When I did, could see the anti-gloss pigment had settled about an inch deep in the bottom of the can. One good thing is I decided to paint the outside in gloss after all. It makes the grain of the wood pop a lot more. I think I will still go semigloss on the inside. :thinking:
What do most of you have for inside finish?
I'm thinking the gloss would reflect the lights to much?

Image

Now I have to wait for the CEPS to try and 2 more coats of varnish.
If things go well next weekend the sides go on the the fun part of making sawdust starts again.

Wolfgang
Wolfgang

Image
User avatar
Wolfgang92025
Lifetime member
 
Posts: 1098
Images: 660
Joined: Fri Apr 18, 2008 10:16 pm
Location: Salt Lake City area, Utah
Top

Postby John T. Hodgen » Sun Sep 20, 2009 4:06 pm

hey Wolfgang,
Those sides are SWWWEEEEEETTTT!!!!!!! :thumbsup: I can't wait to see them up on the floor and the spars in. :applause: Yeah, staining, varnish, and finished coat--seems like you'll never get done :cry: your doing GOOD!!
Til later by the fire--John T. & Linda 8)
User avatar
John T. Hodgen
The 300 Club
 
Posts: 415
Images: 8
Joined: Thu Jul 24, 2008 5:50 am
Location: Summersville, West Virginia
Top

Postby bve » Mon Sep 21, 2009 11:50 pm

Wowwee that is going to be one smokin' tear, I really dig the two tone staining.

:thumbsup: :thumbsup:
Burke

KISS > COMPLEX
Image
Image

Build threads converted to PDFs.
As of 2008-08-08 I have added more build threads to the pdf collection
User avatar
bve
500 Club
 
Posts: 694
Images: 98
Joined: Sat Aug 25, 2007 1:44 am
Location: Edmonton, Alberta, Canada
Top

Postby Wolfgang92025 » Tue Sep 22, 2009 12:25 am

Burke,

As it turn out, it is only one stain on the the lower half (walnut)of the tear. The top half is maple and the color is 2 coats of CEPS and 2 coats of varnish on natural wood. The finish made the walnut lighter from dark brown to what I think of as a medium dark brown. The maple became more yellow and a little darker. I made a punch of different samples before the staining/finishing the sides. It can be surprising how much the color can change just by adding finish.

Wolfgang
Wolfgang

Image
User avatar
Wolfgang92025
Lifetime member
 
Posts: 1098
Images: 660
Joined: Fri Apr 18, 2008 10:16 pm
Location: Salt Lake City area, Utah
Top

Postby bve » Tue Sep 22, 2009 9:54 pm

Wolfgang92025 wrote:Burke,

As it turn out, it is only one stain on the the lower half (walnut)of the tear. The top half is maple and the color is 2 coats of CEPS and 2 coats of varnish on natural wood. The finish made the walnut lighter from dark brown to what I think of as a medium dark brown. The maple became more yellow and a little darker. I made a punch of different samples before the staining/finishing the sides. It can be surprising how much the color can change just by adding finish.

Wolfgang


OK but it STILL is very nice :)

That's a good idea to do a few test samples, if I do a woodie like I am leaning towards I will definitely remember that.
Burke

KISS > COMPLEX
Image
Image

Build threads converted to PDFs.
As of 2008-08-08 I have added more build threads to the pdf collection
User avatar
bve
500 Club
 
Posts: 694
Images: 98
Joined: Sat Aug 25, 2007 1:44 am
Location: Edmonton, Alberta, Canada
Top

Postby Hvysteel » Wed Sep 23, 2009 8:09 pm

Wow, that's a great looking build you have going.

For some reason or another, the sides remind me of chocolate eclairs. :lol:
Hvysteel
Teardrop Inspector
 
Posts: 10
Joined: Tue Jun 30, 2009 7:15 pm
Location: Kansas City
Top

Postby Wolfgang92025 » Tue Sep 29, 2009 8:52 pm

Spend maybe half a hour each day putting on yet another coat of varnish.
Me enjoying a cold one with Smoo on my shoulder watching the varnish dry.

Image

I used bohemian's method this time. It is a lot faster.
Tomorrow we'll see if it gives better results than using a regular brush.
Will I ever get done painting ??


Wolfgang
Wolfgang

Image
User avatar
Wolfgang92025
Lifetime member
 
Posts: 1098
Images: 660
Joined: Fri Apr 18, 2008 10:16 pm
Location: Salt Lake City area, Utah
Top

Postby Wolfgang92025 » Sun Oct 11, 2009 8:41 pm

My brother wanted some more pic's............

Sound familiar ?

Aside from more varnish, got the side mounted permanently to the frame.

Image

Installed all but one spar.

Image

And set the AC where I think I want it. Somehow it never looks quite the same as when you draw it out.

Image

Oh yea, also got a couple of coats of CPES on the inside roof panels.

Image

Well, that's all for today.........

Wolfgang
Wolfgang

Image
User avatar
Wolfgang92025
Lifetime member
 
Posts: 1098
Images: 660
Joined: Fri Apr 18, 2008 10:16 pm
Location: Salt Lake City area, Utah
Top

PreviousNext

Return to Build Journals

Who is online

Users browsing this forum: No registered users and 11 guests