Northwestern Build - Updated 7/4/2010 - Done!

...ask your questions in the appropriate forums BUT document your build here...preferably in a single thread...dates for updates, are appreciated....

Postby Wig » Fri Sep 25, 2009 2:24 pm

I didn't even pay that much attention. that is what those are.all the body men I know swear that the best ones are the huchins brand.this is what they look like new if you ever want one.they even make a orbital one.

http://cgi.ebay.com/ebaymotors/HUTCHINS-2000-HUSTLER-Straightline-AIR-FILE-SANDER-PSA_W0QQitemZ200312508771QQcmdZViewItem
Scott & (Megan)
User avatar
Wig
Teardrop Master
 
Posts: 115
Images: 1
Joined: Wed Sep 09, 2009 6:31 am
Location: Greenville Tx.

Postby wlivesey » Fri Sep 25, 2009 4:43 pm

Wig wrote:I didn't even pay that much attention. that is what those are.all the body men I know swear that the best ones are the huchins brand.this is what they look like new if you ever want one.they even make a orbital one.

http://cgi.ebay.com/ebaymotors/HUTCHINS-2000-HUSTLER-Straightline-AIR-FILE-SANDER-PSA_W0QQitemZ200312508771QQcmdZViewItem


I don't know, wig... Those things looked like a lot of work. Not nearly as fun as making saw dust... I'm gonna leave those to the pros... Thanks for the info though... :)
User avatar
wlivesey
The 300 Club
 
Posts: 469
Images: 283
Joined: Sun Aug 12, 2007 1:22 pm
Location: DFW, Texas

Postby mikeschn » Fri Sep 25, 2009 4:45 pm

wlivesey wrote:
aggie79 wrote:Very nice, Bill! Ranks 10 out of 10 on the cool factor scale. :thumbsup:

I guess you got this done "under cover" before the HOA enforcers came around.

Have you decided how you are going to finish the exterior?

Tom


Thanks Tom! You know, I'd rather ask for forgiveness than permission. :lol:

As for the exterior finish... yeah, I've made up my mind.
Image


This I want to see!!!

I really want to see how you trim out the aluminum in the area where the hatch meets the sidewall. You know, that 3/4" wide shelf...

Mike...
The quality is remembered long after the price is forgotten, so build your teardrop with the best materials...
User avatar
mikeschn
Site Admin
 
Posts: 19202
Images: 475
Joined: Tue Apr 13, 2004 11:01 am
Location: MI
Top

Postby wlivesey » Fri Sep 25, 2009 4:47 pm

mikeschn wrote:
This I want to see!!!

I really want to see how you trim out the aluminum in the area where the hatch meets the sidewall. You know, that 3/4" wide shelf...

Mike...


You're not the only one wondering how I'm going to do that. Suggestions are welcome... :thinking:
User avatar
wlivesey
The 300 Club
 
Posts: 469
Images: 283
Joined: Sun Aug 12, 2007 1:22 pm
Location: DFW, Texas
Top

Postby mikeschn » Fri Sep 25, 2009 5:06 pm

wlivesey wrote:
mikeschn wrote:
This I want to see!!!

I really want to see how you trim out the aluminum in the area where the hatch meets the sidewall. You know, that 3/4" wide shelf...

Mike...


You're not the only one wondering how I'm going to do that. Suggestions are welcome... :thinking:


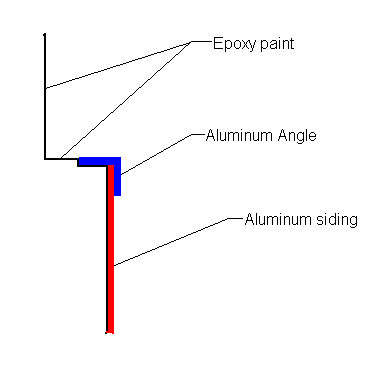
What I suggested to Gary was that the shelf be painted with epoxy paint. Then put aluminum on the side, and put your aluminum angle over that... I would rabbit the edge for the angle...

Here's a quick sketch thru the shelf area...

Image

Mike...
The quality is remembered long after the price is forgotten, so build your teardrop with the best materials...
User avatar
mikeschn
Site Admin
 
Posts: 19202
Images: 475
Joined: Tue Apr 13, 2004 11:01 am
Location: MI
Top

Postby wlivesey » Fri Sep 25, 2009 5:22 pm

mikeschn wrote:
wlivesey wrote:
mikeschn wrote:
This I want to see!!!

I really want to see how you trim out the aluminum in the area where the hatch meets the sidewall. You know, that 3/4" wide shelf...

Mike...


You're not the only one wondering how I'm going to do that. Suggestions are welcome... :thinking:


What I suggested to Gary was that the shelf be painted with epoxy paint. Then put aluminum on the side, and put your aluminum angle over that... I would rabbit the edge for the angle...

Here's a quick sketch thru the shelf area...

Image

Mike...


I'm hoping to get Aluminum above the shelf as well. That could be difficult and will require more trim work. :thinking:
User avatar
wlivesey
The 300 Club
 
Posts: 469
Images: 283
Joined: Sun Aug 12, 2007 1:22 pm
Location: DFW, Texas
Top

Postby WesGrimes » Fri Sep 25, 2009 11:05 pm

PM me if you need an extra set of hands holding that aluminum up. I could use the experience :thumbsup:
User avatar
WesGrimes
Teardrop Master
 
Posts: 289
Images: 31
Joined: Mon Jun 22, 2009 5:41 pm
Location: Garland, TX
Top

Postby wlivesey » Sat Sep 26, 2009 6:39 am

WesGrimes wrote:PM me if you need an extra set of hands holding that aluminum up. I could use the experience :thumbsup:


Thanks for the offer! Be careful though, I just might take you up on it. I got to say, .040 aluminum is a much thicker than I imagined. It seems like it might be tough to cut and trim.
User avatar
wlivesey
The 300 Club
 
Posts: 469
Images: 283
Joined: Sun Aug 12, 2007 1:22 pm
Location: DFW, Texas
Top

Postby RAYVILLIAN » Sat Sep 26, 2009 6:57 am

I'm not fast on the cad like Mike. So no pics .

If you had access to a siding break . cut and break the bottom side to the inside of the step than the same on the top out to almost the edge than seal the heck out of it when you put it on. You'll have some places where you'll have to use sealer to cove seams, like at the top of the hatch at the hinge and it won't be easy but should work. Good Luck

Gary
Where ever we raise the hatch is home.
Darn blank states keep getting further away and we keep traveling slower ain't never gona get this map full.
111961Image
User avatar
RAYVILLIAN
Lifetime member
 
Posts: 1434
Images: 109
Joined: Thu Aug 05, 2004 9:33 pm
Location: Rayville MO
Top

Postby mikeschn » Sat Sep 26, 2009 8:19 am

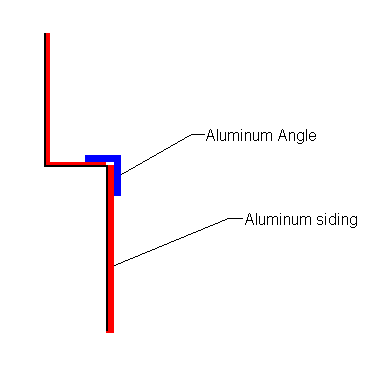
You could also break the top piece where it meets the shelf, and then cover that joint with the angle. You'd want to use real thin angle though...

Image

Mike...

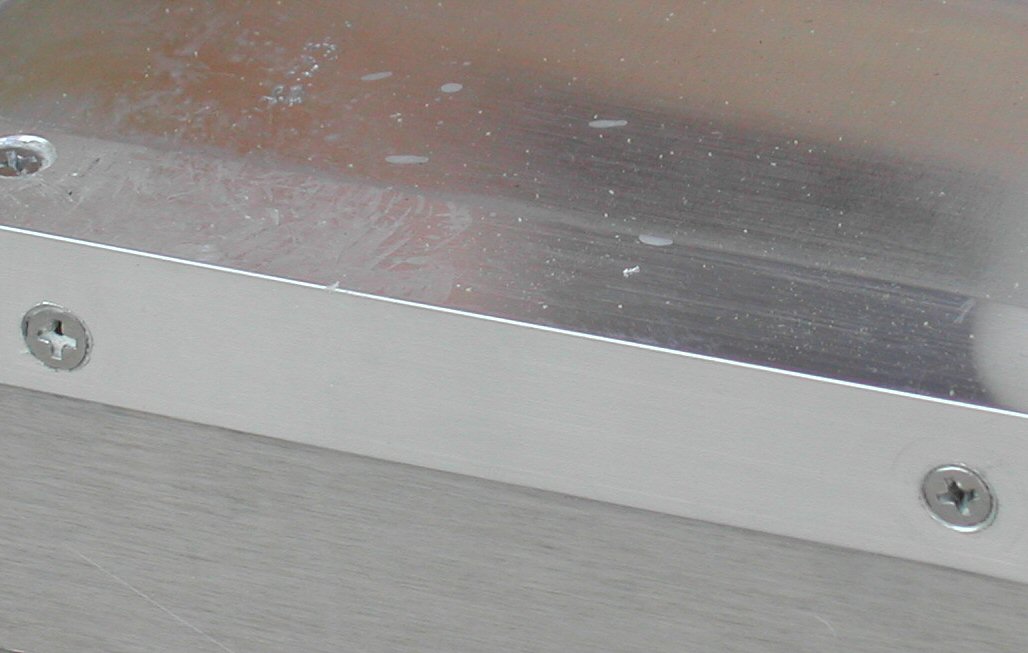
P.S. It would look similar to this I would think!

Image
The quality is remembered long after the price is forgotten, so build your teardrop with the best materials...
User avatar
mikeschn
Site Admin
 
Posts: 19202
Images: 475
Joined: Tue Apr 13, 2004 11:01 am
Location: MI
Top

Postby starleen2 » Sat Sep 26, 2009 9:27 am

Len19070 Posted this about making your own aluminum siding. The pdf does include links on constuction a Brake to form aluminum. I used 10 foot long 2x2 angle to form the bends necessary for the weekenderII

http://www.tnttt.com/viewtopic.php?t=28198&highlight=making+aluminum+siding

:thumbsup:
User avatar
starleen2
5th Teardrop Club
 
Posts: 16272
Images: 224
Joined: Sat May 12, 2007 8:26 pm
Location: Pea Ridge ,AR
Top

Postby wlivesey » Mon Sep 28, 2009 7:09 am

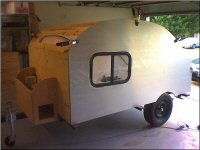
We installed plywood on the hatch sides, shore side, and rear of the Northwestern. Not as much as we would have liked but it's coming along. I've got to get my hands on some 5x plywood before we can finish. I'll post some more progress pictures in the next couple of days.

I made a simple router guide to cut out the wheel wells. It attaches to the bottom of the router on one end, slips over the axle on the other end, and cuts a 15 inch radius. I might decide to enlarge the wheel well later on if there isn't enough clearance for big bumps. At some point I'm also going to make fender flares to cover the half of the tire that's sticking out the side so a larger wheel well opening wouldn't be visible then anyway.

Image
Image
Image
Image
User avatar
wlivesey
The 300 Club
 
Posts: 469
Images: 283
Joined: Sun Aug 12, 2007 1:22 pm
Location: DFW, Texas
Top

Postby S. Heisley » Mon Sep 28, 2009 8:57 am

That router guide was exceptionally clever! :thumbsup:
I'm enjoying watching your build!
User avatar
S. Heisley
Super Lifetime Member
 
Posts: 8867
Images: 495
Joined: Mon Sep 17, 2007 10:02 am
Location: No. California
Top

Postby wlivesey » Mon Sep 28, 2009 8:54 pm

S. Heisley wrote:That router guide was exceptionally clever! :thumbsup:
I'm enjoying watching your build!


Thanks, Sharon! I couldn't think of another way to do it. I'm pretty happy with how it worked out.
User avatar
wlivesey
The 300 Club
 
Posts: 469
Images: 283
Joined: Sun Aug 12, 2007 1:22 pm
Location: DFW, Texas
Top

Postby Juneaudave » Mon Sep 28, 2009 9:54 pm

S. Heisley wrote:That router guide was exceptionally clever! :thumbsup:
I'm enjoying watching your build!


+1 That's using the old noodle!!!
User avatar
Juneaudave
Super Duper Lifetime Member
 
Posts: 3237
Images: 380
Joined: Sun Jul 03, 2005 12:11 pm
Location: Juneau, Alaska
Top

PreviousNext

Return to Build Journals

Who is online

Users browsing this forum: No registered users and 12 guests