

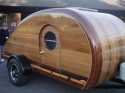
Is three coats of CPES and three coats of Spar Varnish enough on a woody? I'm quite tired of waiting for the varnish to dry and I just want to be done!!!


![]() by SIXTOTWO » Fri Sep 25, 2009 7:24 pm
by SIXTOTWO » Fri Sep 25, 2009 7:24 pm

![]() by Jst83 » Fri Sep 25, 2009 8:03 pm
by Jst83 » Fri Sep 25, 2009 8:03 pm
 what is CPES does it stand for something or is that the name. Is it local bought.


![]() by doug hodder » Fri Sep 25, 2009 8:47 pm
by doug hodder » Fri Sep 25, 2009 8:47 pm
![]() by doug hodder » Fri Sep 25, 2009 8:52 pm
by doug hodder » Fri Sep 25, 2009 8:52 pm
SIXTOTWO wrote:Is three coats of CPES and three coats of Spar Varnish enough on a woody? I'm quite tired of waiting for the varnish to dry and I just want to be done!!!
![]() by 48Rob » Sat Sep 26, 2009 6:02 am
by 48Rob » Sat Sep 26, 2009 6:02 am
this is not the place to cut a corner, as that's what everyone sees first, it's also one of the more difficult tasks to redo.


![]() by SIXTOTWO » Sat Sep 26, 2009 6:55 am
by SIXTOTWO » Sat Sep 26, 2009 6:55 am
![]() by SIXTOTWO » Sat Sep 26, 2009 7:02 am
by SIXTOTWO » Sat Sep 26, 2009 7:02 am
Jst83 wrote:OK I have to ask a dumb question
Did you stain before the CPES then Varnish after?
Thanks
![]() by SIXTOTWO » Sat Sep 26, 2009 7:20 am
by SIXTOTWO » Sat Sep 26, 2009 7:20 am


![]() by tonyj » Sat Sep 26, 2009 10:09 am
by tonyj » Sat Sep 26, 2009 10:09 am

![]() by 48Rob » Sat Sep 26, 2009 6:57 pm
by 48Rob » Sat Sep 26, 2009 6:57 pm


![]() by bohemian » Sun Sep 27, 2009 9:50 am
by bohemian » Sun Sep 27, 2009 9:50 am
![]() by SIXTOTWO » Sun Sep 27, 2009 12:32 pm
by SIXTOTWO » Sun Sep 27, 2009 12:32 pm
bohemian wrote:
![]() by Wolfgang92025 » Thu Oct 01, 2009 3:00 pm
by Wolfgang92025 » Thu Oct 01, 2009 3:00 pm


![]() by bohemian » Mon Oct 05, 2009 12:31 pm
by bohemian » Mon Oct 05, 2009 12:31 pm
Return to Teardrop Construction Tips & Techniques
Users browsing this forum: No registered users and 2 guests