MyAway build - Updates for space usage & organization

...ask your questions in the appropriate forums BUT document your build here...preferably in a single thread...dates for updates, are appreciated....

Postby S. Heisley » Tue Oct 27, 2009 9:12 pm

Steve Cox wrote:
The best thing would be if they didn't find anything


Yeah, maybe I'd be better off if I was a total airhead but I'm not ready to find out! :lol:
User avatar
S. Heisley
Super Lifetime Member
 
Posts: 8866
Images: 495
Joined: Mon Sep 17, 2007 10:02 am
Location: No. California

Postby 2bits » Wed Oct 28, 2009 10:09 pm

S. Heisley wrote:Steve Cox wrote:
The best thing would be if they didn't find anything


Yeah, maybe I'd be better off if I was a total airhead but I'm not ready to find out! :lol:


I sometimes say I wish I was "simple".. I would drive 50mph in the fast lane with my bright lights glaring and my right turn signal on and be is total bliss and happiness, but that is the Matrix, I'll take the Red pill. Give me enlightenment!
Thomas

Image
User avatar
2bits
2bit Member
 
Posts: 5132
Images: 8
Joined: Thu Dec 27, 2007 6:04 pm
Location: Lake Tawakoni, TX

Postby Eunice » Thu Oct 29, 2009 12:18 pm

Sharon you are doing a great job. It looks fabulous!
Eunice
former director
Jefferson State Chapter
TearJerkersImage
User avatar
Eunice
Jefferson State Tearjerker
 
Posts: 1440
Images: 109
Joined: Sun Jul 30, 2006 4:25 pm
Location: northern California, Fortuna
Top

Postby S. Heisley » Thu Oct 29, 2009 10:20 pm

Thanks, Ken & Eunice. It's good to hear from you! Cross your fingers for me that it all turns out okay in the end. :D
User avatar
S. Heisley
Super Lifetime Member
 
Posts: 8866
Images: 495
Joined: Mon Sep 17, 2007 10:02 am
Location: No. California
Top

Postby Chip » Fri Oct 30, 2009 5:35 am

Well Ms Sharon all I can say is "DANG" ,,,,,, you are doing a great job,,, One question though,,, it looks like ya are building partially inside ya home,,,,???? if ya are,,, I AM IN LOVE,,,,,,,,,, a woman dat will let sawdust get inside the house and maybe let me pile wood stuff all around,,,, have mercy,,,, :D :lol:

you are doing yaself proud thar girl,,,, I like it

chipper
Living large,,,travling small !!!
54"x9'4" tear
4'x8' tear
Serro Scotty rebuild(in progress)
User avatar
Chip
2000 Club
2000 Club
 
Posts: 2534
Images: 49
Joined: Sat Apr 17, 2004 7:33 pm
Location: Greenville, S.C.
Top

Postby S. Heisley » Fri Oct 30, 2009 9:33 am

Hi, Chip! Thanks for your comments. I am building in an attached garage but have recruited part of the hall that leads to the garage for storage of the folding pieces (for now). The pieces are clean and have no sawdust on them.
User avatar
S. Heisley
Super Lifetime Member
 
Posts: 8866
Images: 495
Joined: Mon Sep 17, 2007 10:02 am
Location: No. California
Top

Postby jkidd6339 » Fri Oct 30, 2009 10:18 pm

Sharon
Looks like you are doing a great job. I think you will get past the why am I doing This, when you start thinking about you next build and how you would do something a little different. My teardrop is my first build, but I have built many utility trailers. every time I finish one there are allways a couple of things that I don't like. The changes are useally reflected in the next trailer. I figure that this will keep me busy for some time to come. Happy building. :thumbsup:

Jody
User avatar
jkidd6339
Teardrop Master
 
Posts: 198
Images: 1
Joined: Sat Jan 24, 2009 1:16 am
Top

Postby S. Heisley » Sat Oct 31, 2009 9:48 am

Thanks for the encouragement, Jody. It is challenging and fun; but, it takes more time than I expected and, yes, I'm finding things that I would do differently if I built another. :thinking:
User avatar
S. Heisley
Super Lifetime Member
 
Posts: 8866
Images: 495
Joined: Mon Sep 17, 2007 10:02 am
Location: No. California
Top

Postby S. Heisley » Tue Dec 01, 2009 1:37 am

Hi, All:

Here’s the November progress report:

-The ceiling has been screwed and glued in place.
-Front wall braces were added. Those and the front spars were sanded to shape.
-Front wall interior plywood has been attached and insulation was installed.
-The first coat of urethane was applied to the front wall.
-Screws used to attach the walls to the floor were removed so that CPES could be applied in the screw holes. Then, silicone was added before the screws were put back.
-The entire interior deck floor was given a coat of CPES. (This probably wasn’t necessary but I feel better because I did it.)
-The ¾â€
User avatar
S. Heisley
Super Lifetime Member
 
Posts: 8866
Images: 495
Joined: Mon Sep 17, 2007 10:02 am
Location: No. California
Top

Postby 2bits » Tue Dec 01, 2009 9:59 am

Smart thinking with the template! Having things "done" in real size can really help tweak things just right! You've been busy busy! Great job! !
Thomas

Image
User avatar
2bits
2bit Member
 
Posts: 5132
Images: 8
Joined: Thu Dec 27, 2007 6:04 pm
Location: Lake Tawakoni, TX
Top

Postby Miriam C. » Tue Dec 01, 2009 9:27 pm

:applause: :thumbsup: Looking really beautiful Sharon. Good idea with the blue tape to mark screws. :thumbsup:
“Forgiveness means giving up all hope for a better past.â€
User avatar
Miriam C.
our Aunti M
 
Posts: 19675
Images: 148
Joined: Wed Feb 15, 2006 3:14 pm
Location: Southwest MO
Top

Postby S. Heisley » Tue Dec 01, 2009 9:49 pm

Thanks, Thomas, for the continuing encouragement. It really does help. :thumbsup:

Hi, Aunti M! It's good to hear from you! As we discussed at one time, I'm not fast but I keep going. I try to do a little every day, even if it's only a few minutes, just like you advised! :)

I only have a few more Christmas presents to wrap and mail and the tree to put up. After that, I expect there will be a little more build time available to work on the trailer. That will be my Christmas present to me! :D
User avatar
S. Heisley
Super Lifetime Member
 
Posts: 8866
Images: 495
Joined: Mon Sep 17, 2007 10:02 am
Location: No. California
Top

Postby S. Heisley » Tue Dec 01, 2009 10:37 pm

What I learned from Noah's Ark...

1. Don't miss the camp trip!
2. Remember that we are all in the same forum.
3. Plan ahead. It wasn't raining when Noah built.
4. When you're 600 years old, someone may ask you to do something really big. (You may need a bigger tow vehicle.)
5. Just get on with the job that needs to be done.
6. Build your future on wheels. 8)
7. For safety sake, travel in the tow vehicle.
8. Speed isn't always an advantage. The snails were on board with the cheetahs.
9. When you're stressed, float a while and don't pick up a hammer! :roll:
10. Remember, the Ark was built by amateurs; the Titanic by professionals. :thumbsup:
User avatar
S. Heisley
Super Lifetime Member
 
Posts: 8866
Images: 495
Joined: Mon Sep 17, 2007 10:02 am
Location: No. California
Top

Postby S. Heisley » Fri Jan 01, 2010 11:30 pm

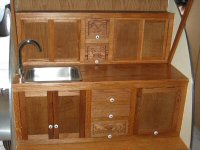
As the holidays progressed, December was used for the building and first fitting of the galley and electric compartment framed pieces. In the rough picture below, the base-coat-only pieces are leaning against each other, not yet attached. The galley is on the left side, where the lowest of the three openings will have a drawer, for easy access to the bottom area. There is a board going across, just above where the drawer will be. That will have bed supports on it. The other two openings will be cupboard doors as they weigh less and there will be less handles and knobs to get in the way.

Image

The blue and white thing on top is the taped Styrofoam mock-up of the galley counter that you saw in a previous posting. That Styrofoam mock-up of the countertop has really come in handy! Here’s a mental picture for you: I sat in the corner of the deck and leaned the counter front and sides together around me, with one leg stretching out of each cupboard hole. Then, I put the Styrofoam mock-up on top, with its marked side facing me. By doing this, I was able to check to be certain that everything fit perfectly against everything else, without banging my head with the real countertop. (I didn’t trust that I was doing things correctly until I had checked it all in place!)

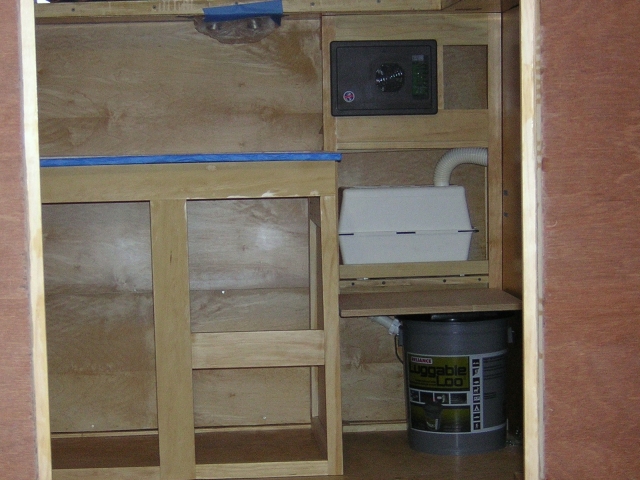
The electrical cupboard tower on the far right side is where the converter is, at the top, and the white battery box, in the middle. In this picture, the battery box vent holes are not in yet. To the right of the converter box is a small opening that will have a hinged door on it. That is for easy access to the electrical. The battery box compartment will have a door that slides down and off, for complete access to the battery areas. At the top, on the left side of the tower, next to/across from the lights, there will be a 12volt electrical outlet that can be used for fans and other 12volt-using items.

Below the white battery box is the "Luggable Loo" potty. That is where the loo will sit but there will be a cabinet around it. The plywood that is sitting on top of the loo is the cabinet lid and it will actually go up much higher than that. If you look to the right, next to the battery box, you will see two small strips of blue tape. That is where the wall's support board is and the actual height that the loo cabinet will be. That way, I can use it as a counter-top to set things on during the day. At night, when the loo is needed, the loo cabinet lid will swing up against the wall and hook in place there. When the loo is in use, a privacy curtain can be pulled in front. The curtain will be hung on a hinged, folding board that will be fastened to the “upâ€
User avatar
S. Heisley
Super Lifetime Member
 
Posts: 8866
Images: 495
Joined: Mon Sep 17, 2007 10:02 am
Location: No. California
Top

Postby Miriam C. » Sat Jan 02, 2010 12:10 am

:thumbsup: :applause: Sharon you are going to an amazing amount of detail and it shows. you do beautiful work! :thumbsup:
“Forgiveness means giving up all hope for a better past.â€
User avatar
Miriam C.
our Aunti M
 
Posts: 19675
Images: 148
Joined: Wed Feb 15, 2006 3:14 pm
Location: Southwest MO
Top

PreviousNext

Return to Build Journals

Who is online

Users browsing this forum: No registered users and 13 guests