San Antonio, Texas Tear Build #1

...ask your questions in the appropriate forums BUT document your build here...preferably in a single thread...dates for updates, are appreciated....

San Antonio, Texas Tear Build #1

Postby SATEAR » Thu Sep 24, 2009 9:53 pm

Teardrop Trailer Rebuild/Restoration Project:

Day 1 9/7/09 Labor Day-Bringing her home

This project was started after seeing a program on the Travel Channel about Teardrop Trailers and what fun they can be. My son, Jacob is a 2nd class scout with Troop 271 at St. Matthew Catholic Church in San Antonio, Texas and we go out camping at least once a month. I thought, wouldn’t this be great to take to our camping trips without the hassle of setting up a tent and then tearing it down.

So Jake and I set out to find a Teardrop. Luckily we came across 2 on Craigslist in San Antonio. One was all aluminum and was a 1962 model. It too had to be restored but the gentleman wanted $1,000 for it and would not budge. On to looking for something else. Then I found Dean’s little Tear in Leon Springs, Texas. As I mention later, It seemed like it was in good condition……

I purchased a what appears to be a 1952 Kitt Teardrop Trailer from Dean Friend. A great guy who lives close to Boerne, Texas in Leon Springs, Texas. He had the teardrop sitting in an enclosed area since he moved here from Phoenix, Arizona. He says the teardrop came fromCalifornia and had been sitting in someones yard for a number of years. Not sure how many. On first glance, it appeared to be in good condition but later I found what most of us find when we look for that antique teardrop-Dry Rot. The entire wood of this teardrop was rotted in more places than it would have been possible to fill-in and repair. So after a closer inspection after Dean dropped off the teardrop on his brother-in-laws trailer to my home in San Antonio I decided that I would do what it appears over 90% of new antique teardrop owners do……Complete restoration.

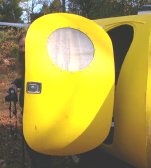
As you can see by the pictures Jake and I started to remove most of the screws, nuts and bolts on the tear getting her ready for a complete demolition. This was a slow process since most of them were rusted out and locked tight. Lots of muscle needed for such little screws.
User avatar
SATEAR
Teardrop Advisor
 
Posts: 78
Images: 75
Joined: Sat Sep 19, 2009 2:47 pm
Location: San Antonio,Texas

Postby del » Mon Sep 28, 2009 1:26 pm

Image

How is the project coming along?

del
User avatar
del
5000 Club
5000 Club
 
Posts: 5674
Images: 410
Joined: Fri Sep 08, 2006 3:27 pm
Location: washington, yakima but tell Mary K Fairbanks

Project Coming along slowwwwwly.....

Postby SATEAR » Tue Sep 29, 2009 7:29 am

Not too much time with an 11 year old at home and lots and lots of homework and scouts and flag football :)

I am just about to start painting the frame and then on to de-rusting the rims and applying Rust Converter.

I have the plywood ready to be cut and put back together. The most work is behind me now after I removed all the rust from the frame.

Hope to get her together by January for winter camping.

Thanks for asking,

Gabe
User avatar
SATEAR
Teardrop Advisor
 
Posts: 78
Images: 75
Joined: Sat Sep 19, 2009 2:47 pm
Location: San Antonio,Texas
Top

Almost 2 months into rebuild

Postby SATEAR » Mon Oct 19, 2009 8:51 pm

Well, here we are almost 2 months into my rebuild of what I have found out is a 1947 Kitt Trailer. Wood has been cut and sanded including doors and windows. I am waiting to here from the person I bought it from who is going to help with the rims. Seems the rims were welded backwards to give more clearance to the side and whoever did this left the air nozzle on the inside. So.....we need to move it to the front of the rim and weld the inside hole. Also need to pick up my hub which had a bolt break trying to remove the old rusted tires. Dean has fixed this and it is ready to put back on the trailer. Most of the aluminum for the sides is too beat up to be useful so I will be using 20" x 50' aluminum flashing since I can't afford the large sheets here in SA. Seems most places want at least $50-$75 a sheet and our budget can't take that hit. The aluminum roll at Lowes is $20 on sale right now. ;)

Here are some pics of my progress: (Please chime in when you guys and gals with more experience see something that should be done but I haven't got around to it!) Thanks,
Image
User avatar
SATEAR
Teardrop Advisor
 
Posts: 78
Images: 75
Joined: Sat Sep 19, 2009 2:47 pm
Location: San Antonio,Texas
Top

More Pics of my rebuild!

Postby SATEAR » Mon Oct 19, 2009 8:59 pm

Here are a few more pics:

Project is coming along. I found some great waterproofing called Cabot's and gave her 3 coats this weekend.

Image
Image
Image
Image
Image
Image
User avatar
SATEAR
Teardrop Advisor
 
Posts: 78
Images: 75
Joined: Sat Sep 19, 2009 2:47 pm
Location: San Antonio,Texas
Top

Re: More Pics of my rebuild!

Postby Wolfgang92025 » Mon Oct 19, 2009 9:11 pm

SATEAR wrote:Here are a few more pics:

Project is coming along. I found some great waterproofing called Cabot's and gave her 3 coats this weekend.
Image

Image

Image

Image

Image

Image

Image


Hope you don't mind my fixing the pic's.........

Wolfgang
Wolfgang

Image
User avatar
Wolfgang92025
Lifetime member
 
Posts: 1098
Images: 660
Joined: Fri Apr 18, 2008 10:16 pm
Location: Salt Lake City area, Utah
Top

Sorry About That

Postby SATEAR » Mon Oct 19, 2009 9:13 pm

Lets try this again......

Image
Image
Image
Image
Image
Image
Image
User avatar
SATEAR
Teardrop Advisor
 
Posts: 78
Images: 75
Joined: Sat Sep 19, 2009 2:47 pm
Location: San Antonio,Texas
Top

Postby Sonetpro » Mon Oct 19, 2009 9:14 pm

I fixed the pics.
}><)))'> ~--------------·´¯) SteveT
You don't know what the limit's are until you take it there.ImageImageImage
User avatar
Sonetpro
Site Admin
 
Posts: 2038
Images: 107
Joined: Sun Oct 30, 2005 8:11 am
Location: Plantersville, TX
Top

Thanks for fixing my pics!

Postby SATEAR » Tue Nov 10, 2009 10:24 pm

Well, it's November 10 today. 2 months into the re-build!

Boy, I think I'm in over my head on this one. I am having a heck of a time trying to get my old rims to work with new tires. My old rims have holes in them since they were tube tires before and now I need to try to have the holes welded closed. The person who sold it to me did a fine job of welding these but a few have developed small holes again and new tires won't work until I get these done. I am going to check with Dean later this week to see if we can weld them again. I bought some other rims and tires but these did not work because there is no clearance for the torsion bar on the axle on a '47 Kitt. That's why the rims were cut and welded backward!!! This has been the slowest part of the build so far. Everything else has come along pretty quickly. I imagine as soon as I get over this hump things will so smoothly once again as all my sides, door, interior roof, masonite and Luan for the interior are ready for putting up as soon as I get my trailer rolling.

I also went and got my license plate for the TD today, hoping that would spur me on to complete this project by January 1 for winter camping. Around San Antonio, Texas, winter camping is camping in 80-90 degree weather.

I will post some more pics soon!

Hope someone has some words of encouragement out there??????

Thanks,

Gabe in San Antonio
User avatar
SATEAR
Teardrop Advisor
 
Posts: 78
Images: 75
Joined: Sat Sep 19, 2009 2:47 pm
Location: San Antonio,Texas
Top

Postby prohandyman » Wed Nov 11, 2009 8:04 am

Gabe
Kit axles are unique. I think you said that you got it to take grease. That's great. Alot of them don't. The hubs accept early Jeep rims, and early Ford 5 bolt wheels, if that helps. I wanted hubcaps on mine, so I chose the Ford rims, 42-47 I think, as the Jeep rims do not accept caps. And yes, they take tubes. Got my tires and tubes from Coker tire. The nice thing about the tubes is that you can run some really low tire pressure to help the ride out!
I also have what I think is the correct bearing replacement numbers if you need them.
I enjoyed the work so much that I am now building Kits replicas from scratch! Here is an example
Image
Dan
155200 Facebook group 164774163701
User avatar
prohandyman
Super Lifetime Member
 
Posts: 1919
Images: 785
Joined: Fri Dec 22, 2006 3:21 pm
Location: Greenwood, IN
Top

Nice Looking Kitt

Postby SATEAR » Wed Nov 11, 2009 11:19 pm

Thanks for the reply.

I am trying to stay away from the tubes and am now having my old rims welded where all the holes were. Hope this works. I am going to get some 215-70-16's to put on for a better ride.

What hinges do you use for the hatch?

Also I am toying with the idea of making my hatch spars straight bottomed and just curve the tops. I am going to try and use one on each side and then 2"x2"'s for support inbetween. I will try to cut out a curved section in the middle of each spar to fit the counter top in the galley. Does this sound reasonable to you?

Thanks, Gabe
User avatar
SATEAR
Teardrop Advisor
 
Posts: 78
Images: 75
Joined: Sat Sep 19, 2009 2:47 pm
Location: San Antonio,Texas
Top

Postby doug hodder » Wed Nov 11, 2009 11:36 pm

What was there for the hatch when you got it and why not just duplicate what was there? 2x2 is a lot of overkill and extra weight. My 49 kit only had about a 1" thick hatch on it and the spars were in 1x material. Ply cut into the hatch curves and 1x material for spars or cross members ought to be plenty. That's what the originals had. Mine was in good shape after 30 years, yours is there after 57 years for a pattern. That was my experience however. Doug
doug hodder
*Snoop Dougie Doug
 
Posts: 12625
Images: 562
Joined: Tue Dec 14, 2004 11:20 pm
Top

Thanks for the comments!

Postby SATEAR » Thu Nov 12, 2009 10:27 pm

I appreciate all the help! I guess I am just going to go with what was there in the beginning. Although I am not that great with a jigsaw, maybe I can hire this part out to get the spars just right. I have to do 5 of them and then join with 1" x 2" 's at each end. Hope this works :o I'll post some pics when I'm done with the hatch.

Now I am still working on the darned frame. The wheels have been a big problem. I am having to use my old rims and try to fix them before going on. The next step after that is to try and get a trailer jack to fit this '47 Kitt. Lots of changes to the frame make doing it as it was original not possible with alot of work.

Wish me luck!

Gabe
User avatar
SATEAR
Teardrop Advisor
 
Posts: 78
Images: 75
Joined: Sat Sep 19, 2009 2:47 pm
Location: San Antonio,Texas
Top

November 14, 2009 Update:

Postby SATEAR » Sat Nov 14, 2009 9:23 pm

Well, today was the first Saturday that I had to devote to the TD. My son's flag football game is tomorrow and nothing else going on! In fact, this is the first saturday in quite a few months where we did not have anything planned!

I took advantage of it and did a bit of work.

Here are the pics:

Image

Image

Image

Image

Image

Image

I also painted one side with oil based white paint to seal it up and now need to finish the other side and interior. Also need to finish the spars and then the hatch.

Build should go pretty fast now! (Hopefully).
User avatar
SATEAR
Teardrop Advisor
 
Posts: 78
Images: 75
Joined: Sat Sep 19, 2009 2:47 pm
Location: San Antonio,Texas
Top

Postby grizz » Sun Nov 15, 2009 3:06 am

Constantly amazed at what you guys get up to , and finish.
Greetings from England.

Rian.


Hoping to get it all done in time.
User avatar
grizz
1000 Club
1000 Club
 
Posts: 1210
Images: 29
Joined: Mon Sep 21, 2009 2:37 pm
Location: Rochester, Kent, UK
Top

Next

Return to Build Journals

Who is online

Users browsing this forum: No registered users and 13 guests